Template:Add users: Difference between revisions
Template page
m (NC moved page Template:BrainStorm Flows to Template:Add users without leaving a redirect) |
No edit summary |
||
| Line 1: | Line 1: | ||
# Complete the following steps: | # Complete the following steps: | ||
#* {{r|a}}. In the navigation menu on the left, expand '''Content''' and select '''Flows'''. | #* {{r|a}}. In the navigation menu on the left, expand '''Content''' and then select '''Flows'''. | ||
#* {{r|b}}. Click on the '''Where Do I Start?''' flow. {{BrainStorm|12}} | #* {{r|b}}. Click on the '''Where Do I Start?''' flow. {{BrainStorm|12}} | ||
# Complete the following steps: | # Complete the following steps: | ||
#* {{r|a}}. Click | #* {{r|a}}. Click the '''People''' tab. | ||
#* {{r|b}}. | #* {{r|b}}. Click the checkbox in the top-left corner to select all users in the list. | ||
#* {{r|c}}. Click | #* {{r|c}}. Click '''Priority Settings''' in the top-right corner. {{BrainStorm|13}} | ||
# Complete the following steps: | # Complete the following steps: | ||
#* {{r|a}}. Set the '''Priority Level''' to '''Required''' | #* {{r|a}}. Set the '''Priority Level''' to '''Required'''. | ||
#* {{r|b}}. | #* {{r|b}}. In the '''Days to complete''' field, enter '''5'''. | ||
#* {{r|c}}. Click the '''Save''' button{{BrainStorm|14}} | #* {{r|c}}. Click the '''Save''' button. {{BrainStorm|14}} | ||
# Complete the following steps: | # Complete the following steps: | ||
#* {{r|a}}. Expand '''Content''' and click '''Flows''' | #* {{r|a}}. Expand '''Content''' and click '''Flows''' | ||
#* {{r|b}}. Scroll down and click on the '''Auto Email Campaign''' flow. {{BrainStorm|15}} | #* {{r|b}}. Scroll down and click on the '''Auto Email Campaign''' flow. {{BrainStorm|15}} | ||
# Complete the following steps: | # Complete the following steps: | ||
#* {{r|a}}. Click | #* {{r|a}}. Click the '''People''' tab. | ||
#* {{r|b}}. | #* {{r|b}}. Click the checkbox in the top-left corner to select all users in the list. | ||
#* {{r|c}}. Click | #* {{r|c}}. Click '''▶ Start Flow''' in the top-right corner. This will send the customer their first welcome email! {{BrainStorm|16}} | ||
Revision as of 18:23, 29 March 2023
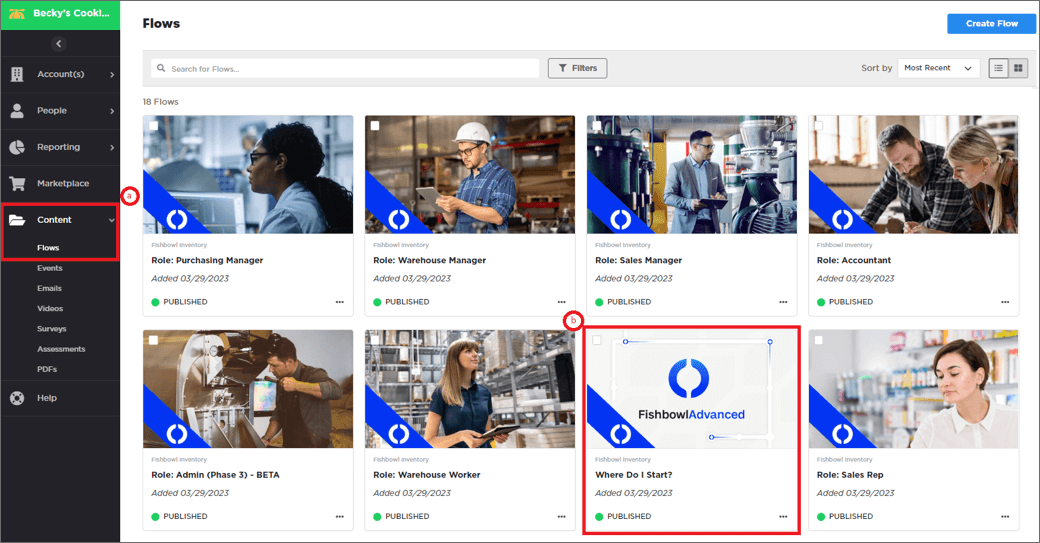
- Complete the following steps:
- a. In the navigation menu on the left, expand Content and then select Flows.
- b. Click on the Where Do I Start? flow.
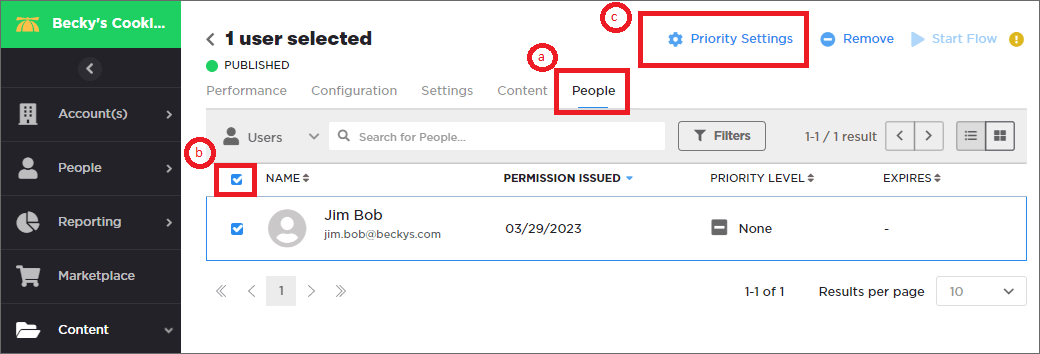
- Complete the following steps:
- a. Click the People tab.
- b. Click the checkbox in the top-left corner to select all users in the list.
- c. Click Priority Settings in the top-right corner.
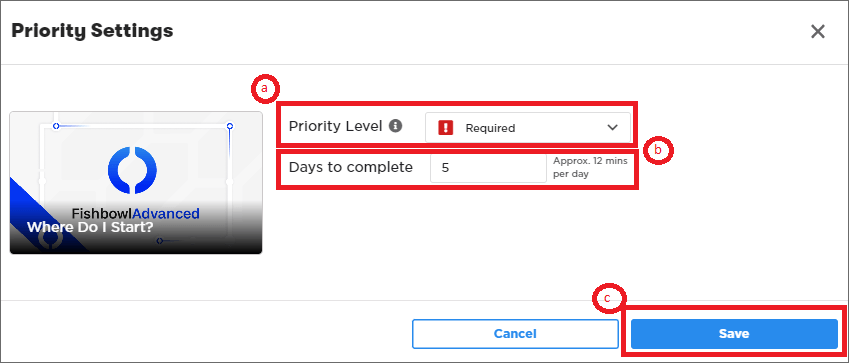
- Complete the following steps:
- a. Set the Priority Level to Required.
- b. In the Days to complete field, enter 5.
- c. Click the Save button.
- Complete the following steps:
- a. Expand Content and click Flows
- b. Scroll down and click on the Auto Email Campaign flow.
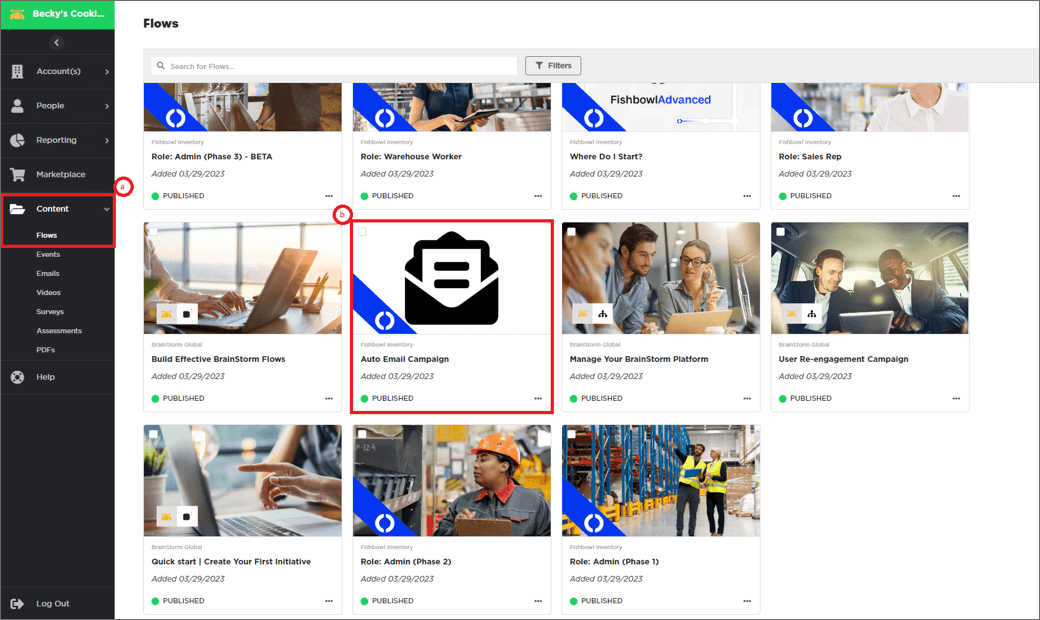
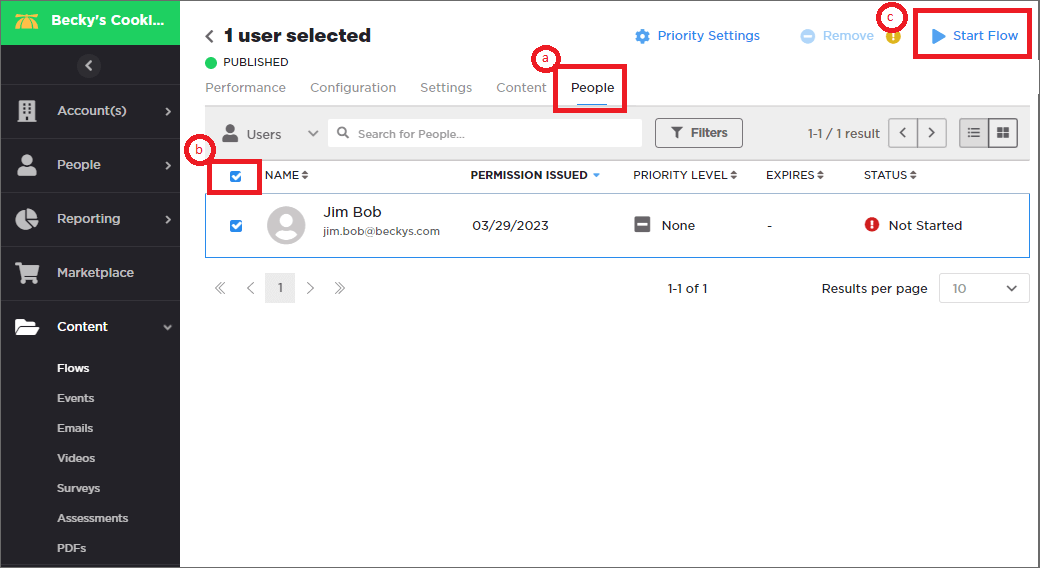
- Complete the following steps:
- a. Click the People tab.
- b. Click the checkbox in the top-left corner to select all users in the list.
- c. Click ▶ Start Flow in the top-right corner. This will send the customer their first welcome email!