Sandbox
From Fishbowl Advanced
In many circumstances, it may be helpful to experiment with a duplicate Sandbox copy of your database so that you don't have to worry about messing up your Live database. There are a few ways to do this, depending on your needs. Listed below are the three methods that will be covered in this article. If you decide you would like to go live with your Sandbox database, you can use the Rebuild Database tool to copy all of the sandbox data, except for inventory and orders, into a new database.
- 1 computer - 1 database at a time: You can have your Live database and your Sandbox database on the same computer with the same Fishbowl installation. When you need to access the Sandbox database, you will temporarily stop the Live database and switch to the Sandbox database.
- 2 computers - 2 simultaneous databases: If you need to be able to access both databases simultaneously, you can install the Fishbowl Server again on a different computer. Then, when you need to access the Sandbox database, you start the Fishbowl Server on the new computer. Any Fishbowl Client on the network can then see both databases and choose which database to use.
- 1 computer - 2 simultaneous databases: If you need the Sandbox database to be running simultaneously on the same computer as the Live database, you will install the Fishbowl Server in a new directory and have the Sandbox database running on a different port than the Live database. Any Fishbowl Client on the network can then choose which database to connect to by entering the corresponding port number.
1 computer - 1 database at a time
Backup
- To create a backup, right-click the Fishbowl Server icon in the system tray and select Options.
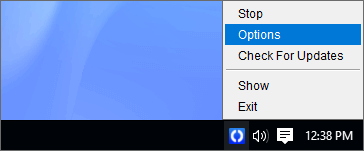
- Right-click your Live database and select Backup Database

- The backup file will be saved in the Fishbowl\data\backups folder. For example, C:\Program Files\Fishbowl\data\backups
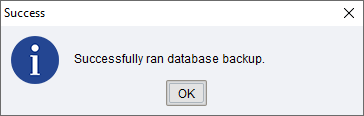
- Close the Fishbowl Server Administration window.
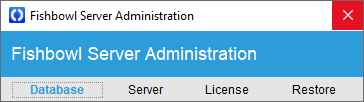


Restore
- On the server computer, double-click the Fishbowl Server icon in the system tray and then click the Stop button.

- When the server is fully stopped, the Server Status window will automatically close.

- Click the Tools menu and select Options.

- Click the Restore tab and then click the
 Find File button.
If the Find File button is disabled, close the window to make sure the Fishbowl Server is fully stopped and then try again.
- Browse to the location of the backup file, select the file, and then click Open.

- In the Database field, change the database name to Sandbox.
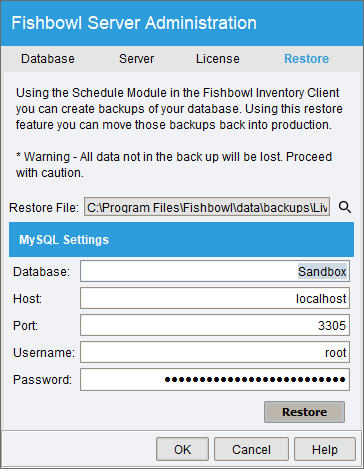
- Click the Restore button and then click Yes to confirm that the process may take a few minutes.

- Once the Sandbox database has been created, click OK in the confirmation window.

- Click the Database tab and make sure the Sandbox database is selected and then click OK.

- After you get a message that the database has been changed to the Sandbox database, click OK.

- Click the Start button.

- When the server is fully started, the Server Status window will automatically close.

- Close the Fishbowl Server window.


Rename
- Open any Fishbowl Client and connect to the new database. Because the address and port are the same, nothing needs to be changed in the login window.
- Open the
 Company module and change the company name so that you can distinguish between the two databases.

- Open the
 Accounting Integration module module and disconnect from your live accounting database.
- Open the
 Schedule module and delete/modify any scheduled tasks.
- You will need to stop and then start the Fishbowl Server to apply the name change. Right-click the Fishbowl Server icon in the system tray and click Stop.
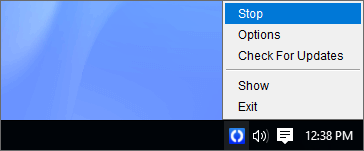
- Right-click the Fishbowl Server icon in the system tray and click Start to apply the name change.


Connect
- Open any Fishbowl Client and click the Details button in the login window. Click the Find Server button and then click the dropdown arrow to verify the correct database is selected.


2 computers - 2 simultaneous databases
Backup
- To create a backup, right-click the Fishbowl Server icon in the system tray and select Options.
- Right-click your Live database and select Backup Database
- The backup file will be saved in the Fishbowl\data\backups folder. For example, C:\Program Files\Fishbowl\data\backups
- Close the Fishbowl Server Administration window.
- Copy the backup file to the second computer that will be running the Fishbowl Server.
Install
- On the second computer, download the latest version of the Fishbowl installer.
- Install Fishbowl on the second computer.
- On the Installation Mode step of the installer, select Current Fishbowl User and select Server with Client.

- On the Select Destination Directory step of the installer, change the destination directory to Fishbowl Sandbox.
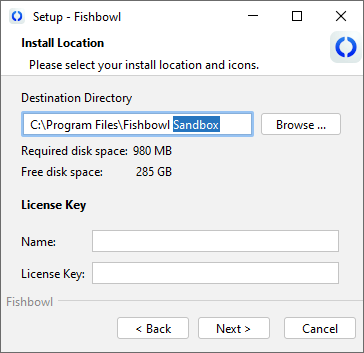
- Enter your license key and proceed through the installation wizard.
- On the final step, make sure Run Fishbowl is selected and then click Finish.

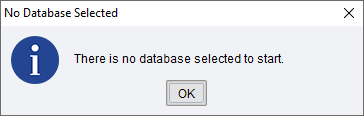
- If you get a message saying that there is no database yet, you can skip the first three steps in the next section.


Restore
- On the second computer, double-click the Fishbowl Server icon in the system tray and then click the Stop button.
- When the server is fully stopped, the Server Status window will automatically close.
- Click the Tools menu and select Options.
- Click the Restore tab and then click the Find File button.
If the Find File button is disabled, close the window to make sure the Fishbowl Server is fully stopped and then try again. - Browse to the location of the backup file, select the file, and then click Open.
- In the Database field, change the database name to Sandbox.
- Click the Restore button and then click Yes to confirm that the process may take a few minutes.
- Once the Sandbox database has been created, click OK in the confirmation window.
- Click the Database tab and make sure the Sandbox database is selected and then click OK.
- After you get a message that the database has been changed to the Sandbox database, click OK.
- Click the Start button.
- When the server is fully started, the Server Status window will automatically close.
- Close the Fishbowl Server window.
Rename
- On the second computer, open a Fishbowl Client.
- On the login window, click the Details button to verify that the Server Address says localhost. This means you will be connecting to the Sandbox server that you just installed on the second computer.

- Open the Company module and change the company name so that you can distinguish between the two databases.
- Open the Accounting Integration module module and disconnect from your live accounting database.
- Open the Schedule module and delete/modify any scheduled tasks.
- You will need to stop and then start the Fishbowl Server to apply the name change. Right-click the Fishbowl Server icon in the system tray and click Stop.
- Right-click the Fishbowl Server icon in the system tray and click Start to apply the name change.

Connect
- Open any Fishbowl Client and click the Details button in the login window. Click the Find Server button and then click the dropdown arrow to verify the correct server/database is selected.
1 computer - 2 simultaneous databases
Backup
- To create a backup, right-click the Fishbowl Server icon in the system tray and select Options.
- Right-click your Live database and select Backup Database
- The backup file will be saved in the Fishbowl\data\backups folder. For example, C:\Program Files\Fishbowl\data\backups
- Close the Fishbowl Server Administration window.
Install
- On the server computer, download the latest version of the Fishbowl installer.
- Install Fishbowl on the server computer.
- On the Installation Mode step of the installer, select Current Fishbowl User and select Server with Client.
- On the Select Destination Directory step of the installer, change the destination directory to Fishbowl Sandbox.
- Enter your license key and proceed through the installation wizard.
- On the final step, make sure Run Fishbowl is selected and then click Finish.
- If you get a message saying that there is no database yet, you can skip the first three steps in the next section.
Restore
- On the server computer, double-click the Fishbowl Server icon in the system tray and then click the Stop button.
- When the server is fully stopped, the Server Status window will automatically close.
- Click the Tools menu and select Options.
- Click the Restore tab and then click the Find File button.
If the Find File button is disabled, close the window to make sure the Fishbowl Server is fully stopped and then try again. - Browse to the location of the backup file, select the file, and then click Open.
- In the Database field, change the database name to Sandbox.
- Click the Restore button and then click Yes to confirm that the process may take a few minutes.
- Click the Server tab and change the port number to 2457.

- Click the Database tab and make sure the Sandbox database is selected and then click OK.
- After you get a message that the database has been changed to the Sandbox database, click OK.
- Click the Start button.
- When the server is fully started, the Server Status window will automatically close.
- Close the Fishbowl Server window.

Rename
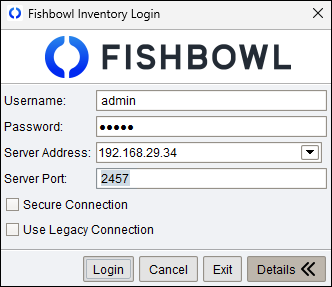
- Open any Fishbowl Client and, in the login window, change the Server Port to 2457 to connect to the Sandbox database.
- Open the Company module and change the company name so that you can distinguish between the two databases.
- Open the Accounting Integration module module and disconnect from your live accounting database.
- Open the Schedule module and delete/modify any scheduled tasks.
- You will need to stop and then start the Fishbowl Server to apply the name change. Right-click the Fishbowl Server icon in the system tray and click Stop.
- Right-click the Fishbowl Server icon in the system tray and click Start to apply the name change.

Connect
- Open any Fishbowl Client and click the Details button in the login window.
- Use Server Port 2457 to connect to the Sandbox database.
- Use Server Port 2456 to connect to the Live database.
- Running two Fishbowl servers on the same computer requires more computing power. If the Sandbox database is only needed occasionally, you may consider shutting down the Sandbox server when it is not in use.