Items: Difference between revisions
From Fishbowl Drive
m (1 revision imported) |
No edit summary |
||
| Line 11: | Line 11: | ||
* To sell an item, add the product details to the '''Sale Items''' tab. | * To sell an item, add the product details to the '''Sale Items''' tab. | ||
* For a step-by-step tutorial on creating items, click the video to the right. | * For a step-by-step tutorial on creating items, click the video to the right. | ||
== How to add an item == | |||
The following are required fields when adding an item: | |||
# Click the ADD NEW button on the top right. Or click on an item, and then click the plus sign that appears above it in the Items box on the left. | |||
# Add a name between 1 and 255 characters in length. | |||
# Select a UOM, or unit of measure. The default UOM will already be selected, but you can change it to any other you’ve created if you wish. Any conversions that apply to the UOM you choose will automatically appear on the left side of the interface. You can make adjustments to them or reset them to their original values. | |||
# Add the average cost, also known as the Average Cost of Goods Sold. This is the amount of money it costs you to obtain this item, not the price you will charge customers for it. It is in U.S. dollars and cents. You can change that price under the Sale Items tab. If you use a different UOM than Each, which means one item, be sure to adjust the average cost to match that change in quantity. The average cost starts at $0.00. | |||
# Select a type. This can be Inventory, Shipping, Service, Non Inventory, Bundle, Labor, or Overhead. The type you choose for the item will change many things, including tabs and certain fields, such as dimensions. The item’s type can’t be changed after you save the item, so make sure it’s exactly what you want it to be before clicking SAVE or SAVE AND CLOSE. | |||
#* Inventory is a physical object | |||
#* Shipping is a charge for a carrier service | |||
#* Service is a job like plumbing or IT work | |||
#* Non Inventory can be software or some other intangible asset | |||
#* Bundle is a combination of at least two items | |||
#* Labor is the cost of an employee’s time to perform a task | |||
#* Overhead is a fixed cost or utility like rent, electricity, etc. | |||
# Click the SAVE or SAVE AND CLOSE button on the top right. | |||
====Bundles==== | ====Bundles==== | ||
Revision as of 07:59, 31 August 2022
Create New Item
Bundles
Reorder Points
Import CSV

- The Items module stores the parts and products that you purchase, manufacture, and sell.
- To create a new item, click the
 New button. Each existing item is displayed in the search area on the left..
- The following tabs are available for each item: General, Sale Items, Substitute Items, Reorder Points, Tracking, Locations, Vendor Items, and History.
- To sell an item, add the product details to the Sale Items tab.
- For a step-by-step tutorial on creating items, click the video to the right.

How to add an item
The following are required fields when adding an item:
- Click the ADD NEW button on the top right. Or click on an item, and then click the plus sign that appears above it in the Items box on the left.
- Add a name between 1 and 255 characters in length.
- Select a UOM, or unit of measure. The default UOM will already be selected, but you can change it to any other you’ve created if you wish. Any conversions that apply to the UOM you choose will automatically appear on the left side of the interface. You can make adjustments to them or reset them to their original values.
- Add the average cost, also known as the Average Cost of Goods Sold. This is the amount of money it costs you to obtain this item, not the price you will charge customers for it. It is in U.S. dollars and cents. You can change that price under the Sale Items tab. If you use a different UOM than Each, which means one item, be sure to adjust the average cost to match that change in quantity. The average cost starts at $0.00.
- Select a type. This can be Inventory, Shipping, Service, Non Inventory, Bundle, Labor, or Overhead. The type you choose for the item will change many things, including tabs and certain fields, such as dimensions. The item’s type can’t be changed after you save the item, so make sure it’s exactly what you want it to be before clicking SAVE or SAVE AND CLOSE.
- Inventory is a physical object
- Shipping is a charge for a carrier service
- Service is a job like plumbing or IT work
- Non Inventory can be software or some other intangible asset
- Bundle is a combination of at least two items
- Labor is the cost of an employee’s time to perform a task
- Overhead is a fixed cost or utility like rent, electricity, etc.
- Click the SAVE or SAVE AND CLOSE button on the top right.
Bundles
Bundles
- A bundle is a group of multiple items that can be sold together.
- To create a new bundle, change the item type to Bundle and add items to the Bundle Items tab.
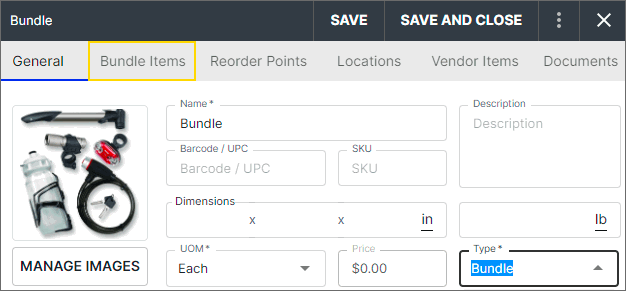
- For a step-by-step tutorial on creating bundles, click the video to the right.

Reorder Points
Reorder Points
- Click the Reorder Points tab in the Items module to set the reorder points for each location and/or company wide.
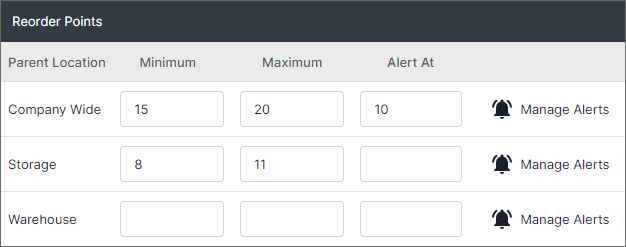
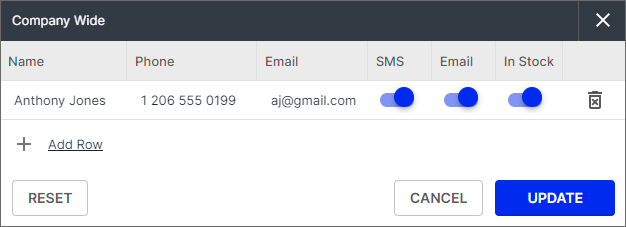
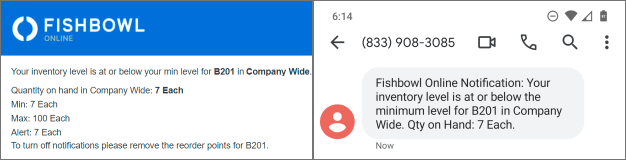
- To receive stock alerts via SMS or email, click Manage Alerts.
- To import reorder points from a spreadsheet or CSV file, click the
 More button at the top of the item list and choose Import Reorder Points.
- To create a template file with the correct column headers, click Export Reorder Points.
- The suggested order of CSV imports for new databases can be found here.
- For a step-by-step tutorial on working with CSV files, check out the CSV video here.
- Below is a list of the CSV columns. All column headers are required. Columns with an asterisk must contain data.
- ReorderPoint-ID
- ReorderPoint-ItemName
- ReorderPoint-ParentLocationName
- ReorderPoint-DailyConsumptionRate
- ReorderPoint-Minimum
- ReorderPoint-Maximum
- ReorderPoint-AlertAt
- ReorderAlert-ContactName - Only if adding alert
- ReorderAlert-Phone
- ReorderAlert-Email
- ReorderAlert-ReceiveSmsNotifications - Only if adding alert


Import items
- To import items from a spreadsheet or CSV file, click the More button at the top of the item list and choose Import Items.
- To create a template file with the correct column headers, click Export Items.
- The suggested order of CSV imports for new databases can be found here.
- For a step-by-step tutorial on working with CSV files, check out the CSV video here.
- Below is a list of the CSV columns. All column headers are required. Columns with an asterisk must contain data.
- Item-Name - Name of the item (e.g. B201)
- Item-Description - Description of the item (e.g. Premium Brake Cables)
- Item-Details - This allows you to leave additional notes about specific items
- Item-Cost - The amount the company pays for this item (e.g. 17.50)
- Item-Upc - This allows you to associate the UPC (Universal Product Code) to an item during the import
- Item-Sku - This allows you to associate the SKU (Stock Keeping Unit) to an item during the import
- Item-Url - This allows you to associate the URL (Uniform Resource Locator) to an item during the import
- Item-ItemType - Inventory, Shipping, Service, Non Inventory, Labor, or Overhead
- Item-DefaultUomName - The UOM (Unit of Measure) for the item (e.g. Each, Pair)
- Item-SalesTaxName - Tax associated with this item
- Item-Length - The length of the item. You can enter in 0 if you do not need/use this information
- Item-Width - The width of the item. You can enter in 0 if you do not need/use this information
- Item-Height - The height of the item. You can enter in 0 if you do not need/use this information
- Item-DimensionUnit - The dimension unit of the item. (e.g. Inches, Feet)
- Item-Weight - The weight of the item. You can enter in 0 if you do not need/use this information
- Item-WeightUnit - The unit of weight for the item (e.g. Ounces, Pounds, Kilograms)
- Item-Taxable - If the item is taxable (e.g. True or False)
- Item-AssetAccountName
- Item-ScrapAccountName
- Item-CostOfGoodsSoldAccountName
- Item-AdjustmentAccountName
- Item-DefaultImageLink
- Item-AccountingClassName
- Item-Tags
- SaleItem-Name - This can be the same name used for Item-Name (e.g. B201)
- SaleItem-Description - This can be the same name used for Item-Description (e.g Premium Brake Cables)
- SaleItem-Details - You can include additional item details for your sale items
- SaleItem-Price - The amount the company sells the item for (e.g. 35)
- SaleItem-Sku - This allows you to associate the SKU (Stock Keeping Unit) to a sale item during the import
- SaleItem-Url - This allows you to associate the URL (Uniform Resource Locator) to a sale item during the import
- SaleItem-DefaultUomName - The UOM (Unit of Measure) for the sale item (e.g. Each, Pair)
- SaleItem-SalesTaxName - Tax associated with this sale item
- SaleItem-Length - The length of the sale item. You can enter in 0 if you do not need/use this information
- SaleItem-Width - The width of the sale item. You can enter in 0 if you do not need/use this information
- SaleItem-Height - The height of the sale item. You can enter in 0 if you do not need/use this information
- SaleItem-DimensionUnit - The dimension unit of the sale item. (e.g. Inches, Feet)
- SaleItem-Weight - The weight of the sale item. You can enter in 0 if you do not need/use this information
- SaleItem-WeightUnit - The unit of weight for the sale item (e.g. Ounces, Pounds, Kilograms)
- SaleItem-DefaultSalesOrderItemType - This determines if the sale item defaults to Sale or Credit Return
- SaleItem-Taxable - If the sale item is taxable (e.g. True or False)
- SaleItem-DefaultFlag - If you have multiple sales items associated to a general item, you can specify if this is the default sales item (e.g. True or False)
- SaleItem-IncomeAccountName
- SaleItem-DefaultImageLink
- SaleItem-AccountingClassName
- SaleItem-Tags
- Tracking-Lot Number - If the item has lot number tracking enabled (e.g. True or False)
- Tracking-Expiration Date - If the item has expiration date tracking enabled (e.g. True or False)
- TrackingSerial-Serial Number - If the item has serial number tracking enabled (e.g. True or False)
Import Item Locations
- To import item locations from a spreadsheet or CSV file, click the More button at the top of the item list and choose Import Item Locations.
- To create a template file with the correct column headers, click Export Item Locations.
- The suggested order of CSV imports for new databases can be found here.
- For a step-by-step tutorial on working with CSV files, check out the CSV video here.
- Below is a list of the CSV columns. All column headers are required. Columns with an asterisk must contain data.
- ItemLocation-ItemName
- Location-ParentName
- Location-PickFrom
- Location-Receive
- Location-PickTo
Import Vendor Items
- To import vendor items from a spreadsheet or CSV file, click the More button at the top of the item list and choose Import Vendor Items.
- To create a template file with the correct column headers, click Export Vendor Items.
- The suggested order of CSV imports for new databases can be found here.
- For a step-by-step tutorial on working with CSV files, check out the CSV video here.
- Below is a list of the CSV columns. All column headers are required. Columns with an asterisk must contain data.
- VendorItem-ID
- VendorItem-ItemName
- VendorItem-VendorItemName
- VendorItem-VendorName
- VendorItem-Cost
- VendorItem-UomName
- VendorItem-LeadTime
- VendorItem-MinQuantity
- VendorItem-Default