Consignment: Difference between revisions
m (1 revision imported) |
|||
| (One intermediate revision by one other user not shown) | |||
| Line 1: | Line 1: | ||
{{Module Introduction|Consignment|Materials}} is used to track inventory that is sold from a consignment location. Consignment is typically used to transfer inventory to a third-party seller. The inventory in consignment locations can | {{Module Introduction|Consignment|Materials}} is used to track inventory that is sold from a consignment location. Consignment is typically used to transfer inventory to a third-party seller. The inventory in consignment locations can be replenished based on [[Part#Create_part_reorder_levels|part reorder levels]]. In this case, the reorder levels should be specified '''By Location Group''' in the {{ModuleOptions|Location Group|General}}. | ||
==Module buttons== | ==Module buttons== | ||
| Line 7: | Line 7: | ||
{{Module Button|Create PO}} [[#Add inventory via purchase order|creates a purchase order to move inventory into the consignment location]]. | {{Module Button|Create PO}} [[#Add inventory via purchase order|creates a purchase order to move inventory into the consignment location]]. | ||
{{Module Button|New Location}} [[#Create a | {{Module Button|New Location}} [[#Create a consignment location|creates a new consignment location]]. | ||
{{Default Buttons}} | {{Default Buttons}} | ||
| Line 21: | Line 21: | ||
==Add inventory via transfer order== | ==Add inventory via transfer order== | ||
Inventory can | Inventory can be added to a consignment location using a transfer order or a [[#Add inventory via purchase order|purchase order]]. To create a transfer order in the {{Module|Consignment}}, use the following steps. | ||
# Double-click | # Double-click the desired consignment location in the search pane. | ||
# Click the {{Button|Create TO}} on the module toolbar. | # Click the {{Button|Create TO}} on the module toolbar. | ||
# Choose whether to '''Ship''' or '''Move''' the inventory to the location. If the order is shipped, the order will be sent to the {{Module|Shipping}}. Click '''Next'''. | # Choose whether to '''Ship''' or '''Move''' the inventory to the location. If the order is shipped, the order will be sent to the {{Module|Shipping}}. Click '''Next'''. | ||
# Choose whether to '''Auto Replenish''' or '''Manually Enter Inventory'''. Click '''Next'''. | # Choose whether to '''Auto Replenish''' or '''Manually Enter Inventory'''. Click '''Next'''. | ||
# Select a '''From''' and a '''To''' location group for moving the inventory. ''' | # Select a '''From''' and a '''To''' location group for moving the inventory. Click '''Next'''. <br> [[File:Transfer items to.png]] | ||
# Choose the customer's shipping address. If the order is to be moved, this step will not appear. Click '''Next'''. | # Choose the customer's shipping address. If the order is to be moved, this step will not appear. Click '''Next'''. | ||
# Choose the company address to use as a return shipping address. Click '''Next'''. | # Choose the company address to use as a return shipping address. Click '''Next'''. | ||
# If using auto replenish, select the desired part and date-range filters and click '''Finish'''. If adding parts manually, type each part into the search bar and press '''Enter''', or use the | # If using auto replenish, select the desired part and date-range filters and click '''Finish'''. If adding parts manually, type each part into the search bar and press '''Enter''', or use the dropdown list to select each part. Click '''Finish'''. | ||
If '''Auto fulfill transfer order''' is enabled in the {{ModuleOptions}}, the items will now appear in the '''Items''' window for the consignment location. | If '''Auto fulfill transfer order''' is enabled in the {{ModuleOptions}}, the items will now appear in the '''Items''' window for the consignment location. | ||
| Line 36: | Line 36: | ||
==Add inventory via purchase order== | ==Add inventory via purchase order== | ||
Inventory can | Inventory can be added to a consignment location using a purchase order or a [[#Add inventory via transfer order|transfer order]]. Parts must have a vendor specified in the {{Module|Part|Vendors tab}} before they can be added to a purchase order. Follow the steps below to create a purchase order in the {{Module|Consignment}}. | ||
# Double-click the desired consignment location in the search pane. | # Double-click the desired consignment location in the search pane. | ||
# Click the {{Button|Create PO}} on the module toolbar. | # Click the {{Button|Create PO}} on the module toolbar. | ||
# Choose whether to '''Auto Replenish''' the inventory for this location according to the item's reorder levels or to '''Manually Enter Inventory'''. Click '''Next'''.<br>[[File:Auto Purchase Order Create Method.png]] | # Choose whether to '''Auto Replenish''' the inventory for this location according to the item's reorder levels or to '''Manually Enter Inventory'''. Click '''Next'''.<br>[[File:Auto Purchase Order Create Method.png]] | ||
# If adding parts manually, type each part into the search bar and press '''Enter''', or use the | # If adding parts manually, type each part into the search bar and press '''Enter''', or use the dropdown list to select each part. Click '''Finish'''.<br> [[File:Auto_Purchase_Order_assign_items.png]] | ||
# If '''Auto Replenish''' was selected, modify the '''Reordering Filters''' as needed. Order will not be created for parts that are above their reorder levels. Click '''Next'''. <br> [[File:Auto_Purchase_Order_reordering_filters.png]] | # If '''Auto Replenish''' was selected, modify the '''Reordering Filters''' as needed. Order will not be created for parts that are above their reorder levels. Click '''Next'''. <br> [[File:Auto_Purchase_Order_reordering_filters.png]] | ||
# Select whether to create the purchase orders in an '''Issued''' or '''Bid Request''' state. This step will also list the purchase order numbers that are to be created. Click '''Finish'''.<br>[[File:Auto Purchase Summary.png]] | # Select whether to create the purchase orders in an '''Issued''' or '''Bid Request''' state. This step will also list the purchase order numbers that are to be created. Click '''Finish'''.<br>[[File:Auto Purchase Summary.png]] | ||
| Line 50: | Line 50: | ||
Follow these steps to create a sales order within the {{Module|Consignment}}. | Follow these steps to create a sales order within the {{Module|Consignment}}. | ||
# Double-click | # Double-click the desired consignment location in the search pane on the left. Move items from the '''Items''' list to the '''Selected Items''' list by double-clicking the desired items, or highlight the items to be added to the sales order in the '''Items''' list and click the {{Button|Select}}. To add multiple items at once, hold down the Shift key while highlighting the desired items. If items and quantities need to be split, highlight the item and click the {{Button|Split}}. Items may also be added to the '''Selected Items''' list using the '''Part''' dropdown list. <br> [[File:Consignment_module_general_subtab.png]] | ||
# Click the {{Button|Create SO}} located on the component toolbar to the right of the '''Selected Items''' list. | # Click the {{Button|Create SO}} located on the component toolbar to the right of the '''Selected Items''' list. | ||
# Select a customer for the sales order. To add a new customer, select '''Add New''' at the bottom of the list. Click '''Next'''. <br>[[File:Consignment_create_SO_choose_customer.png]] | # Select a customer for the sales order. To add a new customer, select '''Add New''' at the bottom of the list. Click '''Next'''. <br>[[File:Consignment_create_SO_choose_customer.png]] | ||
| Line 61: | Line 61: | ||
==Remove inventory via transfer order== | ==Remove inventory via transfer order== | ||
Once inventory has been added to a consignment location it may be moved out via a transfer order at any time. | Once inventory has been added to a consignment location, it may be moved out via a transfer order at any time. | ||
Follow these steps to create a transfer order within the {{Module|Consignment}}. | Follow these steps to create a transfer order within the {{Module|Consignment}}. | ||
# Double-click | # Double-click the desired consignment location in the search pane on the left. Move items from the '''Items''' list to the '''Selected Items''' list by double-clicking the desired items, or highlight the items to be added to the transfer order in the '''Items''' list and click the {{Button|Select}}. To add multiple items at once, hold down the Shift key while highlighting the desired items. If item quantities need to be split, highlight the item and click the {{Button|Split}}. Items may also be added using the '''Part''' dropdown list. Be sure to specify the quantity prior to selecting the product.<br> [[File:Selected_Items.png]] | ||
# Click the {{Button|Create TO}} on the component toolbar located next to the '''Selected Items''' list. | # Click the {{Button|Create TO}} on the component toolbar located next to the '''Selected Items''' list. | ||
# Select whether to '''Ship''' or '''Move ''' the items. Click '''Next'''. Shipped items will proceed through the {{Module|Shipping}}. | # Select whether to '''Ship''' or '''Move ''' the items. Click '''Next'''. Shipped items will proceed through the {{Module|Shipping}}. | ||
# Choose a '''To''' location group for the inventory. If the inventory is being moved, click '''Finish'''. If the inventory is being shipped, click '''Next'''. <br> [[File:Select_Transfer_Order_Location_Group.png]] | # Choose a '''To''' location group for the inventory. If the inventory is being moved, click '''Finish'''. If the inventory is being shipped, click '''Next'''. <br> [[File:Select_Transfer_Order_Location_Group.png]] | ||
# Select | # Select the needed addresses and then click '''Finish'''.<br>[[File:Consignment_select_shipping_address.png]] | ||
If the {{ModuleOptions||General}} are set to '''Open order after creation''', the order will be displayed in the {{Module|Transfer Order}}. Otherwise, a message will appear stating that the transfer order was created. To automatically complete a transfer order upon creation, go to {{ModuleOptions||General}} and select '''Auto fulfill Transfer Order'''. If this option is not selected, the consignment quantities will not be reduced until the transfer order is manually fulfilled. | If the {{ModuleOptions||General}} are set to '''Open order after creation''', the order will be displayed in the {{Module|Transfer Order}}. Otherwise, a message will appear stating that the transfer order was created. To automatically complete a transfer order upon creation, go to the {{ModuleOptions||General}} and select '''Auto fulfill Transfer Order'''. If this option is not selected, the consignment quantities will not be reduced until the transfer order is manually fulfilled. | ||
==Adjust consignment inventory== | ==Adjust consignment inventory== | ||
Many {{Module|Inventory}} functions are available within the {{Module|Consignment}}. It is possible to move inventory to a new location, increase and decrease the quantity through cycle count, scrap inventory, and view the serial numbers of a tag. | Many {{Module|Inventory}} functions are available within the {{Module|Consignment}}. It is possible to move inventory to a new location, you can increase and decrease the quantity through cycle count, scrap inventory, and view the serial numbers of a tag. | ||
To make these adjustments, double-click | To make these adjustments, double-click the consignment location in the search pane. Highlight the inventory item to adjust, and click the {{Icon Button|Move}}, {{Button|Cycle}}, or {{Icon Button|Scrap}} located on the component toolbar to the right. To view serial numbers for a tag, highlight the item and click the {{Button|Tracking}}. Moving and adjusting inventory within the {{Module|Consignment}} is handled in the same manner as within the {{Module|Inventory}}. For more information, see [[Inventory#Move inventory|Move inventory]], [[Inventory#Cycle count|Cycle count inventory]], and [[Inventory#Scrap inventory|Scrap inventory]]. | ||
{{Module Options:Consignment}} | {{Module Options:Consignment}} | ||
Latest revision as of 08:28, 13 December 2024
 The Consignment module, located in the
 Materials group, is used to track inventory that is sold from a consignment location. Consignment is typically used to transfer inventory to a third-party seller. The inventory in consignment locations can be replenished based on part reorder levels. In this case, the reorder levels should be specified By Location Group in the
 Location Group module options.
Module buttons
 Create TO creates a transfer order to move inventory into the consignment location.
 Create PO creates a purchase order to move inventory into the consignment location.
 New Location creates a new consignment location.
 Email opens a window to compose an email. If the module's default report is specified, the PDF report will be attached. Email can be configured on the Email tab of the
 Settings module.
 Print sends the default module report to the printer.
 How To opens this article in a web browser.
 Refresh reloads whatever is currently open in the module.
Create a consignment location
Use the following steps to create a new consignment location.
- Click the
 New Location button located on the module toolbar.
- Complete all of the fields and enter a unique tag number. Click Generate to automatically generate the next available tag.
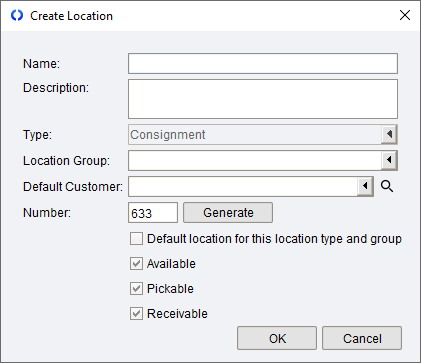
- Determine whether the new location being created is the default for the location type and group, as well as whether it is pickable, receivable, or available.
- Click OK to save the new Consignment location. Consignment locations can also be created and edited in the
 Location module.

Add inventory via transfer order
Inventory can be added to a consignment location using a transfer order or a purchase order. To create a transfer order in the Consignment module, use the following steps.
- Double-click the desired consignment location in the search pane.
- Click the
 Create TO button on the module toolbar.
- Choose whether to Ship or Move the inventory to the location. If the order is shipped, the order will be sent to the
 Shipping module. Click Next.
- Choose whether to Auto Replenish or Manually Enter Inventory. Click Next.
- Select a From and a To location group for moving the inventory. Click Next.

- Choose the customer's shipping address. If the order is to be moved, this step will not appear. Click Next.
- Choose the company address to use as a return shipping address. Click Next.
- If using auto replenish, select the desired part and date-range filters and click Finish. If adding parts manually, type each part into the search bar and press Enter, or use the dropdown list to select each part. Click Finish.

If Auto fulfill transfer order is enabled in the  Consignment module options, the items will now appear in the Items window for the consignment location.
Add inventory via purchase order
Inventory can be added to a consignment location using a purchase order or a transfer order. Parts must have a vendor specified in the  Part module before they can be added to a purchase order. Follow the steps below to create a purchase order in the Consignment module.
- Double-click the desired consignment location in the search pane.
- Click the
 Create PO button on the module toolbar.
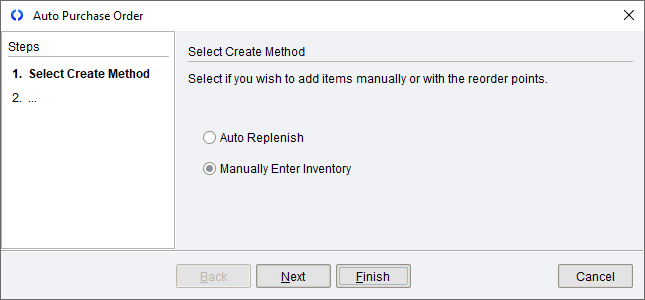
- Choose whether to Auto Replenish the inventory for this location according to the item's reorder levels or to Manually Enter Inventory. Click Next.
- If adding parts manually, type each part into the search bar and press Enter, or use the dropdown list to select each part. Click Finish.

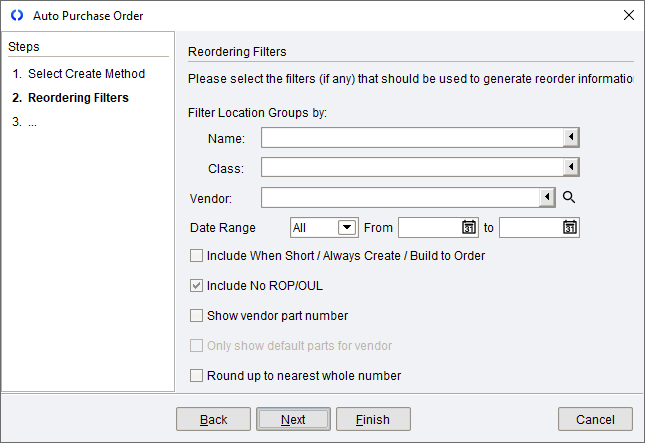
- If Auto Replenish was selected, modify the Reordering Filters as needed. Order will not be created for parts that are above their reorder levels. Click Next.
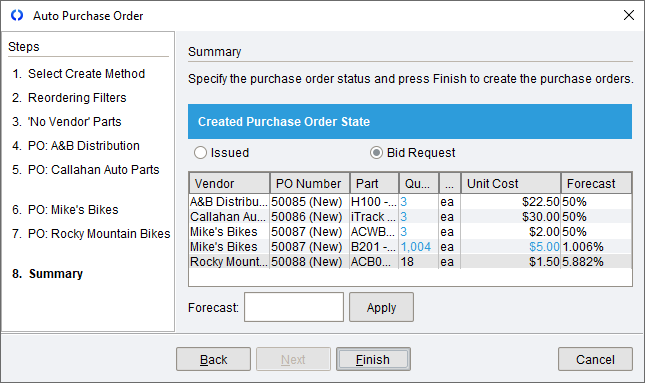
- Select whether to create the purchase orders in an Issued or Bid Request state. This step will also list the purchase order numbers that are to be created. Click Finish.


Remove inventory via sales order
Once inventory has been sold in a consignment location, a sales order must be created to remove the items from inventory. To automatically fulfill sales order items when an order is created, set the Consignment module options to Auto fulfill sales order.
Follow these steps to create a sales order within the Consignment module.
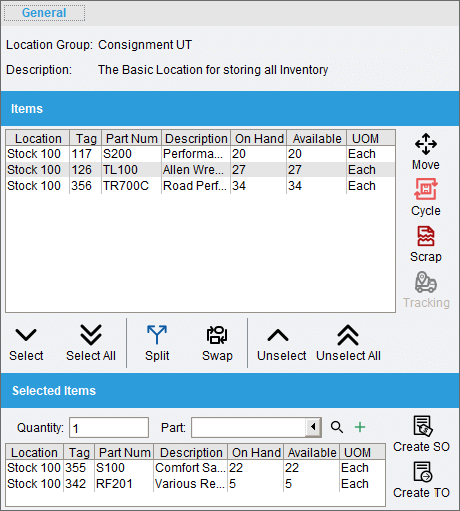
- Double-click the desired consignment location in the search pane on the left. Move items from the Items list to the Selected Items list by double-clicking the desired items, or highlight the items to be added to the sales order in the Items list and click the
 Select button. To add multiple items at once, hold down the Shift key while highlighting the desired items. If items and quantities need to be split, highlight the item and click the
 Split button. Items may also be added to the Selected Items list using the Part dropdown list.
- Click the
 Create SO button located on the component toolbar to the right of the Selected Items list.
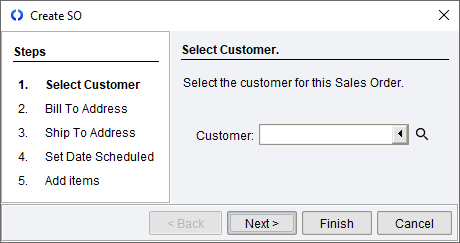
- Select a customer for the sales order. To add a new customer, select Add New at the bottom of the list. Click Next.
- Verify the customer's billing address. It may be edited at this point, if needed. Click Next.
- Verify the customer's shipping address. It may be edited at this point, if needed. Click Next.
- Choose a fulfillment date for the sales order. To select the date on a calendar, click the
 Calendar button. Click Next.
- On the final step, additional items can be added to the sales order. Then click Finish.
- If the Consignment module options are set to Open order after creation, the order will automatically open in the
 Sales Order module. Otherwise, click OK in the confirmation window. The quantities of the items on the sales order have now been removed from the inventory of the consignment location.


Remove inventory via transfer order
Once inventory has been added to a consignment location, it may be moved out via a transfer order at any time.
Follow these steps to create a transfer order within the Consignment module.
- Double-click the desired consignment location in the search pane on the left. Move items from the Items list to the Selected Items list by double-clicking the desired items, or highlight the items to be added to the transfer order in the Items list and click the Select button. To add multiple items at once, hold down the Shift key while highlighting the desired items. If item quantities need to be split, highlight the item and click the Split button. Items may also be added using the Part dropdown list. Be sure to specify the quantity prior to selecting the product.
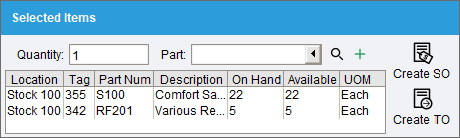
- Click the Create TO button on the component toolbar located next to the Selected Items list.
- Select whether to Ship or Move the items. Click Next. Shipped items will proceed through the Shipping module.
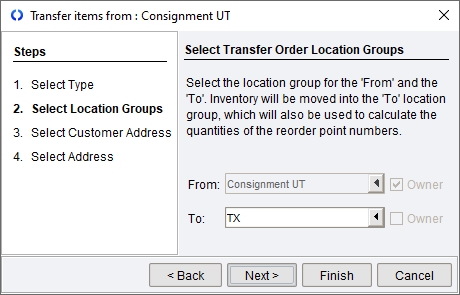
- Choose a To location group for the inventory. If the inventory is being moved, click Finish. If the inventory is being shipped, click Next.
- Select the needed addresses and then click Finish.
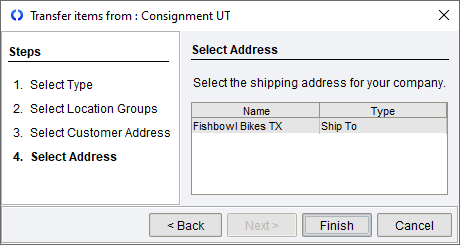


If the Consignment module options are set to Open order after creation, the order will be displayed in the  Transfer Order module. Otherwise, a message will appear stating that the transfer order was created. To automatically complete a transfer order upon creation, go to the Consignment module options and select Auto fulfill Transfer Order. If this option is not selected, the consignment quantities will not be reduced until the transfer order is manually fulfilled.
Adjust consignment inventory
Many  Inventory module functions are available within the Consignment module. It is possible to move inventory to a new location, you can increase and decrease the quantity through cycle count, scrap inventory, and view the serial numbers of a tag.
To make these adjustments, double-click the consignment location in the search pane. Highlight the inventory item to adjust, and click the  Move button,
 Cycle button, or
 Scrap button located on the component toolbar to the right. To view serial numbers for a tag, highlight the item and click the
 Tracking button. Moving and adjusting inventory within the Consignment module is handled in the same manner as within the Inventory module. For more information, see Move inventory, Cycle count inventory, and Scrap inventory.
MODULE OPTIONS
Some aspects of the Consignment module can be customized by opening the module, clicking the Tools menu, and then selecting Module Options.

- Auto fulfill transfer order
- With this option checked, transfer orders created in the Consignment module will automatically be fulfilled, eliminating the need to pick, ship, and receive the order.
- Auto fulfill sales order
- With this option checked, sales orders created in the Consignment module will automatically be fulfilled, eliminating the need to pick and ship the order.
- Open order after creation
- With this option checked, orders will automatically be opened in the applicable module after they are created in the Consignment module.