Inventory
![]() The Inventory module, located in the
The Inventory module, located in the ![]() Materials group, displays parts as well as their quantities, locations, and tracking information. Inventory can be viewed, added, deleted, moved, and modified from within the Inventory module.
Materials group, displays parts as well as their quantities, locations, and tracking information. Inventory can be viewed, added, deleted, moved, and modified from within the Inventory module.
Module buttons
![]() Cycle allows inventory quantities to be adjusted with a cycle count.
Cycle allows inventory quantities to be adjusted with a cycle count.
![]() Add allows new inventory to be added and the cost to be set.
Add allows new inventory to be added and the cost to be set.
![]() Email opens a window to compose an email. If the module's default report is specified, the PDF report will be attached. Email can be configured on the Email tab of the
Email opens a window to compose an email. If the module's default report is specified, the PDF report will be attached. Email can be configured on the Email tab of the ![]() Settings module.
Settings module.
![]() Print sends the default module report to the printer.
Print sends the default module report to the printer.
![]() How To opens this article in a web browser.
How To opens this article in a web browser.
![]() Refresh reloads whatever is currently open in the module.
Refresh reloads whatever is currently open in the module.
Search
The search panel in the ![]() Inventory module displays parts as well as the part description and the quantity on hand. The search parameters can be used to filter the list or find a specific part.
Inventory module displays parts as well as the part description and the quantity on hand. The search parameters can be used to filter the list or find a specific part.
- Basic search - To perform a basic search, enter the part number (or a portion of it) in the Part Number field and then press the Search button or the Enter key. The Description and Location fields can also be used to search. By default, only parts that are in stock are included. To see parts with a zero quantity, use the Advanced Search.

- Advanced search - Click the Advanced Search button to see more search parameters. To include parts with a zero quantity, select Show parts with no on hand inventory. Enter any fields on the General, Tracking, or Custom tabs and then click Search.


Move inventory
Follow the steps below to move inventory from one location to another location.
- Open the part to be moved in the
 Inventory module.
 - Highlight the desired location and click the
 Move button located on the component toolbar to the right.
- Enter the quantity, end location, and any required tracking information, and then click OK to complete the move.

An inventory move can also be performed using the import.
Adjust tracking information
Tracking can be edited in the ![]() Inventory module. For example, an incorrect serial number can be edited. Follow the steps below to adjust tracking information.
Inventory module. For example, an incorrect serial number can be edited. Follow the steps below to adjust tracking information.
- Open the part to be adjusted in the Inventory module.
- Highlight the desired location and click the
 Tracking button, located on the component toolbar to the right, or double-click the line item.
 - Tracking that has already been committed will have a
 icon. Click any field to make the desired changes and then click OK.
Cycle count
A cycle count is used to increase or decrease inventory in Fishbowl. Typically, the cycle count feature is used while performing a physical inventory count, but may also fulfill other company needs. A cycle count can be performed using any of the following methods.
- The
 Cycle button on the module toolbar.
 - The Cycle button on the component toolbar to the right.
- The Cycle Count Data import.
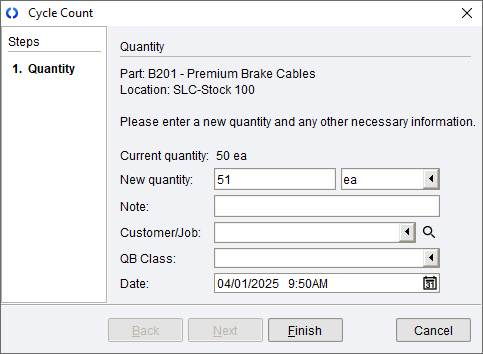
Using the Cycle button on the module toolbar
Follow the steps below to adjust inventory quantities using the Cycle button on the module toolbar.
- Click the Cycle button on the module toolbar.
- Select the Part and Location that will be adjusted, and then click Next.
- Adjust the quantity to the correct amount. If there is a quantity of 50 in the location, then changing the quantity to 51 will add 1 to this location.

- Enter any required tracking information or any optional information, such as a Note, Customer/Job, or QuickBooks Class.
- Click Finish to complete the Cycle Count wizard.

Using the Cycle button on the component toolbar
Follow the steps below to adjust inventory quantities using the Cycle button on the component toolbar to the right.
- Open the part that will be cycled, and highlight the location line item that will be adjusted.
- Click the Cycle button, located on the component toolbar to the right.
- Adjust the quantity to the correct amount. If there is a quantity of 50 in the location, then changing the quantity to 51 will add 1 to this location.
- Enter any required tracking information or any optional information, such as a Note, Customer/Job, or QuickBooks Class.
- Click Finish to complete the Cycle Count wizard.

Add inventory
Adding inventory increases the total quantity and allows for cost adjustments to be made. Follow the steps below to add inventory.
- Click the
 Add button in the Inventory module.
 - Select the part and location, and then click Next.
- Enter the quantity to add. If there is a quantity of 50 in the location, then entering a quantity of 13 will increase the total to 63.

- Enter the unit cost and any other applicable information.
- If the part has tracking, enter the required tracking information. To automatically enter tracking information (serial numbers, revision levels, lot numbers, expiration dates, etc.), click any of the
 Auto buttons.
- Once all the desired information has been entered, click the Finish button.

Inventory can also be added through the import.
Scrap inventory
Scrapping inventory reduces the total quantity, and is often performed when inventory has been damaged or destroyed. Follow the steps below to scrap inventory.
- Open the part that will be scrapped, and highlight the applicable location line item.
- Click the
 Scrap button, located on the component toolbar to the right.
 - Enter the quantity that will be scrapped. If there is a quantity of 10 in the location, then scrapping 3 will result in a total of 7.

- Enter any required tracking information or any optional information, such as a Note, Customer/Job, or QuickBooks Class.
- Click Finish to complete the Scrap wizard.

Modify the average cost or total cost
Follow the steps below to edit a part's average cost or total cost.
- Double-click the desired part in the Inventory module
- Click the
 Edit button located to the right of the current cost.
- Modify either the Average Cost or the Total Cost, and the other cost will be automatically calculated.
- When the desired changes have been made, click OK.

Average costs can also be modified using the import.
View costing details
- To view a part's costing details, load the part in the Inventory module and then click the Costing tab.
- Part cost is set as inventory enters Fishbowl.
- When a part is purchased, the final part cost is determined in the
 Receiving module.
 - When manually adding inventory, the part cost is entered in the Unit Cost field.
- When cycling inventory in, the new inventory will receive the current cost that is listed on the Costing tab of the Inventory module
- If a part is manufactured, the costs of the raw goods are used to determine the cost of the finished good.
- When a part is purchased, the final part cost is determined in the
- NOTE: When inventory leaves Fishbowl (sold, scrapped, etc.), the cost that is exported to the accounting system will rarely match the individual cost of that item when it entered inventory. Instead, a part's cost fluctuates according to the current cost of the selected costing method.
View quantity details
To view the Quantity Details window, click the ![]() Display More Information button, located in the Inventory section, to the right of the total quantities.
Display More Information button, located in the Inventory section, to the right of the total quantities.

The Quantity Details window displays inventory totals, inventory quantities per location group, as well as upcoming orders with the selected part.
Inventory status terms
Below is a description of the inventory status terms displayed in the ![]() Inventory module. In the Fishbowl Client, hover the mouse over an inventory term or quantity to see more details, such as inventory breakdowns or the formula used to calculate the inventory status.
Inventory module. In the Fishbowl Client, hover the mouse over an inventory term or quantity to see more details, such as inventory breakdowns or the formula used to calculate the inventory status.

- On Hand - The total amount of inventory in stock.
- Allocated - The amount of inventory allocated or assigned to other orders. For example, inventory on issued sales orders, purchase orders, transfer orders, and work orders. Hover over the Allocated quantity to see more details.
- Not Available - The quantity in locations that are not available.
- Drop Ship - The quantity being drop shipped directly to customers.
- Available - The quantity available is calculated as On Hand - Allocated - Not Available + Drop Ship.
- On Order - The quantity on order for a purchase order, sales order, work order, or transfer order.
- Committed - Items picked and ready to be shipped, or items started on a work order. Inventory that is committed will always be allocated. However, inventory that is allocated is not always committed.
- Short - The quantity needed to fulfill demand.
- Days of Stock - If a part has a consumption rate set on the Inventory tab of the
 Part module, the days of stock will be calculated based on current inventory levels.
 - Available To Pick - Calculated as On Hand - Committed for inventory in locations that are marked as Pickable.
TABS

The General tab displays important inventory details.
The top section displays the Part Description, Part Number, UOM, Total Cost, and Average Cost.
- Total Cost - The total cost is the dollar value of the inventory in stock for the selected part. When using average cost or standard cost, the total cost is the current unit cost multiplied by the number of items on hand. When using FIFO or LIFO, the total cost is the sum of the remaining costing layers.
- Average Cost - The average cost is set when the cost is first entered for a part. This cost will fluctuate each time the part is purchased for a different cost. The average cost is calculated by taking the total cost of all items divided by the total quantity. For more information, see Costing method.
- The Edit button is used to edit the cost of inventory.
The Inventory section displays the quantity of inventory on hand, as well as the inventory status totals.
- The inventory totals can be viewed for each location group by clicking on the
 Quantity Details button.
 - In the Fishbowl Client, hover the mouse over an inventory status or quantity to see more details or the formula used to calculate the inventory status.
The Information section displays the inventory within each location. This section provides the following functions.

The Costing tab displays costing details.
- The top section displays the part number, the quantity on hand, and the Current Costing Method.
- NOTE: Only the values from the Current Costing Method will be used. At any given moment, each costing method is likely to have a different Total Cost. For example, the FIFO/LIFO total cost is only the sum of the remaining costing layers. Average Cost incorporates previous costs that are not visible in the remaining costing layers. Average Cost is not the same thing as the average of the remaining costing layers. Additionally, values sent to your accounting system may not reflect the physical inventory that you are consuming. You could theoretically be using a FIFO picking method, and a LIFO costing method. Different costing methods will give different values throughout time. If you were to compare the costing methods after selling all your inventory, the total values in your accounting system would be equal. However, while you have inventory, the values displayed in each costing method can be significantly different, so it is important to remember that only the values for the Current Costing Method will be used.
- The lower section displays info for various costing methods. It may be useful to view details for other costing methods, but as described above, only the data for the Current Costing Method will be used.
- Part cost is set as inventory enters Fishbowl.
- When a part is purchased, the final part cost is determined in the Receiving module.
- When manually adding inventory, the part cost is entered in the Unit Cost field.
- When cycling inventory in, the new inventory will receive the current cost that is listed on the Costing tab of the Inventory module
- If a part is manufactured, the costs of the raw goods are used to determine the cost of the finished good.
- When a part is purchased, the final part cost is determined in the
- NOTE: When inventory leaves Fishbowl (sold, scrapped, etc.), the cost that is exported to the accounting system will rarely match the individual cost of that item when it entered inventory. Instead, a part's cost fluctuates according to the current cost of the selected costing method.

The Custom tab displays a read-only version of the part's custom fields that are available on the Custom tab of the ![]() Part module.
Part module.
MODULE OPTIONS
Some aspects of the ![]() Inventory module can be customized by opening the module, clicking the Tools menu, and then selecting Module Options.
Inventory module can be customized by opening the module, clicking the Tools menu, and then selecting Module Options.

- Allow Scheduled Part Cost History Snapshot
- This option stores a daily snapshot of part costs for use with the Historical Part Cost report.