Manufacture Order
![]() The Manufacture Order module, located in the
The Manufacture Order module, located in the ![]() Manufacturing group, organizes work orders and allows for items to be manufactured, disassembled, and repaired. Manufacture orders can be created individually or generated from sales order demand and inventory levels. This article outlines the process, functions, tabs, and module options of the
Manufacturing group, organizes work orders and allows for items to be manufactured, disassembled, and repaired. Manufacture orders can be created individually or generated from sales order demand and inventory levels. This article outlines the process, functions, tabs, and module options of the ![]() Manufacture Order module.
Manufacture Order module.

PROCESS
1. Add items
Follow the steps below to add items to a manufacture order.
- Open the
 Manufacture Order module and click the
  New button on the module toolbar to create a new manufacture order.
 - Add a standard work order by selecting an existing bill of materials from the BOM field.

- Standard means that the BOM will be processed normally by consuming raw goods and creating finished goods. Note that BOMs can be created specifically for disassembling items by swapping the finished goods with the raw goods.
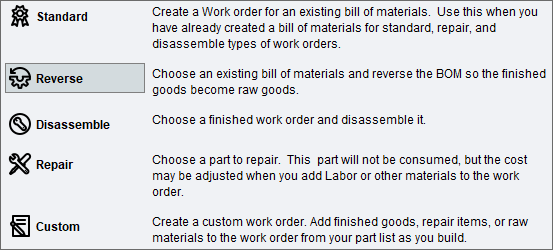
- Fishbowl also provides shortcuts to create work orders using existing parts, BOMs, or finished work orders. Below is a description for Reverse, Disassemble, Repair, and Custom work orders, which can be added by clicking the
 Add button to the right of the BOM field.
- The Summary step shows the lead time and allows the work order to be scheduled. The lead time is the highest default lead time for any raw goods that aren't currently available.

- Click the
 Calendar button to see a small calendar, or click the Calendar tab to see when other work orders are scheduled. Double-click any date on the calendar to set the Date Scheduled and then click Finish.


Reverse
A Reverse work order uses an existing BOM and swaps the finished goods and raw goods. If the process is a little more complex, a new BOM can also be created in the ![]() Bill of Materials module specifically for this purpose. Follow the steps below to add a Reverse work order to a manufacture order.
Bill of Materials module specifically for this purpose. Follow the steps below to add a Reverse work order to a manufacture order.
- Click the Add button to the right of the BOM field.

- Select Reverse and then click Next.
- Select an existing bill of materials from the dropdown.

- Proceed through the wizard to enter the quantity and customize the description.
- The Summary step allows the work order to be scheduled. Click the Calendar button to see a small calendar, or double-click any date on the Calendar tab to set the Date Scheduled. Then click Finish.

- Issue the manufacture order and fulfill the work order to complete the Reverse process.


Disassemble
A Disassemble work order uses a finished work order and swaps the finished goods and raw goods. Follow the steps below to add a Disassemble work order to a manufacture order.
- Click the Add button to the right of the BOM field.
- Select Disassemble and then click Next.

- Select a fulfilled work order to disassemble. This enables you to be precise when searching for a specific finished good to disassemble if you track each one by serial number.
- Proceed through the wizard to enter the quantity and customize the description.
- The Summary step allows the work order to be scheduled. Click the Calendar button to see a small calendar, or double-click any date on the Calendar tab to set the Date Scheduled. Then click Finish.
- Issue the manufacture order and fulfill the work order to complete the Disassemble process.

Repair
Follow the steps below to add a Repair work order to a manufacture order.
- Click the Add button to the right of the BOM field.
- Select Repair and then click Next.

- The next step lets you select a part, even if it doesn’t have a bill of materials, from the dropdown.
- Proceed through the wizard to enter the quantity and customize the description.
- The Summary step allows the work order to be scheduled. Click the Calendar button to see a small calendar, or double-click any date on the Calendar tab to set the Date Scheduled. Then click Finish.
- Issue the manufacture order.
- Go to the Configuration tab to add more repairs, as well as raw goods and finished goods, to the repair work order and then fulfill the work order to complete the Repair process.

Custom
Follow the steps below to add a Custom work order to a manufacture order.
- Click the Add button to the right of the BOM field.
- Select Custom and then click Next.

- The BOM Description step lets you enter a description of the custom bill of materials. The textbox will automatically be populated with Custom BOM, but you can change it to something more descriptive if you prefer.
- In the Add Finished Goods step, enter a quantity and select at least one part to add to the work order as a finished good. You can add multiple finished goods in this step.
- In the Add Raw Goods step, enter a quantity and select at least one part to add to the work order as a raw good. You can add multiple raw goods in this step. This is similar to creating a new bill of materials. It won’t be saved in the
 Bill of Materials module, but the manufacture order can be duplicated if you want to use the same materials again.
 - The Summary step allows the work order to be scheduled. Click the Calendar button to see a small calendar, or double-click any date on the Calendar tab to set the Date Scheduled. Then click Finish.
- Issue the manufacture order and then fulfill the custom work order.

2. Configuration
After adding items to a manufacture order, the parts to be used on a work order can be customized on the Configuration tab. This is especially applicable for Repair and Custom work orders, but the parts can be customized for any type of work order.
- Click the Configuration tab and highlight the desired BOM.

- Click the Add button to the right.
- Choose the item type to be added. To add labor, choose Raw Good and then select a labor type part in the following step.

- Click Next and enter the part, quantity, and any other information required to complete the wizard.
- The buttons in the component toolbar to the right can also be used to remove, rearrange, or reconfigure items on the work order.


Once the manufacture order has been issued, the Configuration tab will become read-only, but changes can continue to be made on the WO Details tab in much the same way. See Configuration and WO Details tabs for more information regarding these similar tabs.
3. Issue a manufacture order
Once all of the items have been added to a manufacture order, click the Issue button on the module toolbar to issue the manufacture order. When the manufacture order is issued, the work orders are created. Once a work order has been created, assigned users can be added, changes can be made on the WO Details tab, and the work order can proceed through the fulfillment process. A work order can be fulfilled in the ![]() Manufacture Order module or in the
Manufacture Order module or in the ![]() Work Order module by clicking the WO Number link.
Work Order module by clicking the WO Number link.![]()
4. Fulfill a work order
Once the manufacture order is issued, each work order can be fulfilled. A work order must be started, picked, and finished. Work orders can proceed through these steps individually by using the appropriate buttons on the component toolbar to the right. Clicking the Finish button in the component toolbar will perform the Start and Pick steps if they have not already been completed. These steps can also be performed quickly for all work orders by using the Quick Fulfill wizard, located on the module toolbar.
Start a work order
Starting a work order flags the work order so that work may begin. The Started Date is stored so that the duration of the work order can be estimated. Complete the following steps to start a work order.
- Highlight one or more work orders and then click the
 Start button located on the component toolbar to open the Start Work Order wizard.
- Make any necessary changes to the Start Quantity and the Assigned Users, and click Next.
- View or print any desired reports and click Finish.

The Start step can also be performed when finishing a work order.
Pick a work order
Picking a work order will gather the raw goods needed to manufacture the finished good.
- To pick a work order, highlight the work order and then click the
 Pick button located on the component toolbar. This will load the work order in the
  Picking module where the pick can be started and finished.
The Pick step can also be performed when finishing a work order, eliminating the need to load the Picking module.
Finish a work order
Finishing a work order will consume the raw goods and place the finished goods into inventory. If the work order was created for a sales order, the inventory needed for the sales order will become available to pick. Complete the following steps to finish a work order.
- Highlight one or more work orders and then click the
 Finish button, located on the component toolbar, to open the Finish Work Order wizard.
 - If the work order has not been started, the Start Work Order step will be displayed. Make any necessary changes and click Next.
- The Picking step allows the pick to be modified and finished. Verify the picking information and click Next.

- The Raw Material Consumption step allows the actual consumption quantities to be adjusted. If you decrease the quantity to consume, then the final step will give you the option to create a new work order with the remaining materials. Make any necessary adjustments and click Next.

- The final step of the wizard can vary depending on the number of finished goods.
- One finished good

- Multiple finished goods (to enable this step for all orders, see the General tab of the Manufacture Order module options)

- One finished good
- Complete the final step of the wizard and then click Finish. If the finished good has serial numbers, the
 Search button can be used to select a serial number from a consumed item.


FUNCTIONS
Module buttons
![]() New creates a new manufacture order.
New creates a new manufacture order.
![]() Issue changes the status of a manufacture order to Issued.
Issue changes the status of a manufacture order to Issued.
![]() Unissue changes the status of a manufacture order to Entered.
Unissue changes the status of a manufacture order to Entered.
![]() Save saves any changes made to the manufacture order.
Save saves any changes made to the manufacture order.
![]() Delete deletes the manufacture order if it is in an Entered status. Issued orders can be unissued to return them to the Entered status.
Delete deletes the manufacture order if it is in an Entered status. Issued orders can be unissued to return them to the Entered status.
![]() Close Short will replace the Delete button when an order has a status of Partial. Work orders must either be in an Entered or Fulfilled status to close short a manufacture order. To void a work order, click the Void Work Order button located on the component toolbar.
Close Short will replace the Delete button when an order has a status of Partial. Work orders must either be in an Entered or Fulfilled status to close short a manufacture order. To void a work order, click the Void Work Order button located on the component toolbar.
![]() MO to PO generates a purchase order with the items that are short or all of the items on the manufacture order. Options can be customized in the
MO to PO generates a purchase order with the items that are short or all of the items on the manufacture order. Options can be customized in the ![]() Manufacture Order module options.
Manufacture Order module options.
![]() Quick Fulfill quickly fulfills all work orders. This will proceed through the Finish Work Order wizard for each work order on the manufacture order.
Quick Fulfill quickly fulfills all work orders. This will proceed through the Finish Work Order wizard for each work order on the manufacture order.
![]() Auto MO launches the Auto MO wizard to automatically create manufacture orders.
Auto MO launches the Auto MO wizard to automatically create manufacture orders.
![]() Duplicate creates a copy of any manufacture order. The order number will automatically be assigned, and the new MO will have an Entered status.
Duplicate creates a copy of any manufacture order. The order number will automatically be assigned, and the new MO will have an Entered status.
![]() Email opens a window to compose an email. If the module's default report is specified, the PDF report will be attached. Email can be configured on the Email tab of the
Email opens a window to compose an email. If the module's default report is specified, the PDF report will be attached. Email can be configured on the Email tab of the ![]() Settings module.
Settings module.
![]() Print sends the default module report to the printer.
Print sends the default module report to the printer.
![]() How To opens this article in a web browser.
How To opens this article in a web browser.
![]() Refresh reloads whatever is currently open in the module.
Refresh reloads whatever is currently open in the module.
Work order buttons
The work order component toolbar is located to the right of the item list and has several functions. Each function will be performed on the highlighted work order.
![]() starts the highlighted work order.
starts the highlighted work order.
![]() picks the highlighted work order.
picks the highlighted work order.
![]() finishes the highlighted work order.
finishes the highlighted work order.
![]() deletes the highlighted work order.
deletes the highlighted work order.
![]() voids the highlighted work order.
voids the highlighted work order.
Auto MO wizard
The Auto MO wizard is an easy way to generate manufacture orders for parts with low inventory levels. In order to use Auto MO on a specific part, a Reorder Level/Point should first be created for that part. The following instructions outline the process of using the Auto MO wizard:
- Make sure parts have the correct reorder levels established.
- Click the Auto MO button on the module toolbar.
- Only parts that are finished goods on a bill of materials will be included. Additional part filters and order filters can be used as described below.

- Include parts with no ROP/OUL - This option will include parts that are backordered, even if those parts don't have reorder levels set.
- Hide parts with configurable Bill of Materials - This option will exclude parts that have a bill of materials with variable quantities or option groups.
- Date Scheduled Range - This filter lets you account for quantities on scheduled orders in the date range. For example, if there is a big sales order scheduled for next week, or a big manufacture order scheduled for next month, you could choose to include or exclude those orders from the quantity calculations.
- Location Group - This filter can be used to include only orders from the specified location group. If no location group is selected, orders from all location groups will be included.
- Location Group Class - This filter can be used to include orders based on the Class of the location group. If no class is selected, orders from all location groups will be included.
- Confirm the list of the orders to be created. An item can be skipped by unselecting it. Quantities can also be modified as necessary. Click Finish to create a separate manufacture order for each item, or select the option to combine items into one order.


Create MO from SO
Manufacture orders can be automatically created from sales order items that have an auto-create BOM. The manufacture order is created once the sales order is issued. To see the manufacture order, double-click the sales order item, select the Configuration tab, and then click the blue MO link.
If the item has a Build To Order BOM, the option is given to configure a new work order.
The scheduled date for the sales order item will be set to the work order scheduled date if it is later than the default date.
The sales order number is also displayed on the General tab of the ![]() Manufacture Order module and can be clicked to jump directly to the sales order.
Manufacture Order module and can be clicked to jump directly to the sales order.
Unlink manufacture order from sales order
To unlink a manufacture order from the sales order it was created from, click the red trashcan icon on the right side of the Sales Order section of the manufacture order. A popup message will appear, asking if you really want to do that. Click Yes, and then the manufacture order will no longer have any connection to the sales order. Once done, this action cannot be undone.
If you issue a manufacture order, you will not be able to unissue, cancel, or void the sales order it is linked to unless you first unissue the manufacture order or unlink it.
Assign users to a work order
Users can be assigned to a work order as soon as a manufacture order is issued, and the work order created. To add users, highlight the work order, and add users on the Assigned Users tab at the bottom of the order.

Users can also be assigned in the Finish work order wizard.
Calculate cost
Once a manufacture order has been saved, the ![]() button can be clicked to load the Manufacture Order Projected Cost report. The costs of the raw goods are used to determine the cost of the finished good. For unfulfilled work orders, finished good costs are estimated using the current costs of the raw goods when the report was generated. For fulfilled work orders, the actual costs of the raw goods from the time the order was fulfilled will be displayed. NOTE: When an item is sold, the cost that is exported to the accounting system will not come from this report, but will be determined by the current cost of the selected costing method.
button can be clicked to load the Manufacture Order Projected Cost report. The costs of the raw goods are used to determine the cost of the finished good. For unfulfilled work orders, finished good costs are estimated using the current costs of the raw goods when the report was generated. For fulfilled work orders, the actual costs of the raw goods from the time the order was fulfilled will be displayed. NOTE: When an item is sold, the cost that is exported to the accounting system will not come from this report, but will be determined by the current cost of the selected costing method.

Search
The ![]() Search pane on the left can be used to filter by Number, BOM Number, SO Number, or Status. Records can also be found by typing in the table. Click the Advanced Search button to search the Custom Fields and the following search options. Manufacture order numbers are listed in this pane first by length (longest first) and then alphabetically (A-Z). For example, 900 would come after 0901 because it has one less digit, but it would come before 901 because it has the same number of digits. And Deck would come before Cup because it has one more character, but it would come after Buck because it has the same number of characters. You can adjust the order of these numbers by clicking the Number column header to make it either ascending or descending.
Search pane on the left can be used to filter by Number, BOM Number, SO Number, or Status. Records can also be found by typing in the table. Click the Advanced Search button to search the Custom Fields and the following search options. Manufacture order numbers are listed in this pane first by length (longest first) and then alphabetically (A-Z). For example, 900 would come after 0901 because it has one less digit, but it would come before 901 because it has the same number of digits. And Deck would come before Cup because it has one more character, but it would come after Buck because it has the same number of characters. You can adjust the order of these numbers by clicking the Number column header to make it either ascending or descending.

TABS

The General tab provides the core information for the manufacture order. The following information is available on the General tab:
- Number - The order number will default to the number in the Manufacture Order module options.
- Date Scheduled - The date scheduled will default to the order creation date.
- Location Group - The location group will default to the user's default location group.
- Sales Order - The Sales Order section will be visible if the manufacture order was generated from a sales order.
- Work Orders - The Work Orders section provides a list of work orders on the manufacture order. The work order buttons to the right are used to modify the currently highlighted work order. The Details and Notes tabs below the item list display information for the currently highlighted work order, and allow the quantity, date, location, class, assigned users, priority, etc. to be edited.
- Category - The calendar category can be set on the Schedule tab at the bottom of the module. The Category label can also be customized in the module options.

The Details tab displays details and notes for the manufacture order.
- Date Created - The date the order was created.
- Date Issued - The date the order was issued.
- Date Fulfilled - The date the order was fulfilled.
- Created By - The user who created the order.
- Revision - The number of times the order has been saved.
- Last User - The last user to modify the order.
- Last Modified - The most recent date the order was saved.
- Notes - A field for adding notes to the order. Click the Save button to save notes.


The Configuration tab and the WO Details tab are very similar. Both tabs allow items to be added, removed, or rearranged. However, there is one important difference between the two tabs:
- The Configuration tab is used to modify the configuration BEFORE the manufacture order is issued.
- The WO Details tab appears AFTER the manufacture order is issued, and it allows the work order to be modified.
A work order is created when the manufacture order is issued, meaning the WO Details tab will not be visible until the manufacture order is issued. Before the work order is created, edits can be made on the Configuration tab. As soon as the manufacture order is issued, the Configuration tab will become read-only, and edits can be made on the WO Details tab.

The Memo tab allows memos to be viewed and added to a manufacture order. The top pane displays a list of memos. Highlighting a memo will display the entire memo in the lower pane. The buttons to the right of the memo list can be used to Add, Edit, Delete, or Print a memo.

The Custom tab is used to enter custom fields for a manufacture order. The fields displayed on the Custom tab can be customized in the ![]() Custom Field module. Custom fields can be searched by clicking the Advanced Search button in the manufacture order search pane. Some reports also have Custom Field filters.
Custom Field module. Custom fields can be searched by clicking the Advanced Search button in the manufacture order search pane. Some reports also have Custom Field filters.
MODULE OPTIONS
Some aspects of the ![]() Manufacture Order module can be customized by opening the module, clicking the Tools menu, and then selecting Module Options.
Manufacture Order module can be customized by opening the module, clicking the Tools menu, and then selecting Module Options.

- Next Number
- The characters entered in this field will be used as the next order number. Every time a new order is created, the final group of numbers will be increased by one. For example, Pier1-Order99-LA will be incremented to Pier1-Order100-LA.
- Match MO number to SO number
- When a manufacture order is created from a sales order, this option will set the manufacture order number to the same as the sales order number. If the SO number is already used on an MO then the next auto-generated MO number will be used.
- Distribute Finished Good costs
- When a Work Order has multiple finished goods, the cost of the raw goods must be distributed between the finished goods. There are two options for the default distribution; however with either option, the distribution can be manually adjusted when finishing the Work Order.
- Evenly - The costs will be distributed evenly between each finished good based on the quantity of the finished good.
- Weighted - The cost distribution will be weighted according to the current cost of the finished goods in inventory.
- Example: A Work Order produces 3 WidgetA and 1 WidgetB. The cost of the raw goods is $100. If the costs are distributed evenly between the four finished goods, each one will receive a cost of $25 for a total of $100. For weighted cost distribution, the current cost of the finished goods in inventory is used to adjust the costs proportionally. If WidgetA currently costs three times as much as WidgetB, then the costs on the Work Order will be adjusted accordingly. WidgetB will receive a cost of $10 and each WidgetA will receive a cost of $30 for a total of $100.
- Issue the Manufacture Order when Sales Order is issued
- With this option checked, a Manufacture Order that is auto created from a Sales Order will automatically be issued when the Sales Order is issued.
- Start the pick when starting a Work Order
- If this option is on, flagging a Work Order as started will also flag the pick as started.
- Do not recalculate labor quantities in fulfillment wizard
- When checked, labor quantities will not be adjusted in the consumption step of the WO fulfill wizard.
- Prompt the user when fulfilling if there are no labor raw goods
- If this option is on, a message will be displayed when trying to fulfill an order that doesn't have labor.
- Always use the multiple finished good step
- When finishing a work order with only one finished good, this option shows the wizard step that allows more finished goods to be added.
- Auto-advance to work order finish step
- This option allows the Quick Fulfill wizard to skip over steps that are already completed, such as picking.
- Category Name
- The calendar category label can display customized text.

- Enable manufacture order to purchase order conversion
- This option enables the MO to PO button on the module toolbar which creates purchase orders for the items on a manufacture order.
- Round quantities up to the nearest whole number
- With this option on, the quantity on the purchase order will be the manufacture order quantity rounded up to the nearest whole number.
- Use the manufacture order's UOM on Purchase Order
- With this option checked, the UOM on the purchase order will be the same UOM used on the manufacture order.
- Combine line items of the same part number
- If the manufacture order has the same part multiple times, this option will combine the quantities into one line item on the purchase order.