Data Import
![]() The Data Import module, located in the
The Data Import module, located in the ![]() Integrations group, is an add-on module that can be installed from the
Integrations group, is an add-on module that can be installed from the ![]() Plugin module. After installing the plugin, a new module is added that allows files to be imported, even if the column headers don't match the Fishbowl format. This allows many external files to be imported into Fishbowl without modification, including .IIF files from Intuit.
Plugin module. After installing the plugin, a new module is added that allows files to be imported, even if the column headers don't match the Fishbowl format. This allows many external files to be imported into Fishbowl without modification, including .IIF files from Intuit.
Install
The documentation on this page is for the most recent version of the ![]() Data Import plugin. To get the most recent version, Update Fishbowl.
Data Import plugin. To get the most recent version, Update Fishbowl.
- In any Fishbowl Client, open the
 Plugin module, located in the
  Integrations group.
 - Select the
 Data Import plugin and click Install.
 - Completely close all Fishbowl Clients.
- Exit the Fishbowl Server by right-clicking the Fishbowl Server tray icon and selecting Exit.
- After re-opening the Fishbowl Server, the admin user can access the Data Import module from any Fishbowl Client by opening the Integrations group.
- To grant access to additional users, assign the Data Import-Full Rights access right to the appropriate groups in the
 User Group module.
Import
- Open the Data Import module, located in the Integrations group.
- Click the
 New button and select the type of CSV that will be imported.
- Browse to the CSV file and then click OK.
- Column headers in the file that match the Fishbowl format exactly will be automatically selected. Column headers that don't match can be selected from the dropdown.
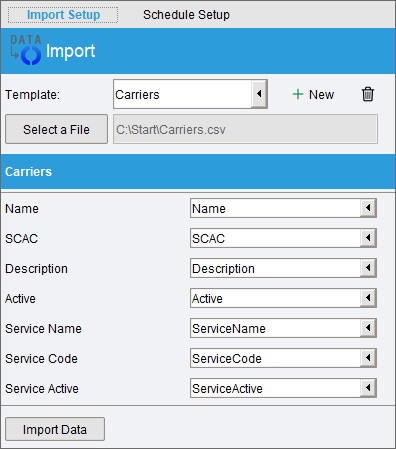
- Click the Import Data button at the bottom to complete the import.


Instructions for each individual import can be found by clicking the File menu in the Fishbowl Client and selecting Import. Instructions can also be found here.
Schedule
- Once an import template has been created, click the Schedule Setup tab and click the
 Add button to create a scheduled task.
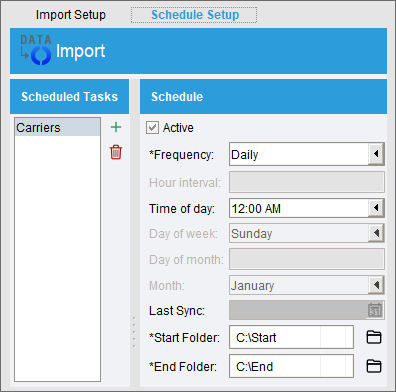
- The Start and End folders allow a successfully imported source file to be moved to the End directory so that it does not get imported again. The folders must be accessible from the Fishbowl Server computer.
- Click the
 Save button at the top of the module to save the schedule.
 - To manually run the schedule, or to see the history, open the
 Schedule module.

Module buttons
The ![]() Import button will be added to many modules (Inventory, Part, Product, Vendor, Customer, Sales Order, Carrier, User, User Group, etc.). Clicking the
Import button will be added to many modules (Inventory, Part, Product, Vendor, Customer, Sales Order, Carrier, User, User Group, etc.). Clicking the ![]() Import button from one of these modules will open an import dialog with the correct import already selected.
Import button from one of these modules will open an import dialog with the correct import already selected.
Troubleshooting
- The import tool does not support files with multiple rows of header data.
- Supported file types include .csv, .xls, .xlsx, and .iif from Intuit.