BigCommerce
From Fishbowl Advanced
 The BigCommerce module, located in the
 Integrations group, is an add-on module that can be installed from the
 Plugin module. After installing the plugin, a new module is added that integrates with BigCommerce. Additional connections can also be purchased to connect to multiple BigCommerce accounts.
Install
The documentation on this page is for the most recent version of the BigCommerce plugin. To get the most recent version, Update Fishbowl.
- In any Fishbowl Client, open the Plugin module, located in the Integrations group.
- Select the
 BigCommerce plugin and click Install.
- Completely close all Fishbowl Clients.
- Exit the Fishbowl Server by right-clicking the Fishbowl Server tray icon and selecting Exit.
- After re-opening the Fishbowl Server, the admin user can access the BigCommerce module from any Fishbowl Client by opening the Integrations group.
- To grant access to additional users, assign the BigCommerce-View access right to the appropriate groups in the
 User Group module.
Setup

Complete the steps below to configure the BigCommerce integration.
- Log into your BigCommerce account using an admin user account, and click the Settings menu in the control panel on the left side of the screen.
- Scroll all the way down to the API section, and select Store-level API accounts.
- Click the Create API Account button to obtain API credentials for your Fishbowl integration.
- Enter identifying text for your Fishbowl integration into the Name field.
- Select the OAuth Scopes configuration to match what is shown in the image to the right, and then click Save.
- Copy the API Path, Client Id, and Access Token from the BigCommerce website.
- Click the
 Settings button on the module toolbar of the BigCommerce module and paste the information from the previous steps.
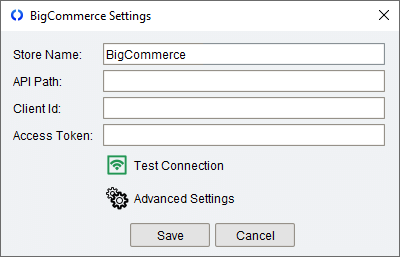
- Click the
 Test Connection button and verify that the connection to the BigCommerce website is working.
- Click the Save button at the bottom of the window to save the BigCommerce settings.


TABS
Several plugins in Fishbowl have a standardized layout. Some of the images below show the options that are most common between all plugins. Any additional  BigCommerce options or notes are included at the bottom of each section.
Order Import

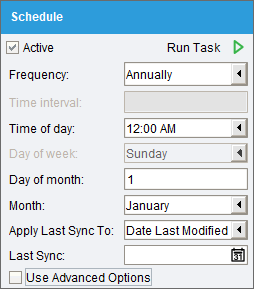
- Schedule - Select the
 Active checkbox to import orders on a set schedule. Click the
 Run task button to run the scheduled task right now. Data that has changed since the Last Sync date will be synchronized. This date will be updated automatically after a sync, or it can be manually edited to adjust which data will be synchronized. If additional options are available, they can be enabled by selecting Use Advanced Options at the bottom of the Schedule section.