Reorder Report: Difference between revisions
m (→Optional: I added a bullet point about items with no order points to this list.) |
m (I added two small changes at the start and end.) |
||
| Line 1: | Line 1: | ||
The '''Reorder''' report generates a list of items that have quantities below their reorder points.{{ReportImage}} | The '''Reorder''' report generates a list of items that have quantities below their reorder points.{{ReportImage}} | ||
When you open the '''Reorder''' report in the '''Reports''' module, all inventory items that need to be reordered will appear in it. In addition to the '''Reports''' module, you can access this report in the '''Inventory''' module. Click on an inventory item, and then click the {{Icon Button|More}} in the action bar. Click '''Show Report''' to bring up four options. Select '''Reorder''', and it will generate a report for the inventory item you clicked on. | |||
You will see the following column headers at the top of this report: | You will see the following column headers at the top of this report: | ||
| Line 30: | Line 30: | ||
To select all of the status fields at once, click the '''Select All Optional''' checkbox. The '''Select All Optional''' checkbox won’t affect the two dropdown menus under the '''Optional''' header. Those will have to be updated manually. To search for an option in a dropdown menu, click in that field and begin entering text. It will show all options that have that text in them. | To select all of the status fields at once, click the '''Select All Optional''' checkbox. The '''Select All Optional''' checkbox won’t affect the two dropdown menus under the '''Optional''' header. Those will have to be updated manually. To search for an option in a dropdown menu, click in that field and begin entering text. It will show all options that have that text in them. | ||
To apply your changes and see what they look like in the report, click the '''GENERATE REPORT''' button on the bottom-right. And follow the directions at the top of | To apply your changes and see what they look like in the report, click the '''GENERATE REPORT''' button on the bottom-right. And follow the directions at the top of the main '''Reports''' article to save your changes to a '''Preset'''. | ||
Latest revision as of 07:55, 22 December 2023
The Reorder report generates a list of items that have quantities below their reorder points.
←Back to list of reports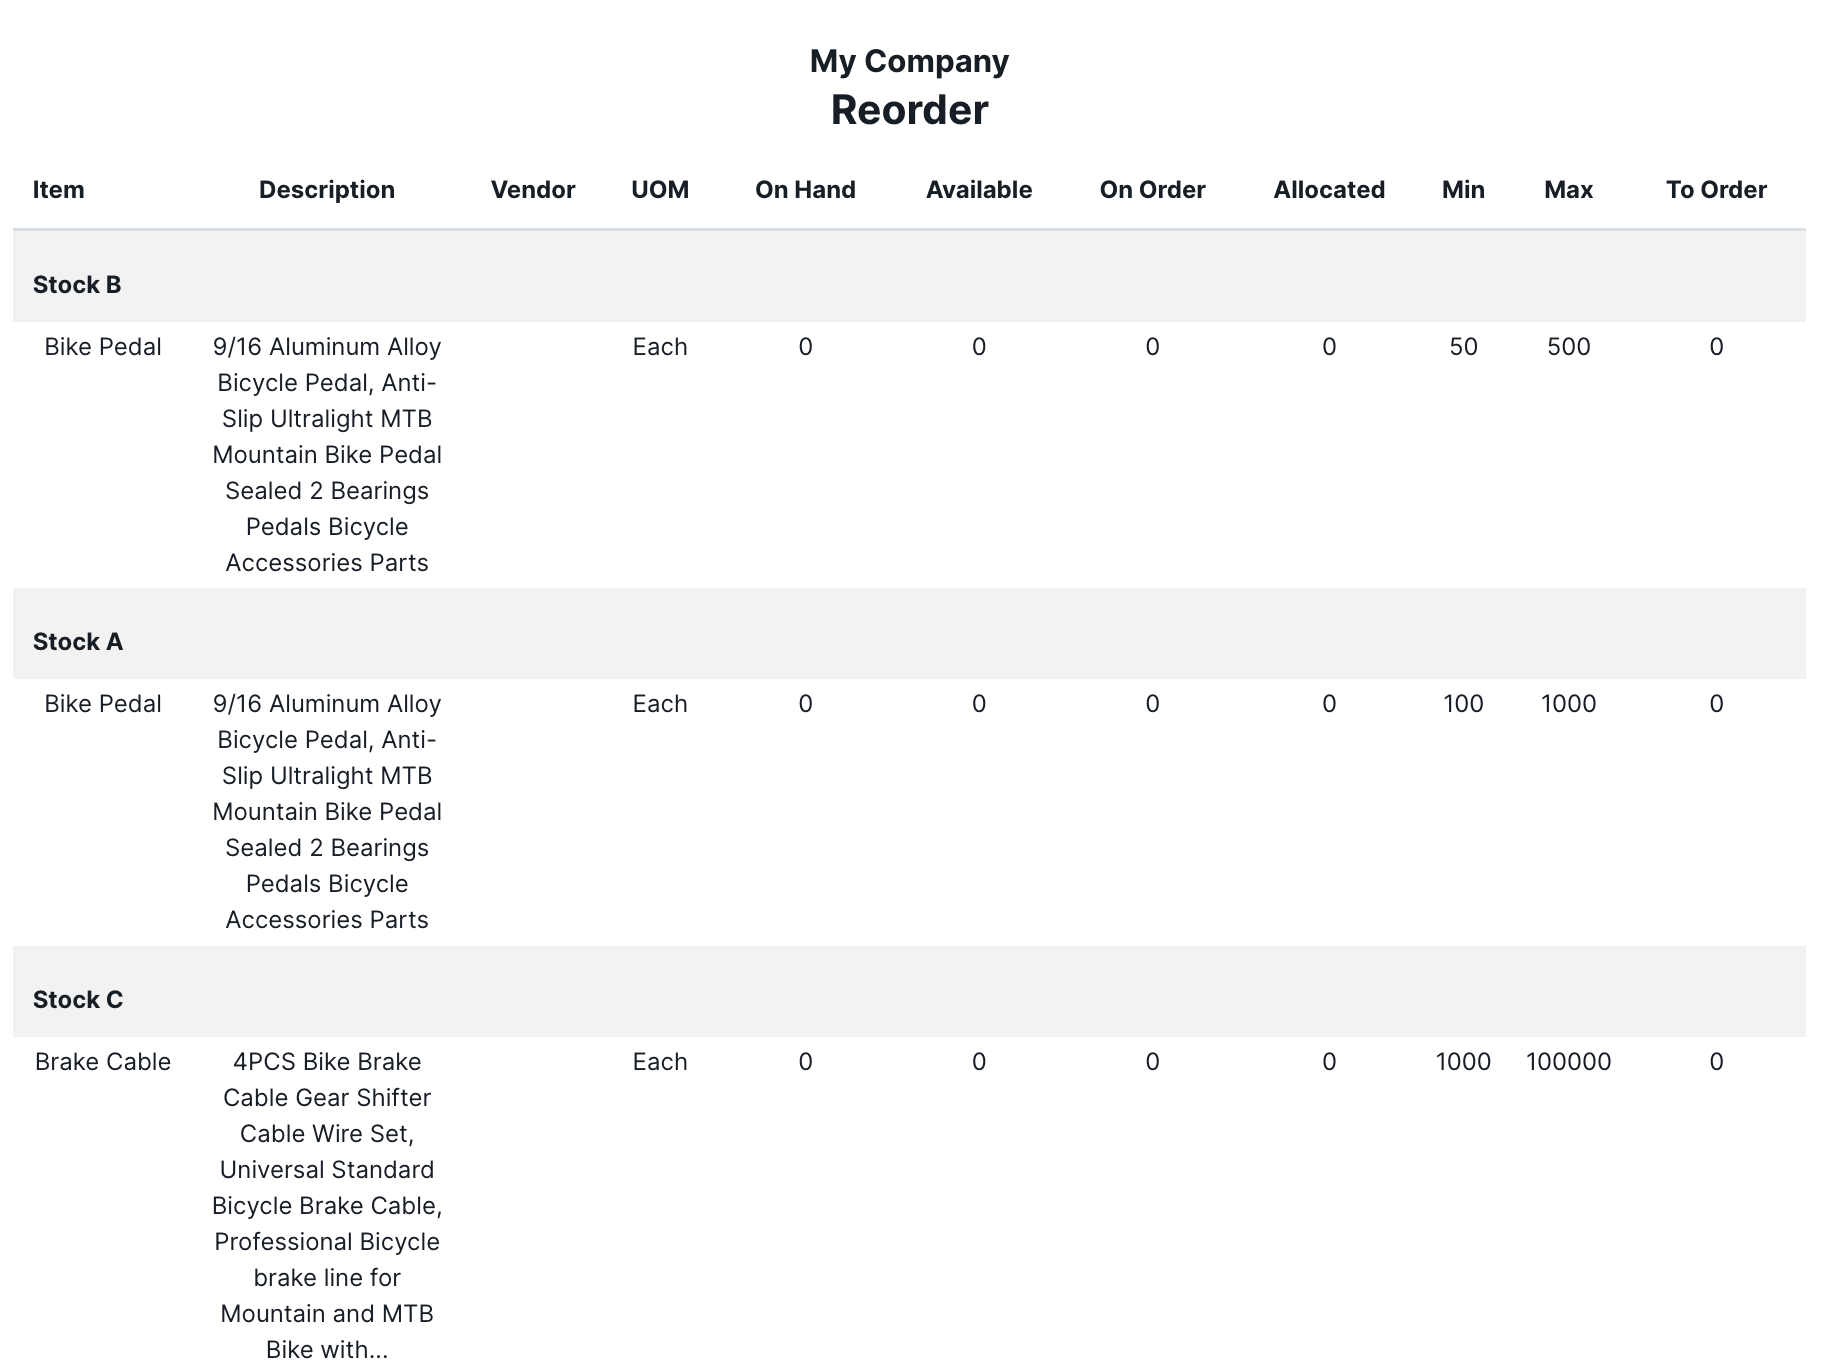
When you open the Reorder report in the Reports module, all inventory items that need to be reordered will appear in it. In addition to the Reports module, you can access this report in the Inventory module. Click on an inventory item, and then click the  More button in the action bar. Click Show Report to bring up four options. Select Reorder, and it will generate a report for the inventory item you clicked on.
You will see the following column headers at the top of this report:
- Item - The name of an item which has an Available quantity that is below its Min quantity in the Inventory module.
- Description - An explanation of an item from what is written in the General tab of the Items module.
- UOM - The unit of measure attached to an item.
- On Hand - The number of units of an item that are currently in stock.
- Available - The number of units of an item that can be sold. This quantity is calculated as On Hand - Allocated.
- On Order - The number of units of an item that are currently on a purchase order, but which haven’t been received yet.
- Allocated - The number of units of an item that are assigned to various orders. This includes inventory on issued sales orders and purchase orders.
- Min - The lowest number an item’s Available quantity can be at. Anything lower will trigger a notification that it’s time to reorder.
- Max - The highest number an item’s Available quantity can be at after it is reordered. This places a cap on the reorder quantity.
- To Order - The number of units that need to be reordered to bring an item back to an appropriate Available quantity.
By default, you will be able to see all items that need to be reordered at all locations in the Reports module. But you can narrow down the results to a single item and/or location by using the Optional features on the right of the report.
Optional
These are the Optional fields that you can use to modify the report:
- Location - A dropdown menu to select a single location to see items that need to be reordered at it. You can create a new location by entering a name for the location in the textbox and hitting Enter or clicking the + Add option. Then fill out the New Location wizard that pops up.
- Item - A dropdown menu to select a single item to see in the report. You can create a new item by entering a name for the item in the textbox and hitting Enter or clicking the + Add option. Then fill out the New Item wizard that pops up.
- Show Default Vendor - A checkbox that adds a Vendor column header in between the Description and UOM columns.
- Show All Reorder Items - A checkbox that displays all items that are below their Max quantity, even if they are not below their Min quantity.
- Show Item Description - A checkbox that adds the Description column header to the report. This is checked by default.
- Include Items with No Reorder Point - A checkbox that adds all items, which do not have min and max quantities, to this report. Normally, these items are left off the report, but this changes that so you can see if they have low quantities.
To select all of the status fields at once, click the Select All Optional checkbox. The Select All Optional checkbox won’t affect the two dropdown menus under the Optional header. Those will have to be updated manually. To search for an option in a dropdown menu, click in that field and begin entering text. It will show all options that have that text in them.
To apply your changes and see what they look like in the report, click the GENERATE REPORT button on the bottom-right. And follow the directions at the top of the main Reports article to save your changes to a Preset.