Shipping Integration
The ![]() Fishbowl ShipExpress module and the
Fishbowl ShipExpress module and the ![]() ShipStation module integrate with nearly all carriers. Alternatively, Fishbowl can integrate with programs like FedEx and UPS WorldShip by utilizing a technology called Open Database Connectivity or ODBC.
ShipStation module integrate with nearly all carriers. Alternatively, Fishbowl can integrate with programs like FedEx and UPS WorldShip by utilizing a technology called Open Database Connectivity or ODBC.
ODBC setup for MySQL 5.7
Fishbowl runs on a database management system called MySQL. MySQL has an ODBC Driver that allows other programs, like FedEx and WorldShip, to connect with the Fishbowl database. To set up the ODBC connection, complete the steps below on each computer that will be using a shipping application.
64-bit note: Some shipping applications are 32-bit, so the following instructions are for the 32-bit connector. However, if needed, the 64-bit connector can be downloaded (by clicking here) and configured in the 64-bit administration window (located at C:\Windows\System32\odbcad32.exe).
- Download the 32-bit ODBC Windows MSI installer by clicking here.
- Complete the MySQL ODBC installer by selecting the Typical installation.
- Open ODBC Data Sources (32-bit). On newer versions of Windows, this can be found by pressing the Windows key and typing ODBC 32. On older versions of Windows, open C:\Windows\SysWOW64\odbcad32.exe.
- Click the System DSN tab and then click the Add button.

- Select the MySQL ODBC 5.3 Unicode Driver and then click Finish.
- A new MySQL ODBC Setup window will appear. Enter the following information in the appropriate fields:
- Data Source Name (DSN): Fishbowl
- TCP/IP Server: For the server computer, enter localhost. For client computers, enter the IP address of the Fishbowl Server computer, for example: 192.168.1.10.
- Port: Fishbowl uses port 3305 for MySQL 5.7.
- Database: Select the database name displayed when double-clicking the Fishbowl Server tray icon.

- Click the Test Connection button to verify the connection is successful and then click OK.


ODBC setup for MySQL 8.0
If you have run the installer for Fishbowl 2023.11 or higher, you are now using MySQL 8.0.
- Download the MySQL 8.0 ODBC Windows MSI installer by clicking here.
- Complete the MySQL ODBC installer by selecting the Typical installation.
- Open ODBC Data Sources by pressing the Windows key and typing ODBC.
- Click the System DSN tab and then click the Add button.
- Select the MySQL ODBC 8.0 Unicode Driver and then click Finish.
- A new MySQL ODBC Setup window will appear. Enter the following information in the appropriate fields.
- Data Source Name (DSN): Fishbowl
- TCP/IP Server: For the server computer, enter localhost. For client computers, enter the IP address of the Fishbowl Server computer, for example: 192.168.1.10.
- Port: Enter port 3306 for MySQL 8.0 (not 3305)
- Database: Select the database name displayed when double-clicking the Fishbowl Server tray icon.
- Click the Test Connection button to verify the connection is successful and then click OK.
ODBC troubleshooting
Below is some troubleshooting information for the ODBC setup.
- Make sure that the ODBC connection, named Fishbowl, is only set up in one of the two available places. You can set up other connections to the Fishbowl database for other purposes, but DO NOT name them Fishbowl.
- The firewall may be blocking the MySQL port (3305 for MySQL 5.7 or 3306 for MySQL 8.0). (WARNING: Opening firewall ports can potentially be a security risk. For more information, we recommend consulting with your IT professional.) On the Fishbowl Server computer, go to Control Panel, System and Security, Windows Firewall. Click on Advanced Settings on the left-hand side, and this will open a screen where you can set up rules to unblock port 3305 (MySQL 5.7) or 3306 (MySQL 8.0). Click Inbound Rules, and then click New Rule on the right-hand side. Choose Port, then choose TCP and enter 3305 or 3306 as the specific port. Choose Allow the Connection in the next screen, choose All in the next screen, and then name it Fishbowl 3305 TCP. Repeat these steps for UDP. Click Finish and you are done, after you have created both. Now go back to the client computer and click Test Connection.
FedEx integration
Follow the steps below to complete the FedEx integration:
- Complete the ODBC setup.
- Install the latest version of FedEx Ship Manager. The installer can be downloaded from here.
- Turn on the ability to show hidden files.
- Download the .xml files and an explanation file by clicking here. Services will map by the numerical code shown before the service in the image below.

- Paste the .xml files into the FedEx Profiles folder. The location of the Profiles folder varies with different versions, but is typically in one of the following locations.
- C:\ProgramData\FedEx\Integration\Profiles
- C:\Documents and Settings\All Users\Application Data\FedEx\Integration\Profiles
- Open FedEx Ship Manager.
- Click the Integration menu and select FDXShipNum.
- The Lookup Value window will appear. If not, ensure the ODBC driver is installed correctly. Enter the sales order number and click OK.

- NOTE: The sales order must be in the Shipping module to show up in FedEx, and the order number must be entered exactly as it appears in Fishbowl.
- The order should have now pulled in. If the carton weight was set in Fishbowl, this will pull into FedEx. Otherwise, the weight can be added in FedEx. Once the information is correct, click Ship. This will print a label and send the tracking number, cost, and updated weight back into Fishbowl to finish.


FedEx troubleshooting
Below is some troubleshooting information for the FedEx integration.
Very slow import
- This is caused by the phone number customer contact mapping. This is mapped to the CUSTOMERCONTACTVIEW table in the database, and if there is a lot of information stored there, it can take a long time to run. The way to fix this is to disconnect the phone number mapping or use the FishbowlSingleFast mapping file that is already built without that mapping.
Mapping Files not showing up under Integration
- The ODBC is not named Fishbowl. Go rename the ODBC connection to Fishbowl, then retry.
- If there are multiple ODBC connections named Fishbowl, this can break the integration. Check to make sure the ODBC is only set up in the 32-bit data sources. Also, check under the User DSN tabs to make sure it is not set up there either. Remove ALL instances of an ODBC connection named Fishbowl except for the connection that is set up in the correct spot. (If more than one connection to the Fishbowl database is needed, you can set it up, just DO NOT name it Fishbowl.)
- Mapping files are not in the correct folder.
- In the current FedEx Ship Manager version, the default folder for the mapping files is C:\ProgramData\FedEx\Integration\Profiles. The ProgramData folder is a hidden folder, so you will need to change your folder view options to Show hidden files, folders, and drives.
- If the above file path does not exist, we recommend manually creating a simple mapping file named findme or something similar, and then search your drive for that name. (Example: findme.xml) For steps on how to create a simple mapping file, click here.
Mapping Files disappearing after FedEx restart
- This is caused by a FedEx process remaining open. Close FedEx and then open the Task Manager and go to the processes tab. Look for IASE.exe and end all instances of it. Then reopen FedEx, and the mapping will show up.
- If the above step does not fix the problem, it is more than likely an install issue. Try reinstalling FedEx Ship Manager.
Order Not Found Import error
- ODBC – Wrong database
- You may have already checked the ODBC setup and the Test Connection was successful, but it could be pointed to the wrong Fishbowl database. Doublecheck the IP address for the Fishbowl Server and the local database path to the Fishbowl database, and then fix the ODBC setup.
- Address Issues
- First, check to make sure there is a country listed on the address. This is the number one reason the import will fail.
- Second, check to make sure the rest of the address is in its proper place. We have noticed orders where all of the street, city, state, zip, and country information is listed in the Street address field in the
 Sales Order module. In instances like this, when looking at the sales order, you may think it all looks fine, but if you click Edit to edit the address, you will see that everything is listed in the Street address field.
 - If, by chance, you never assign countries to addresses in Fishbowl, you can disconnect the Country mapping in the FedEx mapping file so that it's not required. To do this, follow these steps listed here.
- Order #
- FedEx only allows numeric order numbers. Alpha-numeric order numbers will not import into FedEx.
Cannot export tracking information
- If you receive an error in which FedEx cannot export the tracking information back to Fishbowl, or the information just doesn't show up in Fishbowl after shipping the order in UPS or FedEx, check the following things:
- In Fishbowl, reopen the sales order number in question from the search pane on the left of the Shipping module. This will refresh the order and show any changes that were made to the order, like the tracking information being exported.
- If you're using UPS, make sure that "Fishbowl Export" is selected under the Import/Export Data > Automatic Export After Processing Shipment menu.
- If you still have issues after checking those things, contact technical support.
Freight
- We currently do not offer any LTL Freight mappings.
Two Fishbowl Databases – One FedEx Ship Manager install.
- Follow these steps to set up the second database connection/mapping:
- First, set up a second ODBC connection by following the same ODBC setup steps listed here. Instead of naming it Fishbowl, name it Fishbowl1.
- After that is set up, you will have two mapping files that you will switch between under Integration: FishbowlSingle and FishbowlSingle_1.
- Unlike UPS, the mapping file contains both the import and export, so you do not have to worry about changing both the import and export files to the company connection you want.
Alphabetic characters Currently, alphabetic characters will not work in some fields. Fishbowl is in the process of getting shipnum to work, which should resolve this limitation.
Follow the steps below to create a new FedEx mapping.
- Go to Integration.
- Choose FedEx Integration Assistant.
- Click Continue twice.
- Choose Create a new profile.
- Click Continue.
- Choose Import.
- Click Continue.
- Choose ODBC and choose Fishbowl from the list.
- Choose Single Edit.
- Click Continue and click Continue again.
- Click on Recipient and check the checkbox for Address 1. Click OK.
- Click Continue.
- Under the Table dropdown, choose ACCOUNT. Under the Field dropdown, choose ID.
- Click Continue.
- A box will pop up asking for a key index. Highlight ID under ACCOUNT, and then click on the Lookup dialog box box. A colored line will be created. Click OK.
- Click Continue and Continue again.
- Click Finish.
- Choose to save the file, and name it FINDME. Now you can go search for that file.
Follow the steps below to remove the country mapping from FedEx.
- Go to Integration.
- Choose FedEx Integration Assistant.
- Click Continue twice.
- Choose the mapping file you want to modify (Fishbowl Single).
- Click Continue.
- Click Import at the top of the screen.

- Choose Information.

- Click on Recipient and uncheck the checkbox for Country. Click OK.

- Click on the Finish tab at the top of the screen, then click Continue, and finally click Finish. You will be prompted to save. Choose Yes and finish that out. You can now go try the import again.


UPS integration
The instructions below are for integrating with UPS WorldShip, which requires additional software and configuration.
Follow the steps below to complete the UPS WorldShip integration:
- Complete the ODBC setup.
- Install the latest version of UPS WorldShip. The installer can be downloaded by completing this form.
- Download the .dat files and an explanation file by clicking here.
- Paste the .dat files into the UPS Shipment folder. The location of the Shipment folder varies with different versions, but is typically in one of the following locations.
- C:\UPS\WSTD\ImpExp\Shipment
- C:\UPS\UOWS\ImpExp\Shipment
- C:\ProgramData\UPS\WSTD\ImpExp\Shipment
- Open UPS WorldShip.
- Click the Import/Export Data menu, click Automatic Export After Processing Shipment, and then click More.
- Select Fishbowl Export from the list and click Export.
- Click on Import/Export Data menu, click Automatic Export During End of Day, and then click More.
- Select Fishbowl Export from the list and click Export.
- Click on Import/Export Data menu, click Keyed Import, and then click More.
- Select FishbowlSO, FishbowlPO, or FishbowlXO (Sales Order, Purchase Order, or Transfer Order) from the list and click Import.
- The Enter Import Key window will appear. If not, ensure the ODBC driver is installed correctly. Enter the sales order number and press Enter on the keyboard.

- NOTE: The sales order must be in the Shipping module to show up in UPS, and the order number must be entered exactly as it appears in Fishbowl.
- The order should have now pulled in. If the carton weight was set in Fishbowl, this will pull into UPS. Otherwise, the weight can be added in UPS. Once the information is correct, click Process Shipment. This will print a label and send the tracking number, cost, and updated weight back into Fishbowl to finish.

Click here for UPS troubleshooting information.
UPS troubleshooting
Below is some troubleshooting information for the UPS integration.
Mapping files not showing up under Keyed Import
- The ODBC is not named Fishbowl.
- If there are multiple ODBC connections named Fishbowl, this can break the integration. Check to make sure the ODBC is only set up in the 32-bit data sources. Also, check under the User DSN tabs to make sure it is not set up there either. Remove ALL instances of an ODBC connection named Fishbowl except for the connection that is set up in the correct spot. (If more than one connection to the Fishbowl database is needed, you can set it up, just DO NOT name it Fishbowl.)
- Another reason the mapping files will be missing is because the \ImpExp\Shipment folder doesn't exist in the regular spot. Creating this file path manually will not resolve the issue. During the UPS install, a different file path was designated for the mapping files' storage location. To find this location, go to C:\Windows and scroll to the bottom of the folder list. Open wstdUPSWSHIP with Notepad, and then look at the Netpath listing. This will tell you where to browse and place the mapping files.
Order Not Found Import error
- ODBC – Wrong database
- You may have already checked the ODBC setup, and the Test Connection was successful, but it could be pointed to the wrong database. Doublecheck the IP address for the Fishbowl Server and the local database path to the Fishbowl database, and then fix the ODBC setup.
- Address Issues
- First, check to make sure there is a country listed on the address. This is the number one reason the import will fail.
- Second, check to make sure the rest of the address is in its proper place. We have noticed orders where all of the street, city, state, zip and country information is listed in the Street address field in the Sales Order module. In instances like this, when looking at the sales order, you may think it all looks fine, but if you click Edit to edit the address, you will see that everything is listed in the Street address field.
- If, by chance, you never assign countries to addresses in Fishbowl, you can disconnect the Country mapping in the UPS mapping file so that it's not required. To do this, follow these steps.
- In UPS WorldShip, click Import/Export Date and choose Create/Edit Map.
- Select FishbowlSO from the list and click Edit. (Or the mapping file you use.)
- At the bottom of the screen you will see a list of mappings. Highlight COUNTRYCONST::ABBREVIATION ---Ship To::Country/Territory and click Disconnect.
- Click OK, restart UPS, and import that order. Tada!
Found multiple records
- In the event that UPS has "found multiple records," you will need to manually edit the package information after importing and before processing labels. UPS will only import the original shipment, and will therefore export carton tracking number(s), cost(s), and weight(s) back to that shipment rather than the current one. This occurs even if the original shipment has already been fulfilled, possibly weeks prior. Follow these steps to avoid this potential problem:
- Delete all values from the Ref 2 field in WorldShip. These numbers refer to the specific cartons, which are from the original shipment. The correct Ref 2 codes cannot be imported.
- Correct the shipping service class and package weight(s) if necessary.
- Process the shipment, and manually copy the resulting tracking number and cost into Fishbowl.
Cannot export tracking information
- If you receive an error that UPS cannot export the tracking information back to Fishbowl, or the information just doesn't show up in Fishbowl after shipping the order in UPS or FedEx, check the following things:
- In Fishbowl, reopen the sales order number in question from the search pane on the left of the Shipping module. This will refresh the order and show any changes that were made to the order, like the tracking information being exported.
- If you're using UPS, make sure that "Fishbowl Export" is selected under the Import/Export Data > Automatic Export After Processing Shipment menu.
- If you still have issues after checking those things, contact technical support.
Mail Innovations Shipments
- The Fishbowl UPS WorldShip integration is not set up to work with Mail Innovations at this point in time. You can still use the FishbowlSO.dat import to import order information from Fishbowl to UPS, but you cannot use the Fishbowl Export to export tracking numbers, cost, and weight back to Fishbowl from UPS for these type of orders.
Freight Shipments
- Because of the changes that UPS makes to the WorldShip program after you check the Freight checkbox for an order, the Fishbowl UPS WorldShip integration is unable to export tracking, cost, weight, etc. back to Fishbowl from UPS for freight shipments. You are able to use the FishbowlSO.dat import to import order information from Fishbowl into UPS.
Keyed Import box not showing up
- Dual monitors can be a big hassle with this little box. We recommend you always and only use UPS WorldShip on your primary monitor, and then you shouldn't have any issues with finding this box.
- Corrupt UPS install. Try uninstalling and reinstalling UPS WorldShip.
- If all else fails, call UPS tech support. Where this is a WorldShip issue, you will want to contact them. When getting help, you will want to avoid mentioning the integration with Fishbowl or they will be tempted to pass you off and not help you. UPS can more efficiently help you if you speak with them only about WorldShip issues.
Export Failing after processing the shipment
- This error means that there is a record stuck in the SHIPPINGIMPORT table of the database. Call into Fishbowl Support at 1-800-774-7085 x3 to have a technician remote in and fix this through the database, and then the exports will start working again.

Two Fishbowl Databases – One UPS WorldShip install
- This is possible but needs careful attention so that something isn't missed. Honestly, it's better to have UPS WorldShip installed on two different computers and set up the mappings accordingly, one for each database.
- But if there can only be one shipping computer, follow these steps to set up the second database connection/mapping:
- First, set up a second ODBC connection by following the same ODBC setup steps listed here. Instead of naming it Fishbowl, name it Fishbowl1.
- Now the tricky and most vital part of all of this.
- Depending on what database you want to work in, you have to change TWO settings EVERY TIME.
- Go to Import/Export Data > Automatic Export After Processing Shipment and choose the export file you want to use: Fishbowl Export or Fishbowl1Export.
- Next, go to Import/Export Data > Keyed Import and choose the Import file you want to use: FishbowlSO or Fishbowl1SO. (MAKE SURE THIS SELECTION MATCHES WHAT YOU CHOSE UNDER Automatically Export after processing a shipment.)
Endicia integration
Follow the steps below to complete the Endicia integration.
Order Lookup
- Complete the ODBC setup.
- Download and install Endicia Professional and Dazzle from here.
- Open Endicia Professional and enter your Account Number, Pass Phrase, and Address.
- Click the Edit menu, choose Preferences, click the Data Source and Post-Back tab, and then click the Configure button next to Order Lookup (or click here for Batch Print instructions).

- Click the New button in the Data Source area.

- Click Next, choose the ODBC data source option, and then click Next.

- Select Fishbowl from the dropdown and enter your username and password. Then click Next and OK to complete the wizard.
- If the Create a SELECT Statement window pops up, click Cancel to dismiss it.

- Click the Advanced Editor button in the SELECT Statement area.

- Paste ONE of the following queries into SQL Editor window and then click OK.
QUERY FOR IMPORTING WITH SALES ORDER NUMBER
SELECT so.num AS ordernumber, shipcarton.id as groupcode, so.cost, shipcarton.freightweight as weight, so.customercontact as name, so.shiptoname AS company, so.shiptoaddress as address1, so.shiptocity as city, stateconst.code as state, so.shiptozip as postalcode, countryconst.abbreviation as country, carrier.name as carrier, shipcarton.cartonnum, so.email as email, so.phone as phone
FROM so
LEFT JOIN countryconst ON so.shiptocountryid=countryconst.id
LEFT JOIN stateconst ON so.shiptostateid=stateconst.id
LEFT JOIN carrier ON so.carrierid=carrier.id
LEFT JOIN shipcarton ON so.id=shipcarton.orderid
LEFT JOIN customercontactview ON so.customerid=customercontactview.custid
JOIN customer ON so.customerid=customer.id JOIN account ON customer.accountid=account.id
LEFT JOIN carrierservice ON carrierservice.id=so.carrierserviceid
WHERE so.num='$ORDERNUMBER' AND ordertypeid=20
QUERY FOR IMPORTING WITH SHIP NUMBER
SELECT ship.num AS ordernumber, so.num AS sonum, shipcarton.id as groupcode, so.cost, shipcarton.freightweight as weight, so.customercontact as name, so.shiptoname AS company, so.shiptoaddress as address1, so.shiptocity as city, stateconst.code as state, so.shiptozip as postalcode, countryconst.abbreviation as country, carrier.name as carrier, shipcarton.cartonnum, so.email as email, so.phone as phone
FROM ship
LEFT JOIN so ON ship.soid = so.id
LEFT JOIN countryconst ON so.shiptocountryid=countryconst.id
LEFT JOIN stateconst ON so.shiptostateid=stateconst.id
LEFT JOIN carrier ON so.carrierid=carrier.id
LEFT JOIN shipcarton ON so.id=shipcarton.orderid
LEFT JOIN customercontactview ON so.customerid=customercontactview.custid
JOIN customer ON so.customerid=customer.id JOIN account ON customer.accountid=account.id
LEFT JOIN carrierservice ON carrierservice.id=so.carrierserviceid
WHERE ship.num='$ORDERNUMBER' AND ship.ordertypeid=20 - Select the following fields in the Connected Fields area:
- Select the following fields on the Package Details tab:

Make sure to check the Weight is in pounds checkbox. - If desired, the shipping carrier selected on the Fishbowl order can be imported and mapped to Endicia's mail class. If this step is skipped, Endicia will not import the carrier from Fishbowl and will instead use whatever service is currently selected in Endicia's Mail Class field. The mail class can always be changed prior to printing the label. To import the carrier that is selected on the Fishbowl order, click the Edit Mail Class Codes button. In the textbox, enter the name of the carrier in Fishbowl. In the dropdown, select the Endicia Mail Class that corresponds to the Fishbowl carrier and then click the + button. Additional Fishbowl carriers can be created in the
 Carrier module.
- Select the following fields on the Recipient Address tab:

- Select the following fields on the Rubber Stamps tab:

- OPTIONAL: Select CUSTOMEREMAIL in the Email field on the Recipient Address tab to automatically send emails via Dazzle.
- OPTIONAL: Select the BILLTO fields on the Return Addresses tab to bring in a different return address.
- Select the following fields on the Package Details tab:
- Click OK to close the Order Lookup Data Map window, then click the Configure button in the Post-Back Data section.
- Click the New Data Map button in the top-left corner of the Post Back Data Map window.

- Click Next, choose the ODBC data source option, and then click Next.
- Select Fishbowl from the dropdown and enter your username and password. Then click Next and OK to complete the wizard.
- Click the Select button to the right of the table field and choose the SHIPPINGIMPORT table.

- Select the following fields on the Package Details tab.

Make sure to check the Weight is in pounds checkbox. - Click OK to close the Post Back Data Map window, and then click the Options button in the Post-Back Data area.
- Place a checkmark next to Automatically post back data.

- Click OK to close the Post-Back Options window, and then click OK to close the Preferences window.
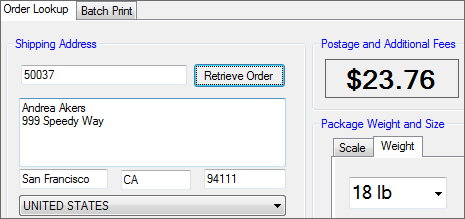
- Click the Order Lookup tab in the main window, enter a sales order number, and then click the Retrieve Order button to retrieve the order from Fishbowl.


Batch Print
The steps for batch print are identical to those listed for Order Lookup, with the following changes:
- For Step 3, click the Configure button next to Batch Print.
- For Step 9, use the query listed below.
SELECT so.id, so.num AS ordernumber, so.customercontact AS name, so.shiptoname AS company, so.shiptoaddress AS address1, so.shiptocity AS city, so.cost, stateconst.code AS state, countryconst.abbreviation AS country, so.shiptozip AS postalcode, carrier.name AS carrier, shipcarton.freightweight AS weight, shipcarton.id as groupcode, shipcarton.cartonnum FROM so LEFT JOIN ship ON ship.soid=so.id LEFT JOIN countryconst ON so.shiptocountryid=countryconst.id LEFT JOIN stateconst ON so.shiptostateid=stateconst.id LEFT JOIN shipcarton ON ship.id=shipcarton.shipid LEFT JOIN carrier ON so.carrierid=carrier.id WHERE carrier.name='USPS' AND ship.statusid=20 AND shipcarton.ordertypeid=20
Click here for Endicia troubleshooting information.
Endicia troubleshooting
Below is some troubleshooting information for the Endicia integration.
Two Fishbowl Databases – One Endicia Account
- This is possible but needs careful attention so that something isn't missed. Honestly, it's better to have Endicia installed on two different computers and set up the mappings accordingly, one for each database.
- But if there can only be one shipping computer, follow these steps to set up the second database connection/mapping:
- First, set up a second ODBC connection by following the same ODBC setup steps listed here. Instead of naming it Fishbowl, name it Fishbowl1 (or Fishbowl *other company name*. Example: Fishbowl Apex).
- Once that is set up, follow the same Endicia setup steps listed here. Instead of choosing the Fishbowl connection, choose Fishbowl1 (or whatever you named it).
- Now the tricky and most vital part of all of this.
- Depending on what database you want to work in, you have to change TWO settings EVERY TIME.
- Go to Edit > Preferences > Database tab.
- First, click Edit Order Lookup Data Map.
- Under Data Source, choose the database you want to work in and click OK.
- Then click Edit Post-Back Map.
- Click the folder button called Open Data Map, choose the database you want to use, and click OK. (MAKE SURE THIS SELECTION MATCHES WHAT YOU CHOSE UNDER Edit Order Lookup Data Map.)
Post back error (Error image below)

- When you receive this error while processing a shipment, it is because the order, in Fishbowl, has not reached the Shipping module (has not been finished in picking). Here are the steps to take:
- Log into the Fishbowl Client and go to the Shipping module. Search for the order number; it will not be there.
- Go to the Picking module and pull up that order. Finish the pick and head back to the Shipping module.
- Then go into Endicia and go to Tools > Post Back Data > and you will see that shipment record listed there. Highlight it and delete it.
- Then process the order through Endicia again.