Margin Report
Also known as the Profit Margins report, the Margin report displays information about how much money was made in each transaction by sale item, customer, or tag.
←Back to list of reports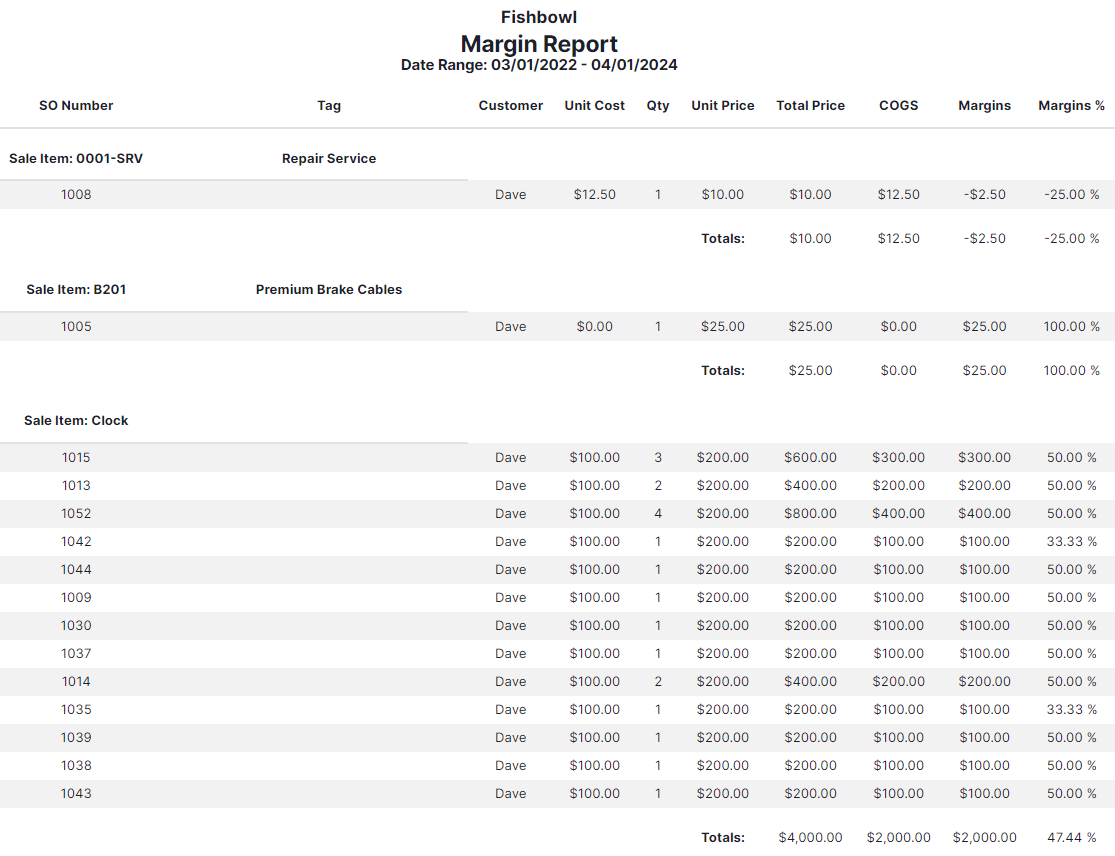
This report initially has the following column headers:
- SO Number - The sales order number generated by Fishbowl Drive. By default, each sales order containing a sale item will appear under that sale item’s name. But this can be changed to the customer or tag in the Group By dropdown menu on the right of the report.
- Tag - The description of each sale item from the Items module. If you select Customer in the Group By dropdown menu, this column will show each sale item’s tag instead of its description.
- Customer - The name of the customer on each sales order.
- Unit Cost - The amount of money you paid to obtain each unit of a sale item that was sold on a sales order.
- Qty - The total number of units of a sale item that were sold on a sales order.
- Unit Price - The amount of money charged to customers for each unit of a sale item.
- Total Price - The total amount of money charged to customers for all sale-item units on a sales order. The total amount on all sales orders will be included at the bottom of this column.
- COGS - The total amount of money you paid to obtain all sale-item units that were sold on a sales order. The total amount on all sales orders will be included at the bottom of this column.
- Margins - The difference between the Total Price and COGS, giving you the dollar amount of either profit or loss from the transaction. The total amount on all sales orders will be included at the bottom of this column.
- Margins % - The percent difference between the Margins and the Total Price. The combined percentage of all sales orders will be included at the bottom of this column.
By default, you will see all sale items on the report. But you can narrow down the results in a variety of ways by using the Optional features on the right of the report.
Optional
These are the Optional fields that you can use to modify the report:
- Group By - A dropdown menu that enables you to group the information in the report by the following criteria:
- Sale Item - This organizes all of the sales orders that each sale item is in under that sale item’s name. This is the default selection when you first open the report.
- Customer - This organizes all of the sales orders under the name of the customer that is on those sales orders. When you select this option, it replaces the Customer header in the report with Sale Item, it moves the Tag header to the right.
- Tags - This organizes all sale items under the tag(s) they have attached to them. Sale items that don’t have any tags will be included under the No Tag Linked header. When you select this option, it changes the report almost exactly like when you select the Customer option above, except that it replaces the Tag header with Customer.
- Select Tag - A dropdown menu to select tags to include on the report. You can select as many tags as you like. After you click an existing tag, you can create a new tag by entering its name in the textbox and hitting Enter or clicking the + Add option. No wizard will pop up. The new tag will simply appear on the list.
- Sales Representatives - A dropdown menu that enables you to only display sales orders that were created by a specific sales rep within your organization. You can’t create a new sales rep from here, nor can you select more than one.
- Location - A dropdown menu that shows a list of all of the Root locations you have created in the Locations module under the Setup module group. Select one to see all sales orders connected to that location and no other. You can’t create a new location from here.
- Customer - A dropdown menu to select a customer to include in the report. All other customers will be excluded if you fill this field with one. By default, all customers are included in the report. You can create a new customer by entering their name in the textbox and hitting Enter or clicking the + Add option. Then fill out the New Customer wizard that pops up.
- Sale Item - A dropdown menu to select a sale item from the list of ones you created in the Items module under the Materials module group. You can’t create a new sale item from here, nor can you select more than one.
- Sales Order Number - A dropdown menu to select a sales order from the list of ones that are in the Sales Orders module. All other sales orders will be excluded if you fill this field with one.
- Date Range - Clicking this textbox brings up a calendar to select a start and end date for the report. In addition, you can select one of these options on the right of the calendar:
- Today
- Yesterday
- This Week
- Last Week
- Last 7 Days
- This Month
- Last Month
- Include Returns - Clicking this checkbox adds return sales orders to the report.
- Include Shipping Items - Clicking this checkbox adds Shipping type items to the report.
- Include Subtotals (by item) - This checkbox makes subtotals for each sale item, customer, or tag visible on the report. This is checked by default.
- Include Grand Total - This checkbox adds a grand total at the very bottom of the report, which adds up all of the numbers in the Total Price, COGS, and Margins columns. It also gives you an average of every percentage in the Margins % column. This is checked by default.
- Show footer - This checkbox adds a footer containing the date and time (MM/DD/YYYY - HH:MM) that the report was generated. This is checked by default.
To search for an option in a dropdown menu, click in that field and begin entering text. It will show all options that have that text in them.
To apply your changes and see what they look like in the report, click the GENERATE REPORT button on the bottom-right. And follow the directions at the top of the main Reports article to save your changes to a Preset.