On Hand By Expiration Report
The On Hand By Expiration report displays all items that have Expiration Date tracking enabled on them.
←Back to list of reports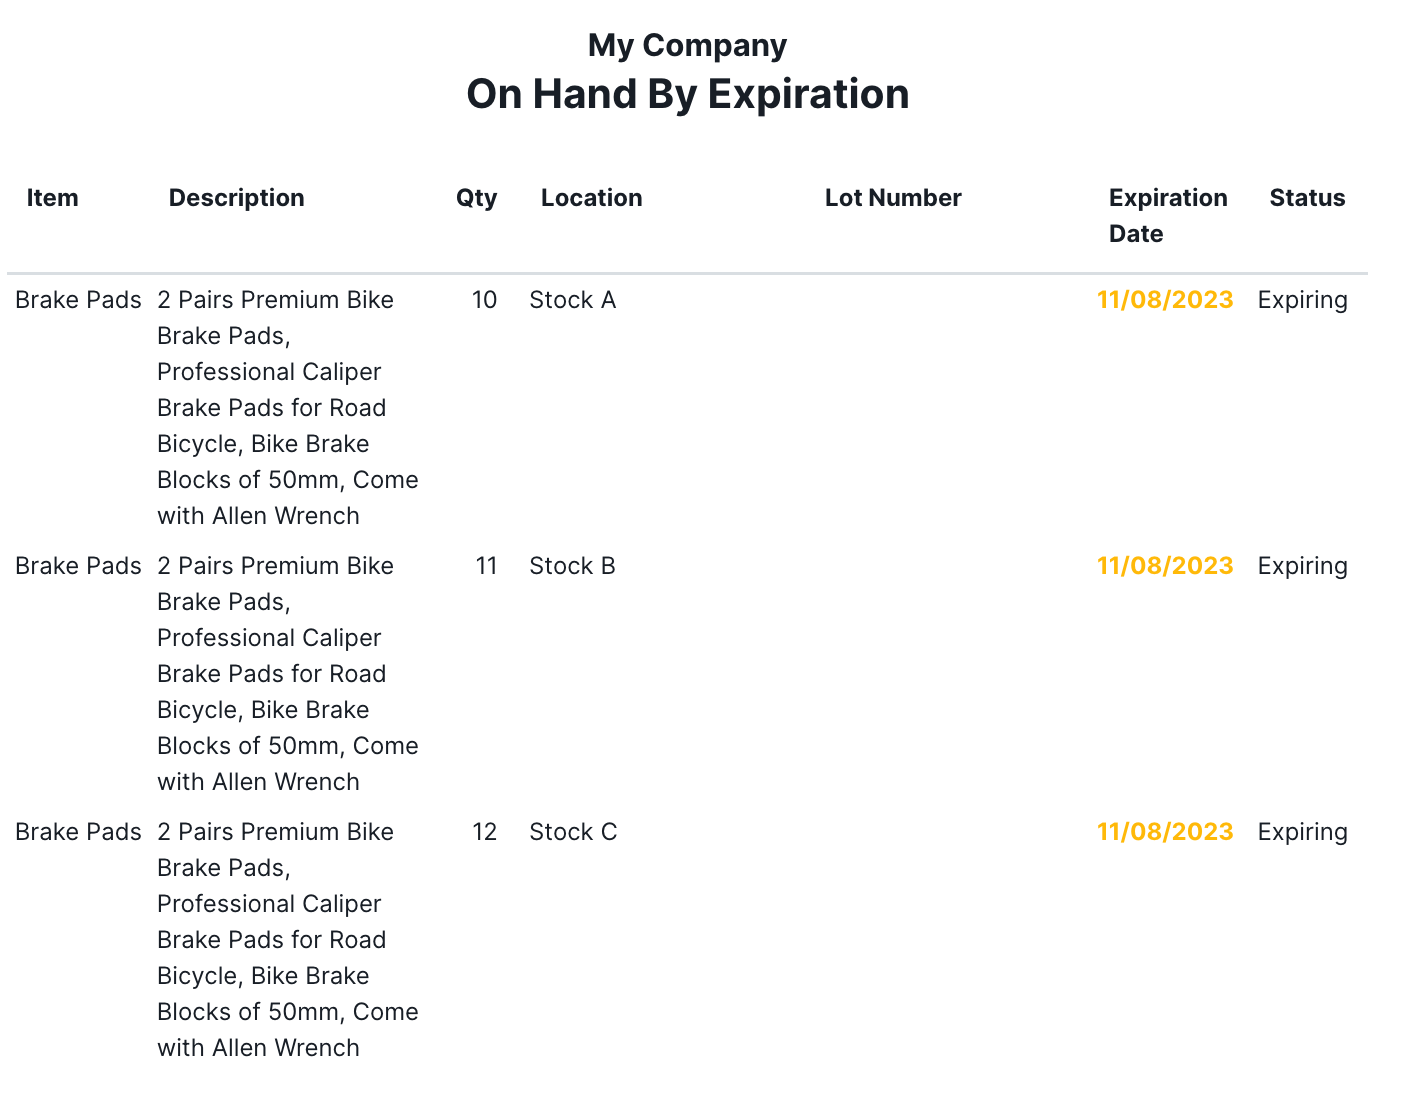
This report has the following column headers:
- Item - The identifying designation for an item found in the Items module.
- Description - An explanation of what an item is from the General tab of the Items module.
- Qty - The number or quantity of an item that is currently in stock at a particular location.
- Location - The place within your inventory where an item is located. There may be multiple locations where units of the item are stored.
- Lot Number - An identifying number for an item’s batch it was received with.
- Expiration Date - The final day, month, and year (MM/DD/YYYY) that an item is considered fresh and available to sell.
- Status - The condition of an item. There are three possibilities:
- Valid - The expiration date is at least 30 days away.
- Expiring - The expiration date is less than 30 days away.
- Expired - The expiration date has passed.
By default, you will be able to see all items with an expiration date on the report. But you can narrow down the results to just one of those items by using the Optional features on the right of the report.
Optional
These are the Optional fields that you can use to modify the report:
- Order By - A dropdown menu that enables you to organize the information in this report by one of two criteria:
- Location - This groups all of the items at a single location together where they are stored. This is the default option for this report.
- Item Number - This groups all of the units of each item together, no matter which locations they’re stored at.
- Status - A dropdown menu to select the status of items to include on the report. All statuses appearing is the default, but you can choose one of the first three options to limit the results to a specific status:
- Valid
- Expiring
- Expired
- All
- Location - A dropdown menu to select a single location to narrow down the report to only items contained at that location. By default, this report includes all locations, but you can trim it down to just one by selecting it in this field. You can create a new location by entering a name for the location in the textbox and hitting Enter or clicking the + Add option. Then fill out the New Location wizard that pops up.
- Item - A dropdown menu to select an item from the list of ones you created in the Items module under the Materials module group. You can create a new item by entering a name for the item in the textbox and hitting Enter or clicking the + Add option. Then fill out the New Item wizard that pops up.
- Date Range - A textbox for picking a time period that expiration dates must fall within in order for their corresponding items to appear on the report. Clicking this textbox brings up a calendar to select a start and end date for the report. In addition, you can select one of these options on the right of the calendar:
- Today
- Yesterday
- This Week
- Last Week
- Last 7 Days
- This Month
- Last Month
To search for an option in a dropdown menu, click in that field and begin entering text. It will show all options that have that text in them.
To apply your changes and see what they look like in the report, click the GENERATE REPORT button on the bottom-right. And follow the directions at the top of the main Reports article to save your changes to a Preset.