Shopify: Difference between revisions
m (→Setup: I added <br> to the section I edited.) |
|||
| (6 intermediate revisions by 2 users not shown) | |||
| Line 13: | Line 13: | ||
# Click '''Create app'''. | # Click '''Create app'''. | ||
# Click '''Select scopes''', select the scopes listed below, and then click '''Save'''. | # Click '''Select scopes''', select the scopes listed below, and then click '''Save'''. | ||
#*'''read/write''':<br>assigned_fulfillment_orders<br>discounts<br>customers<br>draft_orders<br>files<br>fulfillments<br>inventory<br>merchant_managed_fulfillment_orders<br>order_edits<br>orders<br>payment_terms<br>price_rules<br>product_listings<br>products<br>shipping<br>third_party_fulfillment_orders | #*'''read/write''':<br>assigned_fulfillment_orders<br>discounts<br>customers<br>draft_orders<br>files<br>fulfillments<br>inventory<br>manage_merchant_fulfilled_locations<br>merchant_managed_fulfillment_orders<br>order_edits<br>orders<br>payment_terms<br>price_rules<br>product_listings<br>products<br>shipping<br>third_party_fulfillment_orders | ||
#*'''read''':<br>read_locations<br><br> | #*'''read''':<br>read_locations<br><br> | ||
# Click '''API credentials''' and then copy the '''Admin API access token''' as well as the '''API key'''.<br>[[File:Shopify custom app.png]] | #Click '''API credentials''' and then copy the '''Admin API access token''', as well as the '''API key'''.<br>[[File:Shopify custom app.png]] | ||
# In Fishbowl, click the {{Button|Settings}} on the module toolbar of the {{Module|Shopify|}}.<br>[[File:{{PAGENAME}}_Store_Settings.png]] | #In Fishbowl, click the {{Button|Settings}} on the module toolbar of the {{Module|Shopify|}}.<br>[[File:{{PAGENAME}}_Store_Settings.png]] | ||
# Enter a '''Store Name''' and your '''Store URL''' (for example '''<nowiki>https://storename.myshopify.com</nowiki>'''). | #Enter a '''Store Name''' and your '''Store URL''' (for example, '''<nowiki>https://storename.myshopify.com</nowiki>'''). | ||
# Paste the '''API key''' from Shopify into the '''API Key''' field in Fishbowl. | #Paste the '''API key''' from Shopify into the '''API Key''' field in Fishbowl. | ||
# Paste the '''Admin API access token''' from Shopify into the '''Password''' field in Fishbowl. | # Paste the '''Admin API access token''' from Shopify into the '''Password''' field in Fishbowl. | ||
# Click the {{Button|Connect|Test Connection}} to verify that the connection to Shopify is working. | #Click the {{Button|Connect|Test Connection}} to verify that the connection to Shopify is working. | ||
# Click the {{Button|Pull Data|Import Shopify Data}} to import the data needed to configure the mapping tables in Fishbowl. | #Click the {{Button|Pull Data|Import Shopify Data}} to import the data needed to configure the mapping tables in Fishbowl. | ||
# Click the '''Save''' button at the bottom of the window to save the settings. | #Click the '''Save''' button at the bottom of the window to save the settings. | ||
=TABS= | =TABS= | ||
| Line 46: | Line 46: | ||
{{Location Group|{{PAGENAME}}}} | {{Location Group|{{PAGENAME}}}} | ||
{{Notes|{{PAGENAME}}}} | {{Notes|{{PAGENAME}}}} | ||
* '''Use order metadata mapping''' - To enable order metadata mapping, click the {{Button|Settings}} > '''Advanced Settings''' > '''Enable Meta Data Mapping''' > '''Use Order Meta Data''' > '''Save'''<br>[[File:Order Metadata.png]] | *'''Use order metadata mapping''' - To enable order metadata mapping, click the {{Button|Settings}} > '''Advanced Settings''' > '''Enable Meta Data Mapping''' > '''Use Order Meta Data''' > '''Save'''.<br>[[File:Order Metadata.png]] | ||
* '''Use order tag mapping''' - Allows orders to be mapped to Fishbowl location groups according to the Shopify tags on the order.<br>[[File:Shopify order tag mapping.png]] | *'''Use order tag mapping''' - Allows orders to be mapped to Fishbowl location groups according to the Shopify tags on the order.<br>[[File:Shopify order tag mapping.png]] | ||
===Customer Settings=== | ===Customer Settings=== | ||
| Line 78: | Line 78: | ||
::#* Shopify Payments | ::#* Shopify Payments | ||
::#* Amazon Pay | ::#* Amazon Pay | ||
::#* Authorize. | ::#* Authorize.Net | ||
::#* Bitpay | ::#* Bitpay | ||
::#* Cash on Delivery (COD) | ::#* Cash on Delivery (COD) | ||
| Line 94: | Line 94: | ||
{{Order Fulfillment|{{PAGENAME}}}} | {{Order Fulfillment|{{PAGENAME}}}} | ||
{{Notes|{{PAGENAME}}}} | {{Notes|{{PAGENAME}}}} | ||
* If a carrier on an order is not an approved carrier by Shopify it will be defaulted to '''None'''. | *If a carrier on an order is not an approved carrier by Shopify, it will be defaulted to '''None'''. | ||
* For a list of accepted carriers please see [[#Carriers|Carriers]]. | *For a list of accepted carriers, please see [[#Carriers|Carriers]]. | ||
==Product Import== | ==Product Import == | ||
{{Product Import|{{PAGENAME}}}} | {{Product Import|{{PAGENAME}}}} | ||
==Product Export== | ==Product Export == | ||
{{Product Export|{{PAGENAME}}}} | {{Product Export|{{PAGENAME}}}} | ||
:{{Notes|{{PAGENAME}}}} | :{{Notes|{{PAGENAME}}}} | ||
:*{{Include Product Image|{{PAGENAME}}}} | :*{{Include Product Image|{{PAGENAME}}}} | ||
:**'''NOTE:''' The Export Images option only works if a product image has not previously been exported from Fishbowl. If the Fishbowl product link gets deleted and recreated, it will export the Fishbowl product image to Shopify again, but it won’t affect the image that is already there. Instead, it will add the Fishbowl product image as a new, additional image to the Shopify product, even if it is identical to the Shopify product image that is currently there. | |||
:*'''Enable inventory tracking in Shopify for newly created products''' - This will enable inventory tracking on product creation to prevent overselling prior to the first inventory update. | :*'''Enable inventory tracking in Shopify for newly created products''' - This will enable inventory tracking on product creation to prevent overselling prior to the first inventory update. | ||
:*'''Don't publish newly created products in Shopify''' - This will push all new products in Fishbowl to Shopify and keep them hidden from customers' view until you manually publish them in Shopify. | |||
:*'''Delete Inactive Products''' - This option will delete linked products from Shopify if they have been made inactive within Fishbowl. | :*'''Delete Inactive Products''' - This option will delete linked products from Shopify if they have been made inactive within Fishbowl. | ||
==Inventory Update== | ==Inventory Update == | ||
{{Inventory Update|{{PAGENAME}}}} | {{Inventory Update|{{PAGENAME}}}} | ||
{{Notes|{{PAGENAME}}}} | {{Notes|{{PAGENAME}}}} | ||
*'''Update Item Cost''' - When enabled, this option updates the Shopify inventory item cost based on the selected Costing Method. | *'''Update Item Cost''' - When enabled, this option updates the Shopify inventory item cost, based on the selected Costing Method. | ||
==POS Import== | ==POS Import== | ||
{{POS Import|{{PAGENAME}}}} | {{POS Import|{{PAGENAME}}}} | ||
=Troubleshooting= | |||
{{API Logging|{{PAGENAME}}}} | {{API Logging|{{PAGENAME}}}} | ||
{{Partial}} | {{Partial}} | ||
| Line 120: | Line 122: | ||
* If you are getting a '''Failed to run scheduled task''' error, it is likely due to upgrading from Shopify 2.x to 3.x because of the layout change within the plugin. The following fix re-installs the plugin, which will require you to re-enter your store login information and import/export settings. Make sure to write that information down before proceeding with the following steps.<br>First, open the '''Plugin''' module and click the '''Uninstall''' button for the Shopify plugin. Then restart the Fishbowl server. Next, open the '''Plugin''' module, click the '''Install''' button for the Shopify plugin, and then restart the Fishbowl server again. Finally, re-enter the store login information and the import/export settings and then click the '''Save''' button. | * If you are getting a '''Failed to run scheduled task''' error, it is likely due to upgrading from Shopify 2.x to 3.x because of the layout change within the plugin. The following fix re-installs the plugin, which will require you to re-enter your store login information and import/export settings. Make sure to write that information down before proceeding with the following steps.<br>First, open the '''Plugin''' module and click the '''Uninstall''' button for the Shopify plugin. Then restart the Fishbowl server. Next, open the '''Plugin''' module, click the '''Install''' button for the Shopify plugin, and then restart the Fishbowl server again. Finally, re-enter the store login information and the import/export settings and then click the '''Save''' button. | ||
* When running the order import sync, an error may displayed that states '''Could not import order, product X does not exist'''. To verify that the product in Fishbowl is linked to the correct product in Shopify, complete the following steps. | * When running the order import sync, an error may displayed that states '''Could not import order, product X does not exist'''. To verify that the product in Fishbowl is linked to the correct product in Shopify, complete the following steps. | ||
# Using a web browser, log into the Shopify admin page and navigate to the product listed in the error message. | #Using a web browser, log into the Shopify admin page and navigate to the product listed in the error message. | ||
# Right-click anywhere on the page and click '''View page source''' or '''View source'''. This will open up the page source code in another tab. | #Right-click anywhere on the page and click '''View page source''' or '''View source'''. This will open up the page source code in another tab. | ||
# Press ''' | # Press '''Ctrl''' + '''f''' to search within the page. | ||
# In the search bar, type '''variant_id''' | # In the search bar, type '''variant_id''' | ||
# Confirm that the variant ID found in the page source is the same number listed in the '''Shopify Product ID''' field of the {{ModuleTab|Product|Custom tab}}. | #Confirm that the variant ID found in the page source is the same number listed in the '''Shopify Product ID''' field of the {{ModuleTab|Product|Custom tab}}. | ||
# If the numbers do not match, copy the variant ID from Shopify and paste it into the '''Shopify Product ID''' field. Then click the '''Save''' button in the Fishbowl {{Module|Product|Module buttons}}. | # If the numbers do not match, copy the variant ID from Shopify and paste it into the '''Shopify Product ID''' field. Then click the '''Save''' button in the Fishbowl {{Module|Product|Module buttons}}. | ||
# In the {{Module|Shopify}}, run the '''Order Import''' sync again. | #In the {{Module|Shopify}}, run the '''Order Import''' sync again. | ||
{{Plugin Release Notes}} | {{Plugin Release Notes}} | ||
Latest revision as of 09:44, 24 April 2023
 The Shopify module, located in the
  Integrations group, is an add-on module that can be installed from the
  Plugin module. After installing the plugin, a new module is added that integrates with Shopify. Additional connections can also be purchased to connect to multiple Shopify accounts.
Install
The documentation on this page is for the most recent version of the Shopify plugin. To get the most recent version, Update Fishbowl.
- In any Fishbowl Client, open the Plugin module, located in the Integrations group.
- Select the
 Shopify plugin and click Install.
 - Completely close all Fishbowl Clients.
- Exit the Fishbowl Server by right-clicking the Fishbowl Server tray icon and selecting Exit.
- After re-opening the Fishbowl Server, the admin user can access the Shopify module from any Fishbowl Client by opening the Integrations group.
- To grant access to additional users, assign the Shopify-View access right to the appropriate groups in the
 User Group module.
Setup
To allow Fishbowl to connect to Shopify, a few settings must be enabled in Shopify for Custom apps. In previous versions of Shopify, these were referred to as Private apps. The following steps are from Shopify's custom app page.
- From your Shopify admin page, go to Apps.
- Click Develop apps.
- Click Allow custom app development.
- Click Create a custom app.
- Enter Fishbowl as the app name and select an App developer. The app developer can be the store owner, or any staff or collaborator account with the Develop apps permission.
- Click Create app.
- Click Select scopes, select the scopes listed below, and then click Save.
- read/write:
assigned_fulfillment_orders
discounts
customers
draft_orders
files
fulfillments
inventory
manage_merchant_fulfilled_locations
merchant_managed_fulfillment_orders
order_edits
orders
payment_terms
price_rules
product_listings
products
shipping
third_party_fulfillment_orders - read:
read_locations
- read/write:
- Click API credentials and then copy the Admin API access token, as well as the API key.

- In Fishbowl, click the
 Settings button on the module toolbar of the Shopify module.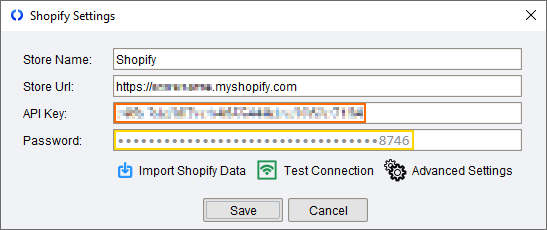
- Enter a Store Name and your Store URL (for example, https://storename.myshopify.com).
- Paste the API key from Shopify into the API Key field in Fishbowl.
- Paste the Admin API access token from Shopify into the Password field in Fishbowl.
- Click the
 Test Connection button to verify that the connection to Shopify is working.
 - Click the
 Import Shopify Data button to import the data needed to configure the mapping tables in Fishbowl.
 - Click the Save button at the bottom of the window to save the settings.


TABS
Several plugins in Fishbowl have a standardized layout. Some of the images below show the options that are most common between all plugins. Any additional  Shopify options or notes are included at the bottom of each section.
Order Import

- Schedule - Select the
 Active checkbox to import orders on a set schedule. Click the
  Run task button to run the scheduled task right now. Data that has changed since the Last Sync date will be synchronized. This date will be updated automatically after a sync, or it can be manually edited to adjust which data will be synchronized. If additional options are available, they can be enabled by selecting Use Advanced Options at the bottom of the Schedule section.


Order Settings

Additional order data will be imported and displayed on the Details tab of the  Sales Order module.
- Order field mapping - Use the mapping table to map Shopify order fields to Fishbowl order fields. If no field is mapped to the Fishbowl Order Number, then it will be generated by Fishbowl. If no date field is mapped to the Fishbowl Date Scheduled, then it will be set to the date of import.
- Salesperson - Sales orders will be created using this salesperson.
- Accounting Class - If there is no class mapped from Shopify, sales orders will be created using this class as the sales order class.
- Payment Terms - If there are no payment terms mapped from Shopify, sales orders will be created using this payment term.
- Shipping Terms - If there are no shipping terms mapped from Shopify, sales orders will be created using these shipping terms.
- Priority - The default priority to be set on imported orders.
- Use customer properties - Pull customer properties to the order such as salesperson, class, payment terms, shipping terms, and priority. If available, these will override the default values selected above.
- Order Number Prefix - Define a short prefix that will be applied to the imported order numbers. The prefix will not be added if the Fishbowl Generated SO Number is being used as the order number.
- Discount Item - Select the flat rate discount type that will be added as a line item to imported orders.
 Additional Shopify information
- Combine All Discounts - Enabling this option will sum up all of the line item discounts and apply them as one order discount.
- Add Discount Code To Notes - Enabling this option will add the discount code to the line item notes.
Order Item Settings

- Item field mapping - Use the mapping table to map Shopify order item fields to Fishbowl order item fields. If the Fishbowl price is not mapped, then the price from the Fishbowl product will be used and any applicable pricing rules applied. If the Fishbowl description is not mapped, then the description from the Fishbowl product will be used.
- Shipping item - Select the shipping type product that will be added as a line item to orders when applicable. It will contain the shipping price to be paid by the customer.
- Ignore miscellaneous items - If this option is selected, Shopify order items that are not related to an actual Shopify product record will be ignored and no Fishbowl line item will be created.
- Enable order import product linking - Shopify order items will be matched to Fishbowl products based on the defined field mapping. If the Shopify product has been linked by ID to a Fishbowl product, that will take precedence.
- Product field - The Fishbowl product field that will match the selected Shopify item field.
- Shopify item field - The Shopify order item field that will match the selected Fishbowl product field.
- Additional Shopify information
- Ignore shipping amount - Enabling this option may lead to order disparities for totals and payments.

Order Status Settings
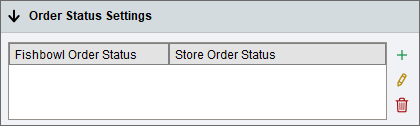
- Use the table to assign Shopify order statuses to Fishbowl order statuses. The Order Import task will only import orders from Shopify that are in a status assigned to a Fishbowl order status. If the Fishbowl order status is set to Historical, the order will be imported into Fishbowl, but it will not affect inventory or accounting. At least one active status mapping is required to use the Order Import task.

Location Group Settings

- Use default location group - Select a default location group for imported orders.
- Use order ship-to state mapping - This option allows orders to be imported into Fishbowl Location Groups according to the ship-to state. If the state is not mapped to a location group, the default location group specified above can be used.
- Use order carrier mapping - This option allows orders to be imported into Fishbowl Location Groups according to the shipping carrier. If the carrier is not mapped to a location group, the default location group specified above can be used.
- Use location group class as order class - This option will set the class for the order to the location group's class.

Additional Shopify information
- Use order metadata mapping - To enable order metadata mapping, click the Settings button > Advanced Settings > Enable Meta Data Mapping > Use Order Meta Data > Save.

- Use order tag mapping - Allows orders to be mapped to Fishbowl location groups according to the Shopify tags on the order.


Customer Settings

- Use the options below to determine how customers are created in Fishbowl and what information is imported into Fishbowl.
- Enable multi-currency settings - This option is only available if Currency Conversion is enabled in Fishbowl.
- Enable advanced mapping settings - This option provides additional options for creating and mapping customers.
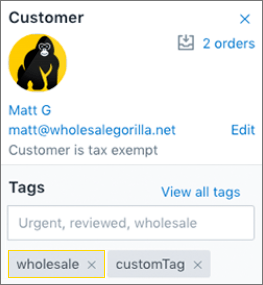
- Enable wholesale & retail settings - After enabling this option, additional fields will allow you to assign your retail orders to use a default Fishbowl customer while allowing your wholesale customers to be mapped as unique customers. If a Shopify order has a Wholesale tag, those orders will use the wholesale mapping settings. If there is not a Wholesale flag, the retail mapping settings will be used. NOTE: The wholesale channel is available to Shopify Plus plans only.
- Use a default customer for all orders - This option will associate all imported sales orders with the customer selected in the Customer field. This could be used with a generic Fishbowl customer such as Shopify Customer.
- Use order billing Address - Use the billing address from the Shopify order instead of the address for the default customer.
- Use order shipping Address - Use the shipping address from the Shopify order instead of the address for the default customer.
- Use the order customer and addresses - This option will import the addresses and customer from the Shopify order instead of using a generic customer.
- Field - Select the Shopify field you want to use as the Fishbowl customer name.
- Alternate Field - An alternate field mapping when the primary mapping does not contain data.


Address Settings

- Ship to address mapping - Use the table to choose which Shopify fields are imported into the Fishbowl Ship To Name and Street Line fields.
- Bill to address mapping - Use the table to choose which Shopify fields are imported into the Fishbowl Bill To Name and Street Line fields.
- Coalesce addresses - If one address is missing, use the existing address for both the shipping and billing address.
- Create missing states - Automatically create missing states.
- Mark addresses residential - Import all shipping addresses as residential.

Carrier Settings
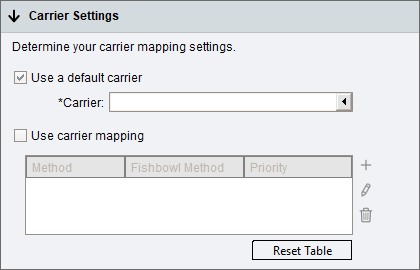
- Use a default carrier - When selected, all orders imported from Shopify will use the selected carrier. If this option is unchecked, carriers can be mapped between Fishbowl and Shopify. Each mapping will also set the Sales Order Priority so that Fishbowl users can identify orders with express shipping that need to be picked and shipped quickly.
- Use carrier mapping - When selected, the table can be used to map carriers between Shopify and Fishbowl.
- Additional Shopify information
- Follow the instructions below to map carriers between Shopify and Fishbowl.
- Log into Shopify.
- Click the Settings menu on the left and then select Shipping to see which carriers are enabled on your account.
- Click here to see which carriers Shopify supports.
- Open the Carrier Mapping section on the Order Import tab and then click the
 New button.
 - Enter the Shopify carrier and service information into Fishbowl. Sometimes it is easiest to find the exact carrier name in the error log for the order import task.
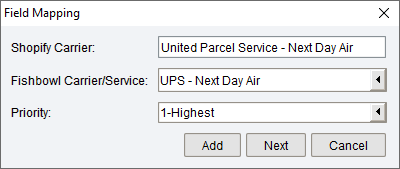
- Select the corresponding Fishbowl Carrier/Service
- Select the Sales Order Priority that corresponds with this carrier/service. This helps Fishbowl users to identify orders with express shipping that need to be picked and shipped quickly.
- Click Add to save the mapping, or click Next to save the mapping and enter a new mapping.
- Follow the instructions below to map carriers between Shopify and Fishbowl.


Payment Settings
-
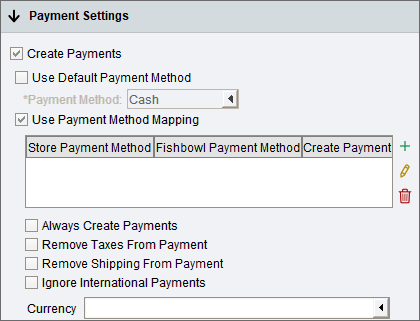
- Create payments in Fishbowl - When selected, payments from the Shopify transaction will be shown in the
 Payment Viewer module.
- Use a default payment method - When selected, all orders imported from Shopify will use the selected payment method.
- Use payment method mapping - When selected, the table can be used to map payment methods between Shopify and Fishbowl.
- Always create payments - If no payment data exists for the order from Shopify, this option will always create a payment in Fishbowl equaling the order total. If payment mapping is enabled, orders without payment data will show "None" as the payment method type.
- Remove taxes from payment - When selected, the tax amount will be deducted from the payment total.
- Remove shipping from payment - Enabling this option may lead to order disparities between Shopify and Fishbowl for totals and payments.
- Ignore international payments - Payments will not be created for orders placed outside the United States. This setting is only available if Use Currency Conversion is enabled in the
 Currency module.
 - Currency - Select the currency type you accept in Shopify. This is a required setting if Use Currency Conversion is enabled in the Currency module.
- Create payments in Fishbowl - When selected, payments from the Shopify transaction will be shown in the
- Additional Shopify information
- Follow the instructions below to map payment methods between Shopify and Fishbowl.
- Log into Shopify.
- Click the Settings menu on the left and then select Payment providers to see which providers are enabled on your account.
- Copy the exact payment method name from any of the sections listed under Payment providers. Below are some examples.
- PayPal Express Checkout
- Shopify Payments
- Amazon Pay
- Authorize.Net
- Bitpay
- Cash on Delivery (COD)
- Bank Deposit
- Money Order
- Open the Payment Mapping section on the Order Import tab and then click the New button.

- Paste the Shopify payment method name into Fishbowl.

- Select the corresponding Fishbowl Payment Method and then click the Save button.
- Follow the instructions below to map payment methods between Shopify and Fishbowl.


Tax Settings
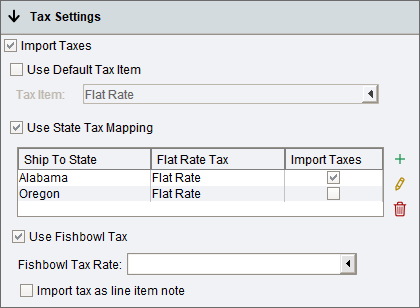
- Import Taxes - When selected, the tax amount from the Shopify order will appear on the Fishbowl sales order as a flat rate line item. The flat rate amount can be set to $0 in the
 Tax Rate module and then the correct total tax amount will be set when the order is imported from Shopify. If taxes are not imported, the Fishbowl payment will equal the order total before tax.
- Use Default Tax Item - With this option selected, the same tax item will be used for all orders.
- Use State Tax Mapping - This option allows different tax items to be used based on the Ship To state/province. If this option is enabled, the plugin will give an error when trying to import an order with a state that has not been mapped.
- Use Fishbowl Tax - Select a Fishbowl tax rate that will be used to calculate the order tax in Fishbowl. Tax calculations done by Fishbowl may differ from those done in Shopify.
- Import Shopify tax as line item note - Import the Shopify tax as a line item note in Fishbowl.
- Import Taxes - When selected, the tax amount from the Shopify order will appear on the Fishbowl sales order as a flat rate line item. The flat rate amount can be set to $0 in the

Canada/Australia/International
- When using the Shopify plugin with international versions of Fishbowl, some additional tax options are available in the Tax Settings section of the Order Import tab.
- Use product tax - When selected, the Tax Code from the General tab of the
 Product module will be used.
- Use province tax - When selected, the shipping province on the order will be used to determine the tax, based on the mapping table below.
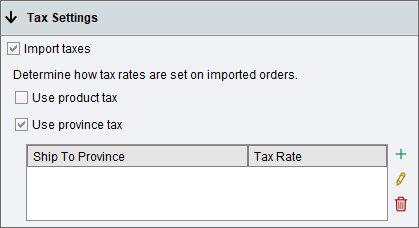
- Use product tax - When selected, the Tax Code from the General tab of the
- When using the Shopify plugin with international versions of Fishbowl, some additional tax options are available in the Tax Settings section of the Order Import tab.


Fulfillment Export

- Schedule - Select the Active checkbox to export orders on a set schedule. Click the Run task button to run the scheduled task right now. Data that has changed since the Last Sync date will be synchronized. This date will be updated automatically after a sync, or it can be manually edited to adjust which data will be synchronized.
- The Fulfillment Export task will export order fulfillment information to Shopify based on fulfilled Fishbowl sales orders.
- Update order status - When selected, Shopify orders will be updated after the product(s) on the order have been shipped in Fishbowl. Shipment tracking information will also be sent from Fishbowl to Shopify.
- Check order status - When selected, the Shopify order status will be checked prior to attempting to send fulfillment information. If the Shopify order status has changed, no fulfillment information will be sent. This will increase the time required to complete the order fulfillment task.
Additional Shopify information
- If a carrier on an order is not an approved carrier by Shopify, it will be defaulted to None.
- For a list of accepted carriers, please see Carriers.
Product Import

- Schedule - Select the Active checkbox to import products on a set schedule. Click the Run task button to run the scheduled task right now. Data that has changed since the Last Sync date will be synchronized. This date will be updated automatically after a sync, or it can be manually edited to adjust which data will be synchronized.
- NOTE: When setting up the Shopify integration for the first time, you will want to adjust the Last Sync to a date before any of your products were created (for example, setting the year to 2000) so that all of the products on your website will be imported.
The Product Import task imports products into Fishbowl from Shopify. A product link is created by storing the Shopify product ID in Fishbowl.
- Link Existing Products will match existing products in Fishbowl and Shopify where data matches in the selected fields.
- Import Products will import products from Shopify into Fishbowl, creating them based on the field mapping and settings below.
Product Export

- Schedule - Select the Active checkbox to export products on a set schedule. Click the Run task button to run the scheduled task right now. Data that has changed since the Last Sync date will be synchronized. This date will be updated automatically after a sync, or it can be manually edited to adjust which data will be synchronized.
- Product Create Settings - Enable Export New Products and then map the fields that should be exported from Fishbowl to Shopify.
- If the Weight UOM or Size UOM are specified, the Fishbowl product UOMs will be converted to the selected UOMs before the values are exported.
- If the Product Tree Filter is used, only the products in the selected product tree category will be exported. If the product tree filter is left blank, all products will be included in the export.
- Product Update Settings - Enable Update Linked Products and then map the fields that should be exported from Fishbowl to Shopify. This section has the same options as the Product Create Settings section above. After the initial product export, only the selected fields will be updated.
- Additional Shopify information
- Export Images - When selected, the Fishbowl product image will be exported to Shopify.
- NOTE: The Export Images option only works if a product image has not previously been exported from Fishbowl. If the Fishbowl product link gets deleted and recreated, it will export the Fishbowl product image to Shopify again, but it won’t affect the image that is already there. Instead, it will add the Fishbowl product image as a new, additional image to the Shopify product, even if it is identical to the Shopify product image that is currently there.
- Enable inventory tracking in Shopify for newly created products - This will enable inventory tracking on product creation to prevent overselling prior to the first inventory update.
- Don't publish newly created products in Shopify - This will push all new products in Fishbowl to Shopify and keep them hidden from customers' view until you manually publish them in Shopify.
- Delete Inactive Products - This option will delete linked products from Shopify if they have been made inactive within Fishbowl.
- Export Images - When selected, the Fishbowl product image will be exported to Shopify.
Inventory Update

- Schedule - Select the Active checkbox to export inventory levels to Shopify on a set schedule. Click the Run task button to run the scheduled task right now. Data that has changed since the Last Sync date will be synchronized. This date will be updated automatically after a sync, or it can be manually edited to adjust which data will be synchronized.
- NOTE: When setting up the Shopify integration for the first time, you will want to adjust the Last Sync to a date before any of your products were created (for example, setting the year to 2000) so that it includes all of your products (or any applicable product tree filter) when updating inventory levels.
- Export Company Wide Inventory - Include inventory quantities from all location groups in the inventory sync. If this option is unchecked, selected location groups can be added by clicking the
 Add button.
 - Inventory Type - Select the inventory quantity that should be used during the update: Available For Sale, Inventory On Hand, or Available To Pick:
- Available For Sale - The quantity available is calculated as On Hand - Allocated - Not Available + Drop Ship.
- Inventory On Hand - The total amount of inventory in stock.
- Available To Pick - Calculated as On Hand - Committed for inventory in locations that are marked as Pickable.
- Available To Kit - In Fishbowl, kits are comprised of various inventory items, so the kit itself isn't displayed in the
 Inventory module. However, Fishbowl will always export an Available to Kit number to Shopify. The available quantity exported for kits will be the lowest available quantity for any of the items in the kit. For example, a Wheel kit may require 1 rim and 1 tire. If there are 100 rims available, but only 5 tires, then the quantity exported for the Wheel kit will be 5. The available quantity for a configurable kit will be the lowest available quantity for the default kit items.
- Product Tree Filter - The export can be limited to a specific product tree category. If this field is left blank, all products will be included in the export.
- Specify Min/Max Inventory Quantity - With this option enabled, the maximum inventory quantity sent to Shopify can be limited. For example, if there is an available quantity of 4000 in Fishbowl, the quantity in Shopify could be set to 999. If there is an available quantity of 3 in Fishbowl, the minimum quantity field could be used to send a quantity of 10 to Shopify.
- Include Quantities Available To Build - When enabled, this option calculates and includes available-to-build quantities from applicable bills of materials in the inventory update. When a product is sold individually but also used as an input for a bill of materials, both quantities are pushed to the channel when applicable. Please note, this could lead to overselling in the scenario described.

Additional Shopify information
- Update Item Cost - When enabled, this option updates the Shopify inventory item cost, based on the selected Costing Method.
POS Import

- The POS Import tab has essentially the same settings as the Order Import tab but is used to import point of sale orders from Shopify.
Troubleshooting
- Click the
 API Logs button at the top of the Shopify module to see the API calls and any errors that have been logged. You can leave the API Logs window open while you work in Fishbowl and click the
  Refresh button at the bottom of the window as needed. API logs can also be viewed in the Fishbowl/logs/plugins folder. Click Tools > Module Options to Disable REST logging.
 - When more than one shipment exists for an order (partial fulfillment), the applicable tracking numbers are synced to Shopify, however this feature does not work for orders with kits.
- Only new orders are imported. Orders are not updated once they have been imported. Returns and refunds are not imported.
- The attributes and IDs for orders and products can be viewed or modified by clicking the Shopify button at the top of the Sales Order module and the Product module.
- To view the scheduled tasks for the Shopify module, open the
 Schedule module.
 - A scheduled task can be run manually by double-clicking the task.
- Enter an email address in the Schedule module to receive error notifications.
- To view the history of a scheduled task, including the result/error, click the
 History button in the Schedule module.
 - More details about recent errors can be viewed by opening the
 Data module and clicking the
  Server Log button.
 - Check for multiple versions of the Shopify.jar file in C:\Program Files\Fishbowl\plugins\ or \Applications\Fishbowl\plugins\ on a Mac. If there are two Shopify versions, exit the Fishbowl Server and remove the older version on all client and server computers.
- If you are getting a Failed to run scheduled task error, it is likely due to upgrading from Shopify 2.x to 3.x because of the layout change within the plugin. The following fix re-installs the plugin, which will require you to re-enter your store login information and import/export settings. Make sure to write that information down before proceeding with the following steps.
First, open the Plugin module and click the Uninstall button for the Shopify plugin. Then restart the Fishbowl server. Next, open the Plugin module, click the Install button for the Shopify plugin, and then restart the Fishbowl server again. Finally, re-enter the store login information and the import/export settings and then click the Save button. - When running the order import sync, an error may displayed that states Could not import order, product X does not exist. To verify that the product in Fishbowl is linked to the correct product in Shopify, complete the following steps.


- Using a web browser, log into the Shopify admin page and navigate to the product listed in the error message.
- Right-click anywhere on the page and click View page source or View source. This will open up the page source code in another tab.
- Press Ctrl + f to search within the page.
- In the search bar, type variant_id
- Confirm that the variant ID found in the page source is the same number listed in the Shopify Product ID field of the Custom tab tab of the Product module.
- If the numbers do not match, copy the variant ID from Shopify and paste it into the Shopify Product ID field. Then click the Save button in the Fishbowl Product module.
- In the Shopify module, run the Order Import sync again.