Fishbowl for Mac
Fishbowl provides a Fishbowl installer for Mac that can be downloaded here. Both the Fishbowl Client and the Fishbowl Server can run on a Mac. Fishbowl integrates with QuickBooks Online and Xero, making it possible to run Fishbowl and an accounting package entirely on Apple computers, or on any combination of supported operating systems. The Fishbowl Server on a Mac can also integrate with QuickBooks Desktop running on a Windows computer.
Install MySQL
Fishbowl Advanced utilizes a popular database platform called MySQL that is free to install. MySQL only needs to be installed on the Fishbowl Server computer. If you are installing the Fishbowl Server on macOS, you should install MySQL before installing Fishbowl Advanced. If you've already installed the Fishbowl Server and want to add the Fishbowl Client to additional computers, you can skip to Install Fishbowl.
Note: If you have been using the Fishbowl Server on a Mac prior to Fishbowl 2023.11, you will need to create a MySQL 5.7 database backup before installing MySQL 8.0. After completing the install of MySQL 8.0 and Fishbowl 2023.11 or higher, you can restore your .sql backup file, which will migrate your database to MySQL 8.0.
- MySQL 8.0 only supports macOS 13 and macOS 14.
- Download the appropriate DMG Archive from this page. Select ARM for Apple Silicon (M1, M2, M3). Otherwise, select x86.
- Double-click the downloaded .dmg file and then double-click the MySQL 8 installer package.

- All of the default settings in the installer can be used, so simply click Continue to proceed through the installation wizard.
- You will be prompted to create a strong password. You will need to enter this password when creating your Fishbowl database, so make sure that it is securely stored and then click Finish.

- Click Close and complete the installation wizard.


Next you will install the Fishbowl Server application on the same computer.
Install Fishbowl
The Fishbowl installer includes a copy of Java, so, in most cases, it is not necessary to install Java separately.
- NOTE: If you are installing the Fishbowl Server on macOS, please install MySQL first. MySQL does not need to be installed if only the Fishbowl Client is being installed.
- Download the Fishbowl Installer for Mac by clicking here.
- Right-click the Fishbowl Installer and select Open.

- When asked if you want to open the Fishbowl Installer, click Open.

If the Open button is not visible, repeat step 3 or adjust your security preferences for installing apps. - Select 14 Day Fishbowl Trial or Current Fishbowl User and then click Next.

- If you are installing the Fishbowl Server, the installer will try to find your MySQL 8 installation.
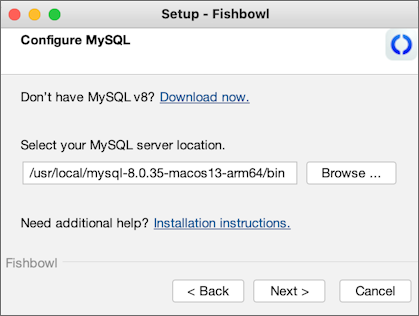
- If the install location is empty, install MySQL on your server computer. If you close and then relaunch the Fishbowl installer, it will attempt to find the MySQL 8.0 installation, or you can click the Browse button to manually find the installation (typically in /usr/local/mysql/bin).
- Click Finish to complete the wizard.


Configure MySQL on the Fishbowl Server
If you installed the Fishbowl Server on a Mac, you can configure MySQL as described below. These steps are not necessary if you are only running the Fishbowl Client on a Mac.
- Click the Apple icon in the top-left corner of your screen and select System Settings or System Preferences.
- Scroll to the bottom and select MySQL. If you don't see MySQL, please restart your computer.
- In the Configuration File field, paste the following: /Applications/Fishbowl/server/bin/my.cnf

- Click the Apply button at the bottom.
- Start Fishbowl using the shortcuts created on the dock. Fishbowl can also be opened with Applications/Fishbowl/server/bin/Fishbowl Server and Applications/Fishbowl/client/bin/Fishbowl Client.

Next you will create a new database. If you were using the Fishbowl Server on a Mac prior to Fishbowl 2023.11, you can now restore your .sql backup file, which will migrate your database to MySQL 8.0.
Create a new database
Follow the instruction below to create a new MySQL database on a Mac.
- Click the Fishbowl Server tray icon and select Options.
- Click the
 New button and enter a new database name.
 - Change the port number to 3306 and enter the secure password that was created earlier.
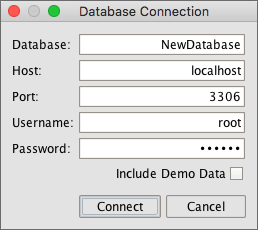
- Click Connect, choose a costing method, and then click OK.
- Click the Fishbowl Server tray icon and select Start.

Database backup
A database backup can be created in the ![]() Schedule module or by right-clicking the database name in the Fishbowl Server options.
Schedule module or by right-clicking the database name in the Fishbowl Server options.

The .sql file created during the backup can then be restored on the Restore tab.

Integrate with QuickBooks
QuickBooks Desktop only runs on Windows computers. The Mac version of the Fishbowl Server can integrate with QuickBooks on a Windows computer, or a Mac running Windows as a virtual machine. NOTE: If the Fishbowl Server is running on a Windows computer, these steps are not necessary. Alternatively, Fishbowl can integrate with QuickBooks Online or Xero, which don't require a Windows computer.
Complete the steps below to allow the Fishbowl Server on a Mac to communicate with a Windows QuickBooks installation.
- Copy Fishbowl Nexus.exe from the Mac (Applications/Fishbowl/server/bin/) to a folder located on the Windows computer. Fishbowl Nexus must be running for the export to work. Placing the program in the Startup folder will allow the program to start automatically when the computer reboots.
- Run Fishbowl Nexus.exe on the Windows computer. The Fishbowl Nexus icon will appear on the taskbar.
- Open the Fishbowl Server and the Fishbowl Client on the Mac.
- Open the
 Property module in the Fishbowl Client and double-click FBNexusURL in the search pane.
 - Change the Value of the property from localhost to the IP address of the Windows computer (for example, 192.168.2.100) and then click Save.
- Open the
 Accounting Integration module and run the QuickBooks Integration Wizard.
You should now be able to export from the Fishbowl Server on a Mac to the QuickBooks installation on Windows.
Integrate with QuickBooks Online
Because QuickBooks Online is web-based, integration is not dependent on the operating system. Simply open the ![]() Accounting Integration module and run the QuickBooks Online Integration Wizard.
Accounting Integration module and run the QuickBooks Online Integration Wizard.
Integrate with Xero
Because Xero is web-based, integration is not dependent on the operating system. Simply open the ![]() Accounting Integration module and run the Xero Integration Wizard.
Accounting Integration module and run the Xero Integration Wizard.
Troubleshooting
Because there are many version combinations for Mac OS X, Fishbowl, and Java, Fishbowl recommends installing the latest version of Fishbowl on the latest version of Mac OS X. If Fishbowl isn't running correctly, some of the steps below may be helpful in troubleshooting.
- For versions of Fishbowl before 2021.6 it may be necessary to modify the folder permissions: In Finder, open the Applications folder. Right-click the Fishbowl folder and select Get Info. Click the lock icon and then assign the Read & Write privilege to all users listed. Then click the gear icon and select Apply to enclosed items.

- As an alternative to the MySQL installer, MySQL can also be installed using Terminal and a package manager called Homebrew.
- INSTALL JAVA - If Fishbowl isn't running at all, it may be necessary to install Java 8, which can be downloaded by clicking here and selecting jre-8u121-macosx-x64.dmg
- If the Fishbowl Installer fails to install Java on a Mac with Apple Silicon (M1, M2, M3), the installer for Java 8 on ARM processors can be downloaded by clicking here.
- FISHBOWL ANYWHERE - To use Fishbowl Anywhere, replace Applications/Fishbowl/webclient/bin/start.sh with the file in this zip file. Follow the instructions above for fixing permissions. Open the Fishbowl Client to enable Fishbowl Anywhere, and set the password. Open the Terminal application and execute start.sh using the commands below.

- cd /Applications/Fishbowl/webclient/bin
- sh /Applications/Fishbowl/webclient/bin/start.sh
MySQL password reset
Sometimes MySQLWorkbench won't prompt you to reset the password, or the new password may not save correctly. If that is the case, follow the instructions below to reset the password using the Terminal application.
- Open Terminal and enter the following command.
sudo /usr/local/mysql/support-files/mysql.server stop - Restart the MySQL server with permissions by entering the following command.
sudo /usr/local/mysql/bin/mysqld_safe --skip-grant-tables - Open a new Terminal window by pressing command + n.
- In the new Terminal window, reset the MySQL password by replacing NewPassword with your own password in the following command.
sudo /usr/local/mysql/bin/mysql -u root
UPDATE mysql.user SET authentication_string=PASSWORD('NewPassword') WHERE User='root';
FLUSH PRIVILEGES;
\q - Close both Terminal windows and open MySQLWorkbench.
- Click Local Instance 3306. If it prompts you to reset the password, enter the password chosen above and verify that it is working correctly.