SPS
![]() The SPS module, located in the
The SPS module, located in the ![]() Integrations group, is an add-on module that can be installed from the
Integrations group, is an add-on module that can be installed from the ![]() Plugin module. After installing the plugin, a new module is added to Fishbowl that exchanges data with SPS Commerce by connecting to a shared file server. Fishbowl customers and vendors can be mapped to SPS trading partners. Then the plugin can be scheduled to upload CSV files to the file server with the latest inventory quantities and purchase orders. The plugin can also download receiving data from the file server, allowing incoming orders to be pre-received in Fishbowl. The
Plugin module. After installing the plugin, a new module is added to Fishbowl that exchanges data with SPS Commerce by connecting to a shared file server. Fishbowl customers and vendors can be mapped to SPS trading partners. Then the plugin can be scheduled to upload CSV files to the file server with the latest inventory quantities and purchase orders. The plugin can also download receiving data from the file server, allowing incoming orders to be pre-received in Fishbowl. The ![]() SPS module is completely separate from the SPS adapter for Fishbowl.
SPS module is completely separate from the SPS adapter for Fishbowl.
Install
The documentation on this page is for the most recent version of the ![]() SPS plugin. To get the most recent version, Update Fishbowl.
SPS plugin. To get the most recent version, Update Fishbowl.
- In any Fishbowl Client, open the
 Plugin module, located in the
  Integrations group.
 - Select the
 SPS plugin and click Install.
 - Completely close all Fishbowl Clients.
- Exit the Fishbowl Server by right-clicking the Fishbowl Server tray icon and selecting Exit.
- After re-opening the Fishbowl Server, the admin user can access the SPS module from any Fishbowl Client by opening the Integrations group.
- To grant access to additional users, assign the SPS-View access right to the appropriate groups in the
 User Group module.
TABS
Trading Partners

- In the SPS module, enter the FTP URL, Username, and Password.
- Select Test or Production directories, and then click the
 Test Connection button to verify that the connection is working.
 - Use the
 Add button to add trading partners. The SPS Trading Partner ID needs to be obtained directly from SPS.
- Click the
 Save button at the top of the module to save the settings.
 - Trading partners that were added can now be selected on the other tabs shown below.

Inventory


- Click the
 Enable inventory exports checkbox.
 - Click the Add button and select a trading partner.
- Customize the inventory data that is sent to SPS using the options below.
- Export Company Wide Inventory - Include inventory quantities from all location groups in the inventory sync. If this option is unchecked, selected location groups can be added by clicking the Add button.
- Inventory Type - Select the inventory quantity that should be used during the update: Available For Sale, Inventory On Hand, or Available To Pick.
- Product Tree Filter - The export can be limited to certain product tree categories. If this field is left blank, all products will be included in the export.
- Use Max Inventory Quantity - With this option enabled, the maximum inventory quantity sent to SPS can be limited. For example, if there is an available quantity of 4000 in Fishbowl, the quantity in SPS could be set to 999.
- Only send updated inventory items - Instead of exporting inventory quantities for all items every time, this option will only export the quantity if it has changed since the last export.
- Send Kit Quantities - In Fishbowl, kits are comprised of various inventory items, so the kit itself isn't displayed in the
 Inventory module. However, if Send Kit Quantities is checked, Fishbowl will always export an Available to Kit number to SPS. The available quantity exported for kits will be the lowest available quantity for any of the items in the kit. For example, a Wheel kit may require 1 rim and 1 tire. If there are 100 rims available, but only 5 tires, then the quantity exported for the Wheel kit will be 5. The available quantity for a configurable kit will be the lowest available quantity for the default kit items.
 - SPS Options - This button allows the header and item fields that are sent to SPS to be customized. You will need to consult with SPS on what data to fill out for this portion of the inventory feed.
- Export Company Wide Inventory - Include inventory quantities from all location groups in the inventory sync. If this option is unchecked, selected location groups can be added by clicking the
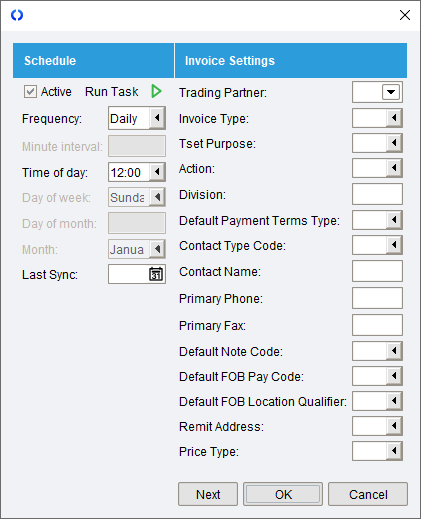
- Click the Active checkbox in the Schedule section. Click the
 Run Task button to run the export now, or select a schedule frequency.
 - Click Next to select another Trading Partner, or click OK to close the dialog window.
- Click the Save button at the top of the module to save the settings.
Invoice

- Click the Enable invoices checkbox.
- Click the Add button and select a trading partner.
- Click the Active checkbox in the Schedule section. Click the Run Task button to run the import now, or select a schedule frequency.
- Click Next to select another Trading Partner, or click OK to close the dialog window.
- Click the Save button at the top of the module to save the settings.
