Support
Extend the Client Inactivity Time
The following instructions will allow each client to have a longer inactivity time.
- Right-click the Fishbowl Server icon in the system tray and select Options.

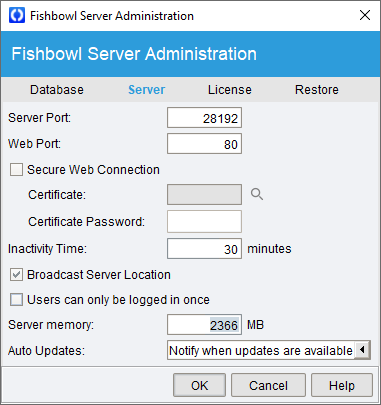
- Click the Server tab, adjust the Inactivity Time, and then click OK.

- Changes will be applied the next time the server restarts.
- To manually restart the server, right-click the server icon and select Stop. Then right-click the server icon and select Start.


Adjust memory allocation
The amount of memory allocated to Fishbowl can affect the performance of Fishbowl and the performance of the computer. If the amount of memory is too low, Fishbowl may run slowly. If the amount of memory is too high, the computer may run slowly. By default, the Fishbowl installer defaults to 1536 MB of Server Memory. If necessary, the amount of memory can be manually adjusted during installation or after installation.
Memory allocation during installation
If Fishbowl is being installed or upgraded, the amount of memory allocated to Fishbowl can be adjusted during installation. Click here if Fishbowl has already been installed.
Follow the steps below to adjust the Fishbowl memory allocation during installation.
- Run the Fishbowl installer and proceed to the Installation Mode step.
- Select Current Fishbowl User and then check Configure Advanced Settings.
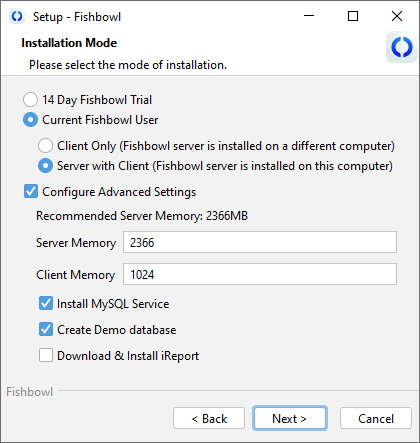
- Above the Server Memory field is a recommendation (typically 30% of the total memory available on your computer).
- The Server Memory field will always default to 1536 MB. Adjust the memory allocation as desired. 8192 MB is the highest recommended amount.
- Complete the installation wizard as usual. Repeat these steps on each Fishbowl computer.

Memory allocation after installation
Memory allocation can also be adjusted after Fishbowl has already been installed. Click here if Fishbowl is being installed or upgraded.
Follow the steps below to adjust the Fishbowl Server memory allocation after installation.
- Right-click the Fishbowl Server icon in the system tray and click Options. Then click Yes to stop the server and disconnect all clients.
- Click the Server tab and adjust the server memory allocation as desired, and then click OK.
- Right-click the Fishbowl Server icon in the system tray and click Start to start the server again.

Follow the steps below to adjust the Fishbowl Client memory allocation after installation.
- Open the C:\Program Files\Fishbowl\client\bin folder. The actual path may vary depending on where Fishbowl was installed.
- Open the Fishbowl Client.vmoptions file in a text editor, such as Notepad.
- Enter the amount of memory desired for the Fishbowl Client.

- Save and close the file. Repeat these steps on each Fishbowl Client computer.

Export Fishbowl Table Data via Excel
Data can be queried and exported from Fishbowl by using the ![]() Data module.
Data module.
Defining the Status terms within Fishbowl
Several modules within Fishbowl have a status column describing the current position each line item, or overall order, is in. The following list describes the status for modules within Fishbowl:
Pick Status
Depending on each item's situation, they will have a specific type of Pick Status. The first column of information in the pick's Order screen is the Line Status. This field is populated by one of seven icons (shown below):
 Item Short signifies that a part is not currently in stock and, therefore, cannot be picked or shipped.
 Finished appears after the Finish button has been is clicked, signaling that the part has been picked and is awaiting shipment.
 Started represents a status level of available. The inventory is not committed at this point. This part is in stock and ready to be picked and shipped. When an item is started, you can save the location that you would prefer that item to picked from.
 Entered represents a pick that is new, not yet started, with inventory available.
 Committed prevents other orders from picking this part. Commit a part after you have taken possession of it or marked it as not available to be used in the warehouse.
 Hold status is used to show that a part is on hold for one reason or another. In order to use this icon, simply highlight a part and click the Hold button located on the component toolbar. This will toggle the hold sign between any other symbol except the BLUE CHECK.
Receiving Status
Within the ![]() Receiving module, users have the ability to receive and reconcile the order in its entirety (which is done by using the module toolbar icons), or they may receive and reconcile each line item individually (which is done by using the component toolbar). Whether the order is completed in its entirety, or by each line item, the following status descriptions remain true:
Receiving module, users have the ability to receive and reconcile the order in its entirety (which is done by using the module toolbar icons), or they may receive and reconcile each line item individually (which is done by using the component toolbar). Whether the order is completed in its entirety, or by each line item, the following status descriptions remain true:
- Ready within the Receiving module means the line item has not undergone any change yet and is waiting to be received or reconciled.
 Reconciled means the line item has been reconciled, but has not yet been received. The item may not be completely fulfilled until it has been both reconciled AND received.
 Received signifies that the line item has been received into inventory, but has not yet been reconciled. The item may not be completely fulfilled until it has been both reconciled AND received; however, as soon as an item has been received, the inventory will become available for use within the Inventory module.
- Hold status is used to show that a part is on hold for one reason or another. A part cannot be received with an on hold status.
- Fulfilled appears after the line items have been both received AND reconciled. There is nothing more that needs to be done with an item once it has been fulfilled.
Purchase Order
The status of a purchase order is found in the top-right corner of the Purchase Order module's General subtab. This does not reflect the line-item status, but the order in its entirety.
- Bid Request: The order has been created and saved, but has not yet been issued.
- Issued: The order has been issued; however, all of the line items remain in Entered status and have not yet been fulfilled or partially fulfilled in any way.
- Partial: The order has been partially completed in some way. This usually means at least one line item has been Received, Reconciled, or Fulfilled, while other line items are still in the Started process.
- Voided: The order has been voided. Line items must be in Entered status to void an order. Orders with at least one item fulfilled are not voided; rather, they are Closed Short.
- Closed Short: The order has been closed short. This means one or more items on the order have been marked as Fulfilled when the order is closed.
- Picked: Items that are placed on a Credit Return Purchase Order have been picked, but are not yet shipped back to the vendor.
- Fulfilled: All line items have been fulfilled, meaning all line items have been successfully received, reconciled, and put into inventory. In the case of a credit return, all items have been picked and shipped.
Sales Order
The status of a sales order is found in the top-right corner of the Sales Order module's General subtab. This does not reflect the line-item status, but the order in its entirety.
- Estimate: The order has been created and saved, but has not yet been issued.
- Issued: The order has been issued; however, all of the line items remain in Entered status and have not yet been fulfilled or partially fulfilled in any way.
- In Progress: The order has been partially completed in some way. This could mean only some of the order has been fulfilled; or it could mean the entire order has been picked, but is not yet shipped.
- Closed Short: The order has been closed short. This means one or more items on the order have been marked as Fulfilled when the order is closed.
- Fulfilled: All of the line items have been fulfilled, meaning all of the line items have been successfully picked, packed, and shipped.
Database maintenance
We recommend that you run database maintenance about once a month.
- Double-click the Fishbowl Server icon in the system tray.
- Click the Stop button so that the database can be accessed.
- Click the Tools menu and then select Options
- On the Database tab, right-click the database and select Database Maintenance.


Viewing the database
The data stored in the Fishbowl database can be viewed in the ![]() Data module. This is helpful for extracting specific data used for reporting, or for troubleshooting.
Data module. This is helpful for extracting specific data used for reporting, or for troubleshooting.
Viewing the log files
Fishbowl will log any errors to text files stored in the logs folder (default location is C:\Program Files\Fishbowl\logs). Follow these steps to check for an error when something unexpected happens in Fishbowl.
- Open the fbserver.log and fbclient.log files.
- Scroll through the document looking for indented text. Often, this text will contain some information about what is causing the error.
- If the problem persists, make a copy of the log files and have them accessible when contacting Fishbowl Support.
The logging level can also be increased to show more detail and some of the database queries.
- Double-click the server tray icon.
- Select the Logging tab.

- Move the slider and/or select the option to show queries.

Run eve.bat and client.bat
When troubleshooting a problem in Fishbowl, it may be helpful to use the .bat files to run Fishbowl. This will open an additional window that displays errors and information that may not be visible when running Fishbowl in the traditional way.
NOTE: It is usually easier and faster to view the log files, instead of running eve.bat and client.bat.
Follow the steps below to launch the Fishbowl Server using eve.bat
- On the server computer, open the C:\Program Files\Fishbowl\server\bin folder. The actual path may vary depending on where Fishbowl was installed.
- Double-click the eve.bat file.
- Important information and errors will be output to the command window.


Follow the steps below to launch the Fishbowl Client using client.bat
- On the client computer, open the C:\Program Files\Fishbowl\client\bin folder. The actual path may vary depending on where Fishbowl was installed.
- Double-click the client.bat file.
- Important information and errors will be output to the command window.


Error messages are typically indented, making it easier to spot the issue. Reading the error message, or having the error message text available, when calling Fishbowl Support can often help to resolve the issue more quickly.
Troubleshooting
Understanding Fishbowl Errors
Many Fishbowl errors will be displayed in a window similar to the one below. Some error windows may also display a proposed fix to the problem. For example, the message below indicates that the street is missing from the address.

Clicking the ![]() Double Arrow button will display more information about the error.
Double Arrow button will display more information about the error.

Clicking the ![]() Copy button will copy all information about the error to the clipboard, allowing the error to be pasted into an email or saved for reference.
Copy button will copy all information about the error to the clipboard, allowing the error to be pasted into an email or saved for reference.
Server is Unable to Connect to Database
Error: The Fishbowl Server is unable to connect to database.
Reason: During the install, part of Fishbowl may have been blocked by firewalls and/or antiviruses on the computer. Or MySQL may need to be reinstalled.
Resolution: Reinstall Fishbowl
- Part of Fishbowl has been blocked by an antivirus or firewall. Uninstall Fishbowl and then reinstall with all firewalls and antiviruses turned off. After Fishbowl has been properly installed, you may turn on your firewalls and antiviruses again.
If you continue to experience problems with the database connecting, contact technical support at 800-774-7085 ext. 3

Client is Unable to Connect to Database
Error: The Fishbowl Client was unable to successfully connect to your database.
Reason: The Fishbowl Client cannot communicate with the Fishbowl Server
Resolution:
1. Confirm the Fishbowl Server is Running
- Ensure the Fishbowl Server Application is running.
- Ask if anyone else is able to log into Fishbowl.
- If no one else can log into Fishbowl the problem is most likely at the server. Most of the time the server application just needs to be started on the server computer. Launch the Fishbowl Server application to start it. Note that it might take a few minutes to start up and be ready for client connections. You can tell that the Fishbowl Server is ready for client connections when the Fishbowl Server icon in the task tray has no red or yellow indicators.
- If someone else is able to log into Fishbowl then the Fishbowl Server must already be running and the issue most likely something else. See step 2.
- Ask if anyone else is able to log into Fishbowl.
2. Verify the IP Address
- Confirm that you’re using the correct IP address.
- Ways to find the IP address of the server computer:
- From the Fishbowl Client login screen, Click the drop down arrow next to the server address, which should auto-populate the IP if it is set to broadcast.
- If the server address doesn’t show up in the drop down then we’ll need to go get it some other way. Here are a few ways you can get it:
- Ask your administrator for the IP Address of the computer where the Fishbowl Server Application runs
- Use Command prompt on the server computer:
- log in to the server computer:
- Open Command Prompt by clicking on the windows icon and typing in CMD, hit enter to start command prompt
- In command prompt type ipconfig, and press Enter.
- Look for the Local Area Network IPv4 address and use this address as the server address when logging in.
- If the server address doesn’t show up in the drop down then we’ll need to go get it some other way. Here are a few ways you can get it:
- From the Fishbowl Client login screen, Click the drop down arrow next to the server address, which should auto-populate the IP if it is set to broadcast.
- Ways to find the IP address of the server computer:
3. Check Server Visibility (Ping Test)
- You need to make sure that your computer can actually communicate with the Fishbowl Server’s Computer. You’ll need to be on the same network. Here’s how you can test this:
- On your client computer, open Command Prompt. Open Command Prompt by clicking on the windows icon and typing in CMD, hit enter to start command prompt
- Type ping [your-server-IP-address] and press Enter.
- If you receive a response, the connection is successful. If you see "Request timed out" or "Ping request could not find host," you may not be connected to the same network. Contact your IT administrator for assistance.
- If you receive a successful response continue to step 4.
4. Confirm Ports are Open (Telnet)
- Fishbowl requires ports 2456 (or 28192 if you're using the legacy login method) and 3306 to be open on the server computer.
- To check these ports are open use the windows Telnet feature:
- Enable Telnet. Telnet is not enabled by default so we'll have to enable it on your client computer. Here's how:
- Open control panel by clicking on the Windows button and searching “control panel” and hit enter.
- In Control Panel click on Programs and Features
- From programs and features click on Turn Windows features on or off
- Find and check the box for Telnet Client (This will require a restart of your computer)
- Test if a port is open using telnet client
- Launch the command prompt by clicking on the windows button and then typing in “CMD” and hit enter
- Once you’re in command prompt, type telnet [your-server-IP] [port-number] and press Enter. Example: telnet 192.168.1.100 2456
- If you get a failure message after 2-3 minutes the ports are closed, ask your IT administrator to open these ports and then try logging in again.
- If the command prompt changes to a blank screen, the port is open. Continue to step 5.
5. Temporarily Disable Antivirus or Firewall
- If possible, ask IT to temporarily disable the firewall to see if this resolves the issue.
- If it does allow you to login, Fishbowl may need to be added as an exception in your antivirus or firewall settings.
- If you still can't log in have your IT administrator re-enable the firewall and continue to step 6.
7. Limit Running Programs on the Server Computer
- On the server computer, close any unnecessary programs that could interfere with the Fishbowl connection.
- Other programs that could affect the Fishbowl Server include:
- Secondary Firewalls
- Secondary Antivirus'
- Other applications that use MySQL
- Other applications that use up a lot of memory on the server
- Other programs that could affect the Fishbowl Server include:
8. Reinstall Fishbowl Client (Client Computer Only)
- Uninstall Fishbowl from Add/Remove Programs in the Control Panel.
- Delete the Fishbowl folder (found in C:/Program Files or C:/Program Files (x86)).
- Reinstall Fishbowl.
Username and Password
Error: Unknown username and password.
Reason: The password or username is incorrect, or not recognized by Fishbowl as valid.
Resolution: Check to see if the keyboard is on CAPS LOCK. Passwords are case-sensitive. On new databases and the Bicycles database, the default username is admin and the password is admin.
Username: admin
Password: admin

In the event that the admin password is forgotten, Fishbowl Support can reset the password.
Begin Session Error

Possible error messages
- Error code=0x0. If the QuickBooks company data file is not open, a call to the "Begin Session" method must include the name of the data file.
- Unable to set up communication with QuickBooks. If the QuickBooks company data file is not open, a call to the "BeginSession" method must include the name of the datafile.
- Could not connect to the file.
- Unable to find the specified QuickBooks file.
Resolutions:
- Open QuickBooks
- Make sure QuickBooks can launch on the same computer that the Fishbowl Server is running on.
- Try to open QuickBooks. You may see an error message from QuickBooks that reads, "There appears to be a problem with the database service that is managing access to the company file. QuickBooks can attempt to fix the database service. Would you like QuickBooks to fix the problem?" Click Yes to this error message.
- The export to QuickBooks should now work.
- Restart QuickBooks
- Make sure QuickBooks can launch on the same computer that the Fishbowl Server is running on.
- If QuickBooks will not start, in the task manager under Processes, check the box at the bottom that says Show processes from all users.
- End any tasks that say Fishbowl, java.exe, or javaw.exe, as these are part of Fishbowl.
- Also, end the process QBW32.EXE, as this is part of QuickBooks.
- Now restart QuickBooks and Fishbowl, and repeat steps 1-2 above.
- Reconfigure Fishbowl's Accounting Configuration
- Make sure QuickBooks can launch on the same computer that the Fishbowl Server is running on.
- Open the Accounting module in Fishbowl.
- Go to the Configuration tab.
- Click "Test Connection." If the connection is green, you should be able to export.
- If the connection fails, click the Accounting Configuration wizard button.
- Complete the Configuration wizard. Note: Be sure you do your account mapping correctly on step 4 of the Configuration wizard by selecting "Choose from existing QuickBooks accounts."
Restart Fishbowl Server and Fishbowl Nexus
Follow the steps below to restart the Fishbowl Server and Fishbowl Nexus. Occasionally, these steps are necessary to resolve export issues.
- Right-click the Fishbowl Server tray icon and select Exit.

- Right-click the Fishbowl Nexus tray icon and select Exit.

- Start the Fishbowl Server using the desktop icon or C:\Program Files\Fishbowl\server\bin\Fishbowl Server.exe.
- Fishbowl Nexus will automatically start when running the accounting export.


Invalid Reference to QuickBooks Sales Rep
Error: The Fishbowl user "admin" does not have a QuickBooks sales rep with matching initials (ADM).
Reason: The specified sales rep in the error does not exist in the sales rep list in QuickBooks. If they do exist, their initials have been changed and are not identical to the initials for that sales rep in Fishbowl.
Resolution: In QuickBooks, go to Lists | Customer and Vendor Profile Lists | Sales Rep list. Find the name of the sales rep trying to export over and make sure the initials shown for them are identical to the initials given in Fishbowl (Note: even spaces will make a difference). If the sales rep does not exist in QuickBooks, create the rep with the exact same initials given in Fishbowl and then export again.

Invalid Reference to QuickBooks Customer or Vendor
Error: Bob Jones already exists in one of these QuickBooks lists: Sales Rep, Customer, Job, Vendor, Employee.
Reason: Neither QuickBooks nor Fishbowl allows the same name to be used for a customer, vendor, or employee. If the name already exists in one of those areas, it will need to be modified in QuickBooks.
Resolution: Go to QuickBooks and find the specified customer name under the vendor, customer, or employee list. (For example, if you had the error on a customer name, that customer likely already exists in QuickBooks as either a vendor or employee. If the error is on a vendor name, that name likely already exists in QuickBooks under the customer or employee list.) Wherever the name is found, you will need to slightly modify it so Fishbowl can create the name under either the vendor or customer list when it exports.
For example, if you had the customer name of Bob Jones on a Fishbowl invoice, and had that same name in QuickBooks as a vendor, you would need to go to QuickBooks and change Bob’s name under the vendor list. You would then need to create Bob Jones as a customer in QuickBooks exactly as he was created in Fishbowl. (Note: You have the choice to just change the vendor name and then export again. Fishbowl will automatically create the customer name in QuickBooks.)
