Install Fishbowl
Fishbowl fundamentals
Fishbowl's design is based on a need for intense inventory control software. We include features for outstanding business management, such as Sales Orders, Purchase Orders, Manufacturing, Customers, Vendors, Picking, Shipping, etc., and flawless integration with QuickBooks accounting software.
Fishbowl has two parts, the Client and the Server. The Fishbowl Server also includes a QuickBooks connector application that runs automatically called Nexus.

As illustrated above, your database (the server part of Fishbowl) is separate from the client (the software you see and use at the workstation).
Fishbowl hardware setup
Setting up your hardware is an important part of getting Fishbowl functioning efficiently. Depending on the number of users and the complexity of your system, the Fishbowl Client and Fishbowl Server software may reside on one or multiple computers. These three scenarios illustrate different ways Fishbowl may be configured to best serve your needs.


There are several solutions available for remote access, including a service called Fishbowl Hosted Services where we host your Fishbowl Server in the cloud. This eliminates the need to buy and maintain a local server computer and allows you to access it from anywhere.
Download the installer
The Fishbowl installer can be downloaded from the internet, or you may request a physical copy.
- The Fishbowl installer can be downloaded here.
- If you already have Fishbowl installed, you can right-click the server tray icon and select Check for updates to Update Fishbowl or to manually download the latest installer.


Install Fishbowl
See Fishbowl fundamentals and System Requirements to identify the hardware setup that will work best for Fishbowl. See Supported operating systems for the list of operating systems supported by Fishbowl.
Before installing Fishbowl, please turn off all firewalls and antiviruses on your computer. They may be turned on again immediately following the install. If you are performing an upgrade of Fishbowl, the server and clients must be shut down during the install.
- Complete these steps to install MySQL on the Fishbowl Server. MySQL does not need to be installed on computers that only need the Fishbowl Client.
- Download the latest Fishbowl installer from here.
- Double-click the Fishbowl installer.

- Select the Country, Business Type, and Industry. This will allow the creation of the most applicable demo database.

- Read and accept the License Agreement, and then click Next.
- If you haven't purchased a license key, select the 14 Day Fishbowl Trial and then complete the wizard. Otherwise, select Current Fishbowl User.

- Client Only: This option will install the client version of Fishbowl, which is the option to select for every computer other than your server. These clients will connect to your server through a network or internet access. This option allows you to specify a different install location if you wish. For simplicity, you can refer to #Install Fishbowl Client only when installing only the Fishbowl Client.
- Server with Client: This option installs both the Fishbowl Server and Fishbowl Client. It is recommended to install this only on your server computer, since workstations generally use the Client Only install. This option allows you to specify a different install location if you wish.
- Configure Advanced Settings: This option offers a few additions, such as adjusting memory allocation for the client and server, as well as the option to download and install iReport.
- Enter the license key. See Change license key for instructions on changing a trial license key to a permanent license key. You may also contact your sales rep or Fishbowl's support team at 1-800-774-7085 ext 3, or support@fishbowlinventory.com.

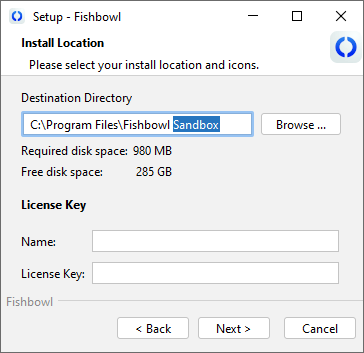
- You can also customize the install location and the icons that are created. Fishbowl can automatically start as soon as you log in to your computer.
- On the last step, select Run Fishbowl and then click Finish.


The Fishbowl Server always needs to be running before a client will be able to connect. A welcome screen will be displayed the first time you connect your client to the server. This is informing you that you are on an example database. If you would like to create your own database please review how to change your default database.
Congratulations! You are done with the install. If you have any further questions or concerns, please contact our support team at 1-800-774-7085 ext 3, or email support@fishbowlinventory.com.
Install Fishbowl Client only
If you've already installed the Fishbowl Server on your server computer, it's time to install the Fishbowl Client on each workstation that will connect to the Fishbowl Server. The same installer file is used for all installs, but the options that you select will be slightly different if you are only installing the Fishbowl Client.
- Download the latest Fishbowl installer from here.
- Double-click the Fishbowl installer.
- Select the Country, Business Type, and Industry. This will allow the creation of the most applicable demo database.
- Read and accept the License Agreement, and then click Next.
- Select Current Fishbowl User.

- You don't want to install the Fishbowl Server on each workstation. Just the Fishbowl Client, so select Client Only and then click Next.
- You can also customize the install location and the icons that are created. Fishbowl can automatically start as soon as you log in to your computer.
- On the last step, select Run Fishbowl and then click Finish.
- Now it's time to Start Fishbowl and log in.

Update Fishbowl
See Update Fishbowl.
Running multiple Fishbowl Servers
Follow the instructions below to run multiple Fishbowl Servers on the same network, or on the same computer. For more detailed information, see Sandbox.
Multiple Fishbowl Servers on the same network
- Complete the Fishbowl Server installation on each computer that will run a Fishbowl Server.
- Open any Fishbowl Client on the network and click the
 Find Fishbowl Servers button to search the network for Fishbowl Servers that are broadcasting their location on the default port.
 - Select a database from the Server Address dropdown or enter the computer name or IP address of any computer that is running a Fishbowl Server.

- Enter a valid username and password and then click Login.

Multiple Fishbowl Servers on the same computer
- Repeat the Fishbowl Server installation on the computer that already has a Fishbowl Server. It is important that each Fishbowl Server be installed in a separate directory.
- On the Installation Mode step of the installer, select Current Fishbowl User and select Server with Client.
- On the Select Destination Directory step of the installer, enter a new destination directory and then complete the installer.
- On the Installation Mode step of the installer, select Current Fishbowl User and select Server with Client.
- Open any Fishbowl Server. Then right-click the Fishbowl Server icon in the system tray and select Options.

- Click the Server tab in the Fishbowl Server Administration window. Then enter a different Server Port and click OK.

- Right-click the Fishbowl Server tray icon and select Start.
- Open any additional Fishbowl Servers. Each server must have a unique Server Port.
- Open any Fishbowl Client on the network and enter the computer name or IP address of the Fishbowl Server in the Server Address field.
- Change the Server Port to designate which Fishbowl Server the client should connect to.
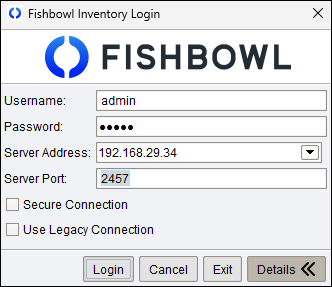
- Enter a valid username and password, and then click Login.


Move an existing installation
Moving an existing Fishbowl installation to a different server computer requires a way to transfer files, such as a USB thumb drive or a shared network folder. By default, the Fishbowl installation folder is located at C:\Program Files\Fishbowl, but this can be customized in the installation wizard. The following steps are for Fishbowl 2017 or later.
- Complete the Fishbowl installation on the new server computer.
- Copy any custom reports or custom plugins from the old server computer to the matching folders on the new server computer.
- Follow the steps to create a backup of the MySQL database on the old computer.
- Browse to Fishbowl\data\backups on the old computer and copy the latest .sql backup file to the new computer.
- Start the new Fishbowl Server and follow the steps to restore a database using the .sql file that was created.
- Once the new server is running, it may be necessary to change the server address when logging in from Fishbowl Clients.
- After logging into the new server, the latest versions of plugins can be downloaded from the
 Plugin module.
 - If applicable, the new Fishbowl Server may need to reintegrate with the Accounting system and any ODBC connections may need to be modified to point to the new server.
Uninstall Fishbowl
Follow the steps below to uninstall Fishbowl.
- Close the Fishbowl Server and the Fishbowl Client.
- Run the backup.bat file (default location is C:\Program Files\Fishbowl\server\bin\backup.bat) to make a backup of important files to the desktop.
- Run and complete the Fishbowl uninstaller (default location C:\Program Files\Fishbowl\uninstall.exe).
As a safety precaution, the uninstaller will leave the database and server folders in the installation directory, but these can be deleted manually if desired.
Install Fishbowl on Linux or Mac
See Fishbowl for Linux and Fishbowl for Mac.