|
|
| (33 intermediate revisions by 2 users not shown) |
| Line 1: |
Line 1: |
| {{Image|1|Reports}}
| | The '''Reports''' module displays many reports that can be customized and exported. Below is a general description of some common report options, followed by a [[#List of reports in Fishbowl Drive|list of reports]]. |
| | |
| == List of reports in Fishbowl Drive ==
| |
| The '''Reports''' module displays more than 20 reports that can be customized and exported. Below is a list of the included reports: | |
| | |
| * '''Barcode''' - This report generates barcodes for your items.
| |
| * '''Customer History''' - This report shows details on sales by customer.
| |
| * '''Cycle Count''' - This report generates a list of items to check their quantities on the shelves.
| |
| * '''Inventory Event History''' - This report lists when new items were received into your inventory or rejected.
| |
| * '''Inventory On Hand''' - This report shows how many items are in stock by location.
| |
| * '''Inventory Valuation Summary''' - This report shows the value of assets in stock.
| |
| * '''Item Barcode Label''' - This report generates barcodes for items in a specific purchase order.
| |
| * '''Item Barcode One Off''' - This report generates barcodes for your items on individual pages.
| |
| * '''Item Price List''' - This report lists sale items and their prices.
| |
| * '''Location Barcode''' - This report generates barcodes for your '''Parent Locations''' and '''Child Locations'''.
| |
| * '''On Hand By Expiration''' - This report lists items by their expiration date.
| |
| * '''Packing List''' - This report generates a packing list by Ship Number.
| |
| * '''Pick''' - This report shows information on a pick based on a sales order number.
| |
| * '''Purchase Order''' - This report shows information in a specific purchase order.
| |
| * '''Purchase Order Summary''' - This report lists all purchase orders in a date range.
| |
| * '''Receiving List''' - This report generates a receiving list by Receipt Number.
| |
| * '''Reorder''' - This report generates a list of items that have fallen below their reorder point.
| |
| * '''Sales Order''' - This report shows information in a specific sales order.
| |
| * '''Sales Order Summary''' - This report lists all sales orders in a date range.
| |
| * '''Shipping Invoice''' - This report generates a shipping invoice by Ship Number.
| |
| * '''Total Item Sales''' - This report lists all of your sales by item and dollar amount.
| |
|
| |
|
| | [[File:FBO Reports 1.png|border|837x837px]] |
| == Presets and options in all reports == | | == Presets and options in all reports == |
| In every report, you have the ability to customize it and then save your preferred settings by creating presets. Plus, there are several options or tools above each report that allow you to adjust it, print it, email it, and more. We will explain how to do those things in the following sections. | | In every report, you have the ability to customize it and then save your preferred settings by creating presets. Plus, there are several options or tools above each report that allow you to adjust it, print it, email it, and more. We will explain how to do those things in the following sections. |
|
| |
|
| === How to create a new preset === | | === How to create a new preset === |
| To save a revised report’s settings for easy access in the future, click the '''CREATE NEW PRESET''' button on the top right of the window. A popup will appear asking for just one thing: '''Preset Name'''. Add any name you like. For example, it can be the name of some of the settings the report includes. Then click the '''SAVE''' button. You can either do this before you begin making changes to the report, or you can do it at the end. If you want to make additional changes to the report, click the '''UPDATE''' button. The '''CREATE NEW PRESET''' button changes to '''UPDATE''' when you’re in a report preset. | | To save a revised report’s settings for easy access in the future, click the '''CREATE NEW PRESET''' button on the top-right of the window. A popup will appear asking for just one thing: '''Preset Name'''. Add any name you like. For example, it can be the name of some of the settings the report includes. Then click the '''SAVE''' button. You can either do this before you begin making changes to the report, or you can do it at the end. If you want to make additional changes to the report, click the '''UPDATE''' button. The '''CREATE NEW PRESET''' button changes to '''UPDATE''' when you’re in a report preset. |
|
| |
|
| === Additional presets === | | === Additional presets === |
| Line 37: |
Line 13: |
| The first report preset you create will automatically be the default. Once it’s saved, there will be a '''Default''' checkbox option above the '''UPDATE''' button. | | The first report preset you create will automatically be the default. Once it’s saved, there will be a '''Default''' checkbox option above the '''UPDATE''' button. |
|
| |
|
| If this isn’t the first time you’ve opened a report, and you previously created at least one preset, you will see the default report preset first thing. And you will be able to see all of the report presets you have saved listed in the dropdown menu on the top right. | | If this isn’t the first time you’ve opened a report, and you previously created at least one preset, you will see the default report preset first thing. And you will be able to see all of the report presets you have saved listed in the dropdown menu on the top-right. |
|
| |
|
| To set a new default report preset, click the '''Default''' checkbox in it and click the '''UPDATE''' button. If you uncheck the '''Default''' checkbox on the default report preset and click the '''UPDATE''' button, you’ll receive an error message. That’s because there usually has to be a default. However, if you delete the default report preset, there won’t be a default report, and it will show the original default options when you click the '''Show Report''' option under the {{Icon Button|More}} in an individual receipt. That is, until you select a report preset as the default or create a new one. | | To set a new default report preset, click the '''Default''' checkbox in it and click the '''UPDATE''' button. If you uncheck the '''Default''' checkbox on the default report preset and click the '''UPDATE''' button, you’ll receive an error message. That’s because there usually has to be a default. However, if you delete the default report preset, there won’t be a default report, and it will show the original default options when you click the '''Show Report''' option under the {{Icon Button|More}} in an individual receipt. That is, until you select a report preset as the default or create a new one. |
| Line 46: |
Line 22: |
|
| |
|
| === Report options === | | === Report options === |
| The following buttons are at the top of each report to enable you to make adjustments and send the report to other people: | | The following buttons are at the top of each report to enable you to make adjustments and send the report to other people. Tooltips appear when you mouse over these buttons for a couple seconds. They succinctly explain what each one does. |
|
| |
|
| * '''Zoom Out''' - This makes the text in the report appear smaller. | | * '''Zoom Out''' - This makes the text in the report appear smaller. |
| Line 53: |
Line 29: |
| * '''Next Page''' - If the report has multiple pages, this button enables you to move to the next page. | | * '''Next Page''' - If the report has multiple pages, this button enables you to move to the next page. |
| * '''Previous Page''' - If the report has multiple pages, this button enables you to move to the previous page. | | * '''Previous Page''' - If the report has multiple pages, this button enables you to move to the previous page. |
| * '''Download XSLX File''' - This enables you to download the report into an XSLX file, which you can open in Excel. | | * '''Download XLSX File''' - This enables you to download the report into an XLSX file, which you can open in Excel. |
| * '''Download PDF''' - This enables you to download the report into a PDF, which you can open with Adobe Acrobat. | | * '''Download PDF''' - This enables you to download the report into a PDF, which you can open with Adobe Acrobat. |
| * '''Print Report''' - This enables you to print a hard copy of the report. | | * '''Print Report''' - This enables you to print a hard copy of the report. |
| Line 59: |
Line 35: |
| * '''Expand''' - This expands the report to the full size of your browser window. When you click this button, it changes to a '''Contract''' button, which you can click to return the report to its previous smaller size. | | * '''Expand''' - This expands the report to the full size of your browser window. When you click this button, it changes to a '''Contract''' button, which you can click to return the report to its previous smaller size. |
|
| |
|
| == Barcode report == | | = List of reports in Fishbowl Drive = |
| The '''Barcode''' report doesn’t have column headers or anything like that. It’s quite simple, really. All it has on it are barcodes for your items. When you first click on this report, it will have a barcode for every item in the '''Items''' module, and it will have each item’s name under its barcode. This isn’t limited by the type of item. Inventory, Non Inventory, Shipping, Bundle, Service, Labor, and Overhead items will all receive barcodes.
| | Below is a list of the included reports in alphabetical order. Click the report to see more details. |
| | |
| === Optional ===
| |
| On the right of the report, you will find several '''Optional''' features to select which barcodes will be displayed:
| |
| | |
| * '''Item''' - A dropdown menu to narrow down the report to a barcode for the selected item. By default, you will see barcodes for all items, but this lets you focus in on just one, excluding all others. You can create a new item by entering a name for the item in the textbox and hitting Enter or clicking the '''+ Add''' option. Then fill out the '''New Item''' wizard that pops up.
| |
| * '''Count''' - A textbox to enter the number of copies of each barcode to include in the report. By default, the number of copies will be 1, but you can enter 2, 3, etc. to multiply the barcode count by that number.
| |
| * '''Starting Label''' - A textbox to enter the number of barcodes to skip. By default, this will be filled with the equivalent of 0, but if you enter 1, the first barcode will be excluded from this report. If you enter 2, the first two barcodes will be excluded, and so forth.
| |
| * '''Produced From Type''' - A dropdown menu to limit the barcodes displayed by their source. There are three fields from the '''General''' tab of the '''Items''' module you can choose from to determine which barcodes are included in the report:
| |
| ** '''Name''' - The name of each item. This is the default field used for this report. Since all items have a name, they will all be included.
| |
| ** '''Barcode/UPC''' - The universal product code for each item. This field isn’t required, so not every item might have one.
| |
| ** '''SKU''' - The stock-keeping unit number for each item. This field isn’t required, so not every item might have one.
| |
| * '''Format Report For Exporting''' - A checkbox that is supposed to remove the page breaks and display the report on one long page for exporting to PDF and CSV formats. It isn’t working currently, but hopefully it will in the future.
| |
| * '''Show Description''' - A checkbox that adds each item’s description under its name on the report. If there is no description in the '''Items''' module, nothing will appear.
| |
| * '''Show Price''' - A checkbox that adds each item’s price above its barcode on the report.
| |
| * '''Show UPC''' - A checkbox that adds each item’s universal product code under its barcode on the report. Of course, this only applies to items that have a UPC in the '''Items''' module.
| |
| | |
| To select all of the status fields at once, click the '''Select All Optional''' checkbox. The '''Select All Optional''' checkbox won’t affect any of the dropdown menus or textboxes under the '''Optional''' header. Those will have to be updated manually. To search for an option in a dropdown menu, click in that field and begin entering text. It will show all options that have that text in them.
| |
| | |
| To apply your changes and see what they look like in the report, click the '''GENERATE REPORT''' button on the bottom right. And follow the directions at the top of this article to save your changes to a '''Preset'''.
| |
| | |
| == Customer History report ==
| |
| The '''Customer History''' report displays information about each customer’s purchases. In addition to the '''Reports''' module, you can access this report in the '''Customers''' module. Click the {{Icon Button|More}} in the action bar on the main page of that module. Click '''Show Report''' to bring up the '''Customer History''' report.
| |
| | |
| This report initially has the following sections and column headers:
| |
| | |
| * '''Sale Item''' - The name of each sale item sold to a customer. This column header will appear by default or if you select '''Customer''' in the '''Order By''' field.
| |
| * '''Customer''' - The name of the customer who purchased a particular item on a sales order. This column header will appear if you select '''Sale Item''' in the '''Order By''' field.
| |
| * '''Description''' - The description of the sale item. This column header will appear by default or if you select '''Customer''' in the '''Order By''' field.
| |
| * '''SO #''' - The sales order number the sale item is contained in.
| |
| * '''Shipped''' - The month, day, and year (MM/DD/YYYY) the item was shipped. If the item hasn’t been shipped yet, this will display its current status of '''Entered''', '''Picked''', etc.
| |
| * '''Qty''' '''Shipped''' - The number of units of an item being shipped, along with their unit of measure.
| |
| * '''Price''' - The price charged to the customer for each unit of an item.
| |
| * '''Totals''' - Each customer’s total '''Quantity Shipped''' and '''Price''' paid for sale items. If you change the '''Order By''' field to '''Sale Item''', the total will be for each sales order, not each customer.
| |
| * '''Grand Total''' - All customers’ total '''Quantity Shipped''' and '''Price''' paid for sale items.
| |
| | |
| At the top of the report, you will see your company name followed by the '''Date Range''' the report includes. By default, you will be able to see all customers on the report. But you can narrow down the results to a single customer or sale item by using the '''Optional''' features on the right of the report.
| |
| | |
| === Optional ===
| |
| These are the '''Optional''' fields that you can use to modify the report:
| |
| | |
| * '''Customer''' - A dropdown menu to select a customer to include in the report. All other customers will be excluded if you fill this field with one. By default, all customers are included in the report. You can create a new customer by entering their name in the textbox and hitting Enter or clicking the '''+ Add''' option. Then fill out the '''New Customer''' wizard that pops up.
| |
| * '''Order By''' - A dropdown menu that enables you to group the information in this report by one of two criteria:
| |
| ** '''Sale Item''' - Group all sales orders under each sale item.
| |
| ** '''Customer''' - Group all sales orders under each customer. This is the default choice if you leave this field empty.
| |
| * '''Sales Representative''' - A dropdown menu that enables you to only display sales orders that were created by a specific sales rep within your organization. You can’t create a new sales rep from here, nor can you select more than one.
| |
| * '''Location''' - A dropdown menu that shows a list of all of the locations you have created in the '''Locations''' module under the '''Setup''' module group. Select one to see all sales orders connected to that location and no other. You can create a new location by entering a name for the location in the textbox and hitting Enter or clicking the '''+ Add''' option. Then fill out the '''New Location''' wizard that pops up.
| |
| * '''Report Title''' - A textbox to enter the title of the report, which will appear at the top in between your company name and the '''Date Range'''.
| |
| * '''Sale Item''' - A dropdown menu to select a sale item from the list of ones you created in the '''Items''' module under the '''Materials''' module group. You can select a sale item to see all sales orders containing it. You can’t create a new sale item from here, nor can you select more than one.
| |
| * '''Sales Order Number''' - A dropdown menu to select a sales order from the list of ones that are in the '''Sales Orders''' module. All other sales orders will be excluded if you fill this field with one.
| |
| * '''Date Range''' - Clicking this textbox brings up a calendar to select a start and end date for the report. In addition, you can select one of these options on the right of the calendar:
| |
| ** Today
| |
| ** Yesterday
| |
| ** This Week
| |
| ** Last Week
| |
| ** Last 7 Days
| |
| ** This Month
| |
| ** Last Month
| |
| * '''Include Credit Return Items''' - A checkbox that enables items being returned from customers or to vendors to be included in this report.
| |
| * '''Include Misc Sale Items''' - A checkbox that enables Miscellaneous Sale Items to be included in this report.
| |
| * '''Include Misc Credit Items''' - A checkbox that enables Miscellaneous Items being returned from customers to be included in this report.
| |
| | |
| To select all of the status fields at once, click the '''Select All Optional''' checkbox. The '''Select All Optional''' checkbox won’t affect any of the dropdown menus or textboxes you see under the '''Optional''' header. Those will have to be updated manually. To search for an option in a dropdown menu, click in that field and begin entering text. It will show all options that have that text in them.
| |
| | |
| To apply your changes and see what they look like in the report, click the '''GENERATE REPORT''' button on the bottom right. And follow the directions at the top of this article to save your changes to a '''Preset'''.
| |
| | |
| | |
| == Cycle Count report ==
| |
| The '''Cycle Count''' report, or '''Cycle Count List''', generates a list of all items and current quantities organized by location. There is a blank line to write the actual item quantities during a physical count of inventory.
| |
| | |
| In addition to the '''Reports''' module, you can access this report in the '''Inventory''' module. Click on an inventory item, and then click the {{Icon Button|More}} in the action bar of that module. Click '''Show Report''' to bring up four options. Select '''Cycle Count''', and it will generate a report for the inventory item you clicked on.
| |
| | |
| When you first open this report, it will have the following column header and section:
| |
| | |
| * '''Item''' - The name of each item at a particular location, as well as its description. These items will be in alphabetical order. There may also be some information below an item, depending on if you have attached tracking criteria to it:
| |
| ** Lot Number
| |
| ** Expiration Date
| |
| * '''Blank Line''' - The line on the right of each item is deliberately left blank for a warehouse worker to fill it with the actual quantity in stock. If there is a discrepancy, you can update the quantity in the '''Inventory''' module to fix it.
| |
| | |
| === Optional ===
| |
| To the right of the report are several '''Optional''' fields you can use to customize this report:
| |
| | |
| * '''Location''' - A dropdown menu to select a single location to check item quantities at. By default, you will be able to see items at all locations, but this allows you to narrow down your focus to just one location. You can create a new location by entering a name for the location in the textbox and hitting Enter or clicking the '''+ Add''' option. Then fill out the '''New Location''' wizard that pops up.
| |
| * '''Item''' - A dropdown menu to select a single item to check its quantity at one or more locations. You can create a new item by entering a name for the item in the textbox and hitting Enter or clicking the '''+ Add''' option. Then fill out the '''New Item''' wizard that pops up.
| |
| * '''Show Zero Quantity Items''' - A checkbox that adds a section at the end of the report under the header '''Items Without Quantity'''. That way, there will be no doubt which items aren’t expected to be in stock, even if you don’t click the '''Show Quantity''' checkbox.
| |
| * '''Show Quantity''' - A checkbox that adds each item’s quantity next to the blank line in the report. This is important because it allows you to compare the actual quantity to what is expected.
| |
| * '''Show Serial Numbers''' - A checkbox that adds serial numbers as a tracking method to items that have it. You may have noticed that serial numbers were missing by default under the '''Item''' column header above. This allows you to add a section for serial numbers, or '''SN(s)''', if you like.
| |
| | |
| To select all of the status fields at once, click the '''Select All Optional''' checkbox. The '''Select All Optional''' checkbox won’t affect the dropdown menus under the '''Optional''' header. Those will have to be updated manually. To search for an option in a dropdown menu, click in that field and begin entering text. It will show all options that have that text in them.
| |
| | |
| To apply your changes and see what they look like in the report, click the '''GENERATE REPORT''' button on the bottom right. And follow the directions at the top of this article to save your changes to a '''Preset'''.
| |
| | |
| | |
| == Inventory Event History report ==
| |
| The '''Inventory Event History''' report shows every time that a user changed the status of units of items at specific locations over a certain date range. This can help with finding when a mistake was made or when a specific unit was added or removed from your inventory.
| |
| | |
| This report has the following column headers:
| |
| | |
| * '''Location''' - The '''Parent Location''' or '''Child Location''' where an event occurred. It also includes the month, day, and year (MM/DD/YYYY) and time (HH:MM AM/PM) it was recorded.
| |
| * '''Event''' - The action that occurred in relation to an item. There are many things it can include. This list may not be exhaustive, but these are many of the events that can be in this column:
| |
| ** Add
| |
| ** Add Tracking
| |
| ** Adjust Cost
| |
| ** Commit
| |
| ** Cycle
| |
| ** Finish
| |
| ** Receive
| |
| ** Remove
| |
| ** Ship
| |
| ** Void
| |
| * '''Change Qty''' - The number of units affected by an event.
| |
| * '''On Hand''' - The total number of units in stock after an event was recorded. Note that this quantity isn’t necessarily all available. For example, some or all of it may be committed to a sales order.
| |
| * '''Note''' - A note that was written by a user when an event was recorded. This can describe the action and/or explain their reason for it.
| |
| * '''User''' - The name of the user who made a change to an item.
| |
| * '''Item''' - The item that has units being affected by an event.
| |
| * '''Tracking Info''' - The serial numbers, lot numbers, and/or expiration dates attached to units being added, committed, shipped, received, or otherwise modified.
| |
| | |
| === Optional ===
| |
| To the right of the report are several '''Optional''' fields you can use to customize this report:
| |
| | |
| * '''Date Range''' - A textbox that brings up a calendar to select a start and end date for the report. In addition, you can select one of these options on the right of the calendar:
| |
| ** Today
| |
| ** Yesterday
| |
| ** This Week
| |
| ** Last Week
| |
| ** Last 7 Days
| |
| ** This Month
| |
| ** Last Month
| |
| * '''User''' - A dropdown menu to select a user to see which events he or she is responsible for. By default, all users will be included in the report, but this lets you narrow down the results to a single user. You can create a new user by entering their name in the textbox and hitting Enter or clicking the '''+ Add''' option. Then fill out the '''New User''' wizard that pops up. If you have an available user account, you will be able to create a new user.
| |
| * '''Parent Location''' - A dropdown menu to select a main location that other locations fall under. This can be the main warehouse or another large location with many aisles, departments, and shelves within it. If you only select a '''Parent Location''' and not a '''Child Location''' in the field below, you will only see events that took place at that exact '''Parent Location'''. You won’t see anything that happened at any of its '''Child Locations'''. By default, every location will be on this report. Selecting one from this list will narrow down the results.
| |
| * '''Child Location''' - A dropdown menu to select a sublocation that falls under a '''Parent Location'''. To select a '''Child Location''', first select a '''Parent Location''' in the dropdown menu directly above this one. Then, when you click on this dropdown menu, it will automatically populate with every '''Child Location''' under the selected '''Parent Location'''.
| |
| * '''Item''' - A dropdown menu to narrow down the report to events involving a single item. By default, you will see events for all items, but this lets you focus in on just one item, excluding all others. You can create a new item by entering a name for the item in the textbox and hitting Enter or clicking the '''+ Add''' option. Then fill out the '''New Item''' wizard that pops up.
| |
| * '''Tracking Info''' - A textbox to enter part or all of a serial number, lot number, or expiration date to narrow down the results in the report. Only items that have the number you enter into this textbox will appear. For example, if you enter 1, then events with units containing an expiration date with “01” or “11” in their month or day, and “1” anywhere in their serial number or lot number will be in the report.
| |
| | |
| To search for an option in a dropdown menu, click in that field and begin entering text. It will show all options that have that text in them.
| |
| | |
| To apply your changes and see what they look like in the report, click the '''GENERATE REPORT''' button on the bottom right. And follow the directions at the top of this article to save your changes to a '''Preset'''.
| |
| | |
| | |
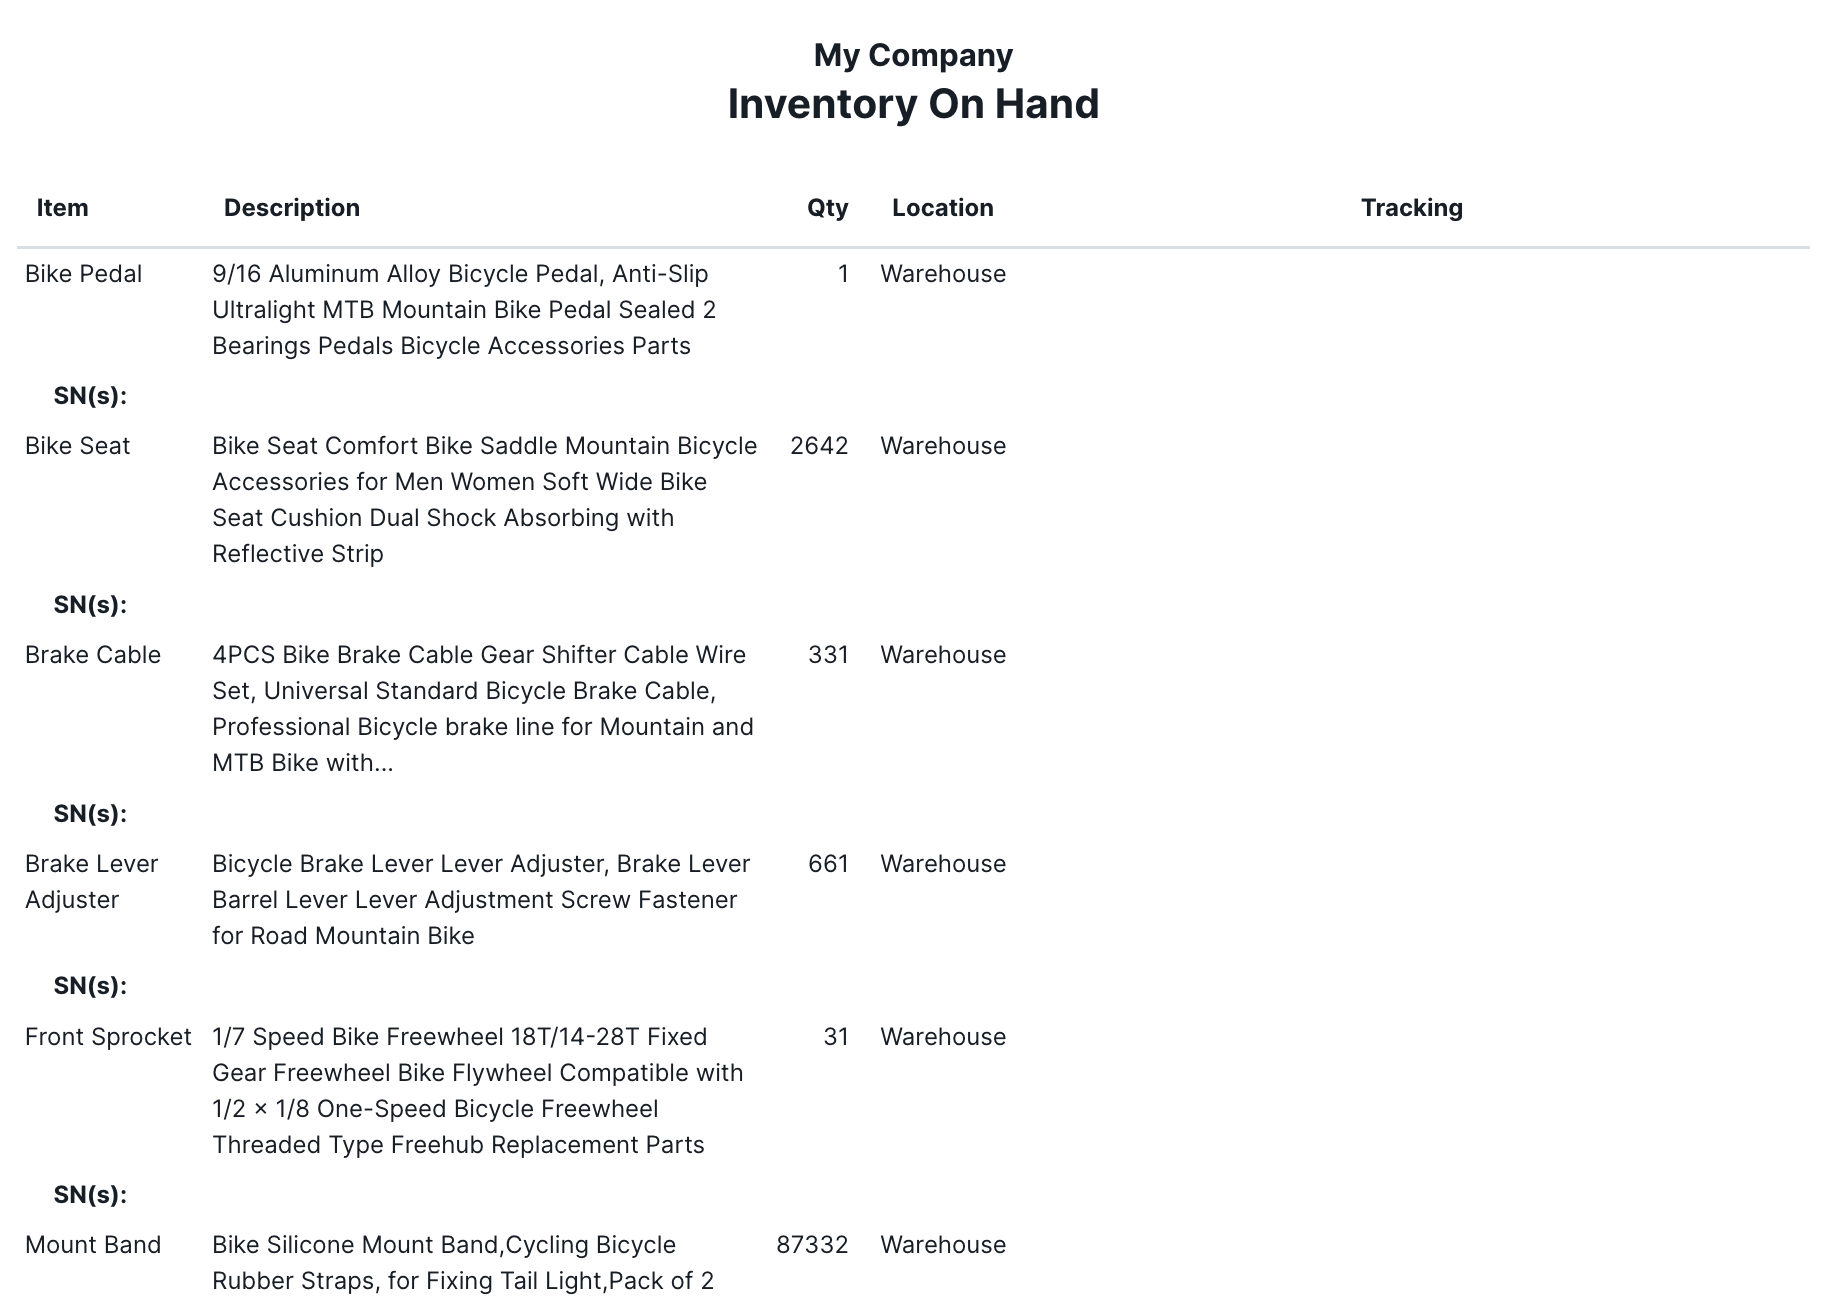
| == Inventory On Hand report ==
| |
| The '''Inventory On Hand''' report displays a list of items with their current quantity on hand by location. Other than the '''Reports''' module, there are three ways to access this report:
| |
| | |
| # On the main page of the '''Inventory''' module, next to the '''FORECASTING''' button in the action bar is the '''REPORT''' button. Click it to bring up the '''Inventory On Hand''' report for all of your inventory items.
| |
| # On an individual inventory item in the '''Inventory''' module, there is a {{Icon Button|More}} in the action bar. Click it to bring up four report options. Select '''Inventory On Hand''', and it will generate a report for the inventory item you clicked on.
| |
| # On an individual item in the '''Items''' module, there is a {{Icon Button|More}} in the action bar. Click it to bring up three report options. Select '''Inventory On Hand''', and it will generate a report for the item you clicked on.
| |
| | |
| The '''Inventory On Hand''' report initially has the following columns:
| |
| | |
| * '''Item''' - The identifying designation for the item from the '''Items''' module.
| |
| * '''Description''' - An explanation of what the item is from the '''Items''' module.
| |
| * '''Qty''' - The number or quantity of the item that is in stock in the '''Inventory''' module.
| |
| * '''Location''' - The place within your inventory where the item is located.
| |
| | |
| In addition, you can add a '''Tracking''' column, which contains the tracking information for each item. Click the checkbox next to '''Show Tracking''' on the right. You can also click the checkbox next to '''Select All Optional''', and it will have the same effect. Then serial numbers, or '''SN(s)''', will be added to the '''Item''' column, and a new '''Tracking''' column will appear with other tracking criteria, such as expiration dates and lot numbers.
| |
| | |
| === Optional ===
| |
| Under '''Select All Optional''', there are the following for you to filter results and modify the report:
| |
| | |
| * '''Location''' - A dropdown menu to only list items at one '''Parent Location''' or '''Child Location'''. By default, all locations will be included on the report. But you can narrow down the results to a single location by selecting one in this field. You can create a new location by entering a name for the location in the textbox and hitting Enter or clicking the '''+ Add''' option. Then fill out the '''New Location''' wizard that pops up.
| |
| * '''Item''' - A dropdown menu to only list a single item. You can create a new item by entering a name for the item in the textbox and hitting Enter or clicking the '''+ Add''' option. Then fill out the '''New Item''' wizard that pops up.
| |
| * '''Tracking Value''' - A textbox where you can enter a lot number, serial number, or other tracking value to narrow down your search to a specific item or a group of items.
| |
| * '''Show Tracking''' - A checkbox to add a '''Tracking''' column header on the right of the '''Location''' column.
| |
| | |
| If you only choose a location and not an item in the fields above, the report will include all items at that location. If you only choose an item and not a location in the fields above, the report will include all locations where that item is found. But if you choose both a location and an item, the report will only include information about that item at that specific location.
| |
| | |
| To search for an option in a dropdown menu, click in that field and begin entering text. It will show all options that have that text in them.
| |
| | |
| To apply your changes and see what they look like in the report, click the '''GENERATE REPORT''' button on the bottom right. And follow the directions at the top of this article to save your changes to a '''Preset'''.
| |
| | |
| | |
| == Inventory Valuation Summary report ==
| |
| The '''Inventory Valuation Summary''' report generates an overview of the quantity and value of all items currently on hand. Cost values are based on today’s costs. You can use this report to compare inventory asset value between Fishbowl and your accounting system when running an Actual or Average costing method in Fishbowl Drive.
| |
| | |
| In addition to the '''Reports''' module, you can access this report in the '''Inventory''' module. Click on an inventory item, and then click the {{Icon Button|More}} in the action bar. Click '''Show Report''' to bring up four options. Select '''Inventory Valuation Summary''', and it will generate a report for the inventory item you clicked on.
| |
| | |
| This report includes the following column headers and sections:
| |
| | |
| * '''Item''' - The name of each item at a particular location. That location will be a '''Parent Location''' by default, but you can change it to a '''Child Location''' using the '''Show Location Details''' checkbox on the right of the report. In addition, you can change the whole setup of this report by selecting '''Item''' in the '''Group By''' dropdown menu. That will display every location where units of an item are found under that item as the header.
| |
| * '''Description''' - An explanation of what an item is from the '''Items''' module.
| |
| * '''Asset Account''' - The ledger account from the '''Chart of Accounts''' module that an item is included under for accounting purposes.
| |
| * '''Qty''' - The number of an item’s units that are currently in stock, along with their unit of measure.
| |
| * '''Unit Cost''' - The amount of money you paid to obtain a single unit of an item.
| |
| * '''Asset Value''' - The total value of all units of an item, which is calculated using this equation: '''Qty''' x '''Unit Cost'''. It might not add up perfectly because the '''Unit Cost''' in this report cuts off at the second digit after a decimal point while the '''Average Cost''' field in the '''Items''' module can include several more digits after a decimal point.
| |
| * '''Location Total''' - A summary of how many units of all items are at a particular location, as well as their total '''Asset Value'''. This changes to '''Item Total''' if you select '''Item''' in the '''Group By''' dropdown menu. And then it will show the '''Qty''' of a single item’s units across all locations, as well as their total '''Asset Value'''
| |
| | |
| === Optional ===
| |
| To the right of the report are several '''Optional''' fields you can use to customize this report:
| |
| | |
| * '''Date To''' - A textbox that brings up a calendar to select an end date (MM/DD/YYYY) for the report. Only inventory added before the date you select will be in the report. By default, it will be the present date, but you can enter any date in the past to get a snapshot of what your inventory valuation looked like at that point.
| |
| * '''Group By''' - A dropdown menu that enables you to reorganize the items in this report by one of two criteria:
| |
| ** '''Location''' - This organizes all items under each location where they are stored. This is the default option for this report.
| |
| ** '''Item''' - This organizes all locations where an item is stored under that item’s name.
| |
| * '''Location''' - A dropdown menu to select a '''Parent Location''' or '''Child Location''' to include in this report. All other locations will then be excluded. By default, every location will be on this report. Selecting one from this list will narrow down the results significantly unless you only have one location. You can create a new location by entering a name for the location in the textbox and hitting Enter or clicking the '''+ Add''' option. Then fill out the '''New Location''' wizard that pops up.
| |
| * '''Item''' - A dropdown menu to narrow down the report to a single item. You can create a new item by entering a name for the item in the textbox and hitting Enter or clicking the '''+ Add''' option. Then fill out the '''New Item''' wizard that pops up.
| |
| * '''Costing Method''' - A dropdown menu to select a costing method to run this report for. There are two options you can choose from:
| |
| ** Actual
| |
| ** Average
| |
| * '''Show Location Details''' - A checkbox that allows '''Child Locations''' to be displayed in this report instead of only '''Parent Locations'''. By default, items at '''Child Locations''' will be counted under the '''Parent Location''' over those smaller locations. But clicking this checkbox allows for more precision in seeing exactly where each item is located.
| |
| | |
| To select all of the status fields at once, click the '''Select All Optional''' checkbox. The '''Select All Optional''' checkbox won’t affect any of the dropdown menus or the textbox under the '''Optional''' header. Those will have to be updated manually. To search for an option in a dropdown menu, click in that field and begin entering text. It will show all options that have that text in them.
| |
| | |
| To apply your changes and see what they look like in the report, click the '''GENERATE REPORT''' button on the bottom right. And follow the directions at the top of this article to save your changes to a '''Preset'''.
| |
| | |
| | |
| == Item Barcode Label report ==
| |
| The '''Item Barcode Label''' report is similar to the '''Barcode''' report. Just like that one, it doesn’t have column headers or anything like that. All it has on it are barcodes for your items in purchase orders. When you first click on this report, it will be blank because you need to select a purchase order to display barcodes for the items in it.
| |
| | |
| Once you do that and click the '''GENERATE REPORT''' button, you will see that each barcode has an item name under it. This isn’t limited by the type of item. Inventory, Non Inventory, Shipping, Bundle, Service, Labor, and Overhead items will all receive barcodes. However, miscellaneous items won’t have a barcode.
| |
| | |
| === Optional ===
| |
| On the right of the report, you will find several '''Optional''' features to customize the barcodes that are displayed:
| |
| | |
| * '''Purchase Order''' - A dropdown menu to select a purchase order to generate barcodes for the item(s) in it.
| |
| * '''Item''' - A dropdown menu to narrow down the report to a barcode for the selected item. By default, you will see barcodes for all items in a purchase order, but this lets you focus in on just one item, excluding all others. You can create a new item by entering a name for the item in the textbox and hitting Enter or clicking the '''+ Add''' option. Then fill out the '''New Item''' wizard that pops up.
| |
| * '''Count''' - A textbox to enter the number of copies of each barcode to include in the report. By default, the number of copies will be 1, but you can enter 2, 3, etc. to multiply the barcode count by that number.
| |
| * '''Starting Label''' - A textbox to enter the number of barcodes to skip. By default, this will be filled with the equivalent of 0, but if you enter 1, the first barcode will be excluded from this report. If you enter 2, the first two barcodes will be excluded, and so forth.
| |
| * '''Produced From Type''' - A dropdown menu to limit the barcodes displayed by their source. There are three fields from the '''General''' tab of the '''Items''' module you can choose from to determine which barcodes are included in the report:
| |
| ** '''Name''' - The name of each item. This is the default field used for this report. Since all items have a name, they will all be included.
| |
| ** '''Barcode/UPC''' - The universal product code for each item. This field isn’t required, so not every item might have one.
| |
| ** '''SKU''' - The stock-keeping unit number for each item. This field isn’t required, so not every item might have one.
| |
| * '''Format Report For Exporting''' - A checkbox that is supposed to remove the page breaks and display the report on one long page for exporting to PDF and CSV formats. It isn’t working currently, but hopefully it will in the future.
| |
| * '''Show Description''' - A checkbox that adds each item’s description under its name on the report. If there is no description in the '''Items''' module, nothing will appear.
| |
| * '''Show Price''' - A checkbox that adds each item’s price above its barcode on the report.
| |
| * '''Show UPC''' - A checkbox that adds each item’s universal product code under its barcode on the report. Of course, this only applies to items that have a UPC in the '''Items''' module.
| |
| | |
| To select all of the status fields at once, click the '''Select All Optional''' checkbox. The '''Select All Optional''' checkbox won’t affect any of the dropdown menus or textboxes under the '''Optional''' header. Those will have to be updated manually. To search for an option in a dropdown menu, click in that field and begin entering text. It will show all options that have that text in them.
| |
| | |
| To apply your changes and see what they look like in the report, click the '''GENERATE REPORT''' button on the bottom right. And follow the directions at the top of this article to save your changes to a '''Preset'''.
| |
| | |
| | |
| == Item Barcode One Off report ==
| |
| The '''Item Barcode One Off''' report is similar to the '''Barcode''' report and the '''Item Barcode Label''' report. Just like those two, it doesn’t have column headers or anything like that. All it has on it are barcodes for all of your items in a specific format. When you first click on this report, it will be blank because you need to select a label format to display every item’s barcode in.
| |
| | |
| Once you do that and click the '''GENERATE REPORT''' button, you will see that each barcode has an item name under it. This isn’t limited by the type of item. Inventory, Non Inventory, Shipping, Bundle, Service, Labor, and Overhead items will all receive barcodes.
| |
| | |
| === Optional ===
| |
| On the right of the report, you will find several '''Optional''' features to customize the barcodes that are displayed:
| |
| | |
| * '''Labels''' - A dropdown menu to select a label format to generate barcodes in. There are eight options:
| |
| ** 2” x 1” labels
| |
| ** 2” x 1.25” labels
| |
| ** 2” x 1.1875” labels
| |
| ** 2” x 3” labels
| |
| ** 3” x 1.75” labels
| |
| ** 4” x 2” labels
| |
| ** 4” x 3” labels
| |
| ** 4” x 6” labels
| |
| * '''Item''' - A dropdown menu to narrow down the report to a barcode for the selected item. By default, you will see barcodes for all items, but this lets you focus in on just one item, excluding all others. You can create a new item by entering a name for the item in the textbox and hitting Enter or clicking the '''+ Add''' option. Then fill out the '''New Item''' wizard that pops up.
| |
| * '''Count''' - A textbox to enter the number of copies of each barcode to include in the report. By default, the number of copies will be 1, but you can enter 2, 3, etc. to multiply the barcode count by that number.
| |
| * '''Starting Label''' - A textbox to enter the number of barcodes to skip. By default, this will be filled with the equivalent of 0, but if you enter 1, the first barcode will be excluded from this report. If you enter 2, the first two barcodes will be excluded, and so forth.
| |
| * '''Produced From Type''' - A dropdown menu to limit the barcodes displayed by their source. There are three fields from the '''General''' tab of the '''Items''' module you can choose from to determine which barcodes are included in the report:
| |
| ** '''Name''' - The name of each item. This is the default field used for this report. Since all items have a name, they will all be included.
| |
| ** '''Barcode/UPC''' - The universal product code for each item. This field isn’t required, so not every item might have one.
| |
| ** '''SKU''' - The stock-keeping unit number for each item. This field isn’t required, so not every item might have one.
| |
| * '''Format Report For Exporting''' - A checkbox that is supposed to remove the page breaks and display the report on one long page for exporting to PDF and CSV formats. It isn’t working currently, but hopefully it will in the future.
| |
| * '''Show Description''' - A checkbox that adds each item’s description under its name on the report. If there is no description in the '''Items''' module, nothing will appear.
| |
| * '''Show Price''' - A checkbox that adds each item’s price above its barcode on the report. This can be helpful for labeling items that will be sold to customers.
| |
| * '''Show UPC''' - A checkbox that adds each item’s universal product code under its barcode on the report. Of course, this only applies to items that have a UPC in the '''Items''' module.
| |
| | |
| To select all of the status fields at once, click the '''Select All Optional''' checkbox. The '''Select All Optional''' checkbox won’t affect any of the dropdown menus or textboxes under the '''Optional''' header. Those will have to be updated manually. To search for an option in a dropdown menu, click in that field and begin entering text. It will show all options that have that text in them.
| |
| | |
| To apply your changes and see what they look like in the report, click the '''GENERATE REPORT''' button on the bottom right. And follow the directions at the top of this article to save your changes to a '''Preset'''.
| |
| | |
| | |
| == Item Price List report ==
| |
| The '''Item Price List''' report displays information about each sale item and its price. In addition to the '''Reports''' module, you can access this report in the '''Items''' module. Click on an item, and then click the {{Icon Button|More}} in the action bar. Click '''Show Report''' to bring up three options. Select '''Item Price List''', and it will generate a report for the sale item you clicked on.
| |
| | |
| This report initially has the following column headers:
| |
| | |
| * '''Sale Item''' - The name of each sale item in the '''Items''' module.
| |
| * '''Description''' - The description of a sale item from the '''Items''' module.
| |
| * '''Price''' - The price charged to customers for each unit of a sale item.
| |
| | |
| By default, you will see all sale items on the report. But you can narrow down the results to a single item by using the '''Optional''' features on the right of the report.
| |
| | |
| === Optional ===
| |
| These are the '''Optional''' fields that you can use to modify the report:
| |
| | |
| * '''Group By''' - An option that enables you to group the information in this report by the following criterion:
| |
| ** '''Tags''' - Click this checkbox to organize all sale items under the tag(s) they have attached to them. Sale items that don’t have any tags will be included under the '''No Tag''' header.
| |
| * '''Tag''' - A dropdown menu to select tags to include on the report. You can select as many tags as you like. Unfortunately, this field doesn’t appear to affect this report right now. But this will likely be fixed in the future. After you click on an existing tag, you can create a new tag by entering its name in the textbox and hitting Enter or clicking the '''+ Add''' option. No wizard will pop up. The new tag will simply appear on the list.
| |
| * '''Sale Item''' - A dropdown menu to select a sale item from the list of ones you created in the '''Items''' module under the '''Materials''' module group. You can’t create a new sale item from here, nor can you select more than one.
| |
| * '''Show SKU''' - A checkbox that adds a column in between '''Description''' and '''Price'''. This column displays each sale item’s stock-keeping unit number, if available.
| |
| * '''Show UPC''' - A checkbox that adds a column in between '''SKU''' and '''Price'''. This column displays each sale item’s universal product code, if available.
| |
| | |
| To select all of the status fields at once, click the '''Select All Optional''' checkbox. The '''Select All Optional''' checkbox won’t affect either of the dropdown menus you see under the '''Optional''' header. Those will have to be updated manually. To search for an option in a dropdown menu, click in that field and begin entering text. It will show all options that have that text in them.
| |
| | |
| To apply your changes and see what they look like in the report, click the '''GENERATE REPORT''' button on the bottom right. And follow the directions at the top of this article to save your changes to a '''Preset'''.
| |
| | |
| | |
| == Location Barcode report ==
| |
| The '''Location Barcode''' report is unique from the other barcode reports above. Just like those three, it doesn’t have column headers or anything like that. However, it doesn’t have barcodes for any items. Instead, it generates barcodes for every '''Parent Location''' and '''Child Location'''.
| |
| | |
| === Optional ===
| |
| On the right of the report, you will find several '''Optional''' features to customize the barcodes that are displayed:
| |
| | |
| * '''Location''' - A dropdown menu to select a location to narrow down the report to a single barcode for that location. By default, this report includes barcodes for all locations, but you can trim it down to just one by selecting it in this field. You can create a new location by entering a name for the location in the textbox and hitting Enter or clicking the '''+ Add''' option. Then fill out the '''New Location''' wizard that pops up.
| |
| * '''Show Locked Locations''' - A checkbox that enables you to generate barcodes for locations that are no longer in use.
| |
| * '''Count''' - A textbox to enter the number of copies of each barcode to include in the report. By default, the number of copies will be 1, but you can enter 2, 3, etc. to multiply the barcode count by that number.
| |
| * '''Starting Label''' - A textbox to enter the number of barcodes to skip. By default, this will be filled with the equivalent of 0, but if you enter 1, the first barcode will be excluded from this report. If you enter 2, the first two barcodes will be excluded, and so forth.
| |
| | |
| To select all of the status fields at once, click the '''Select All Optional''' checkbox. The '''Select All Optional''' checkbox won’t affect the dropdown menu or textboxes under the '''Optional''' header. Those will have to be updated manually. To search for an option in a dropdown menu, click in that field and begin entering text. It will show all options that have that text in them.
| |
| | |
| To apply your changes and see what they look like in the report, click the '''GENERATE REPORT''' button on the bottom right. And follow the directions at the top of this article to save your changes to a '''Preset'''.
| |
| | |
| | |
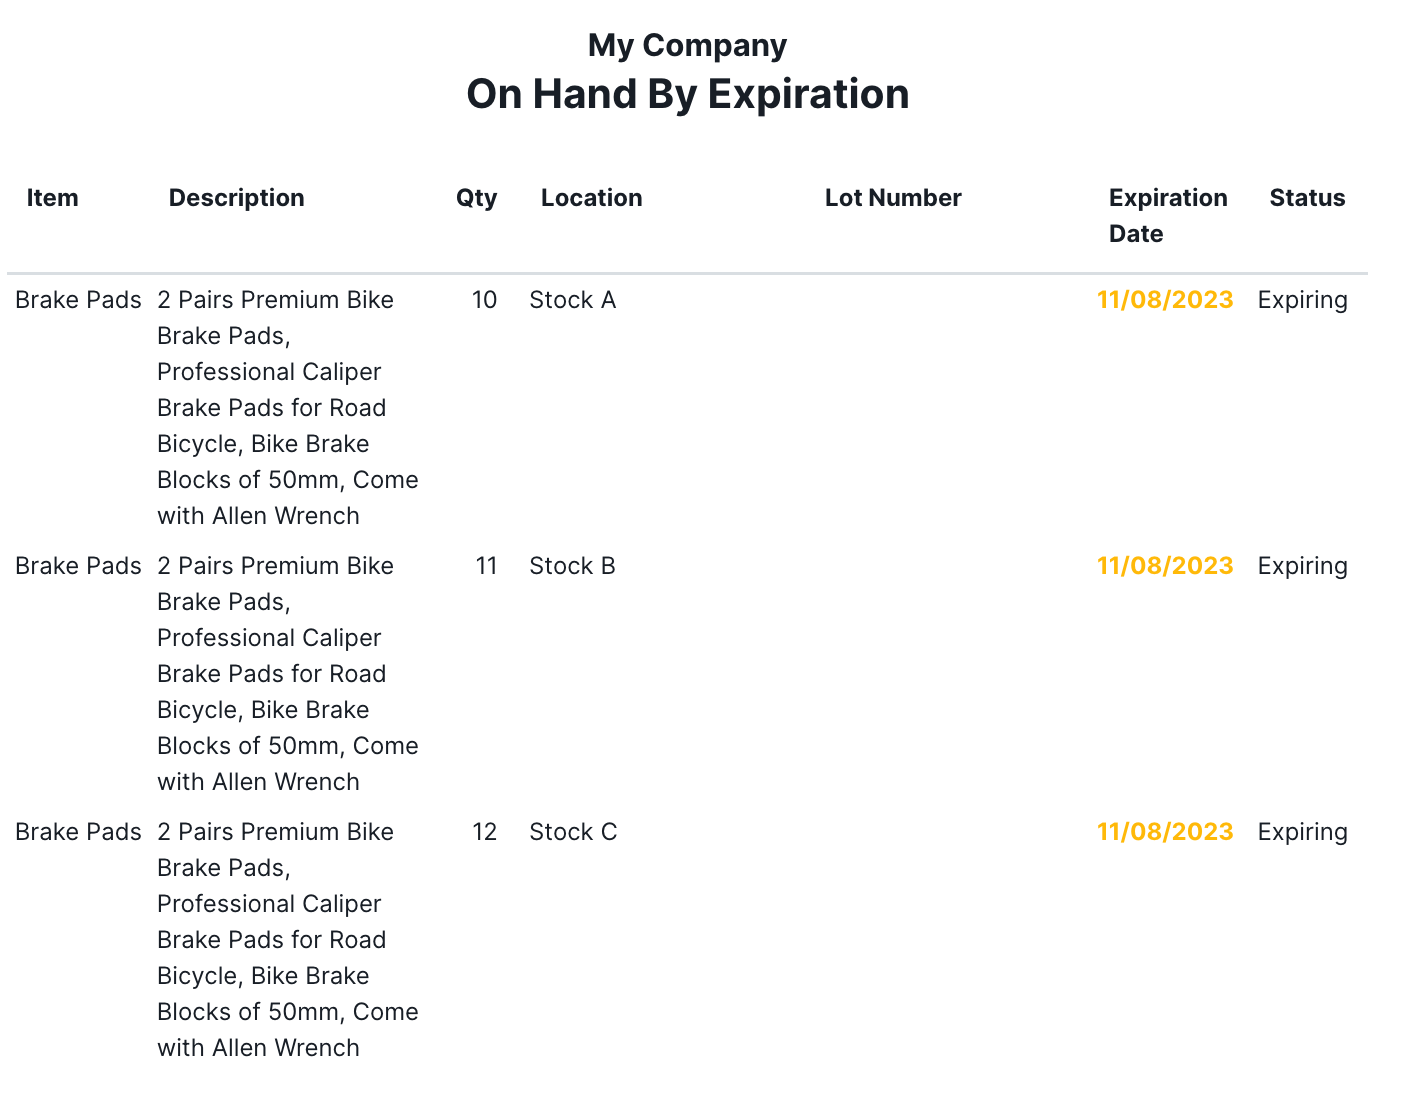
| == On Hand By Expiration report ==
| |
| The '''On Hand By Expiration''' report displays all items that have Expiration Date tracking enabled on them.
| |
| | |
| This report has the following column headers:
| |
| | |
| * '''Item''' - The identifying designation for an item found in the '''Items''' module.
| |
| * '''Description''' - An explanation of what an item is from the '''General''' tab of the '''Items''' module.
| |
| * '''Qty''' - The number or quantity of an item that is currently in stock at a particular location.
| |
| * '''Location''' - The place within your inventory where an item is located. There may be multiple locations where units of the item are stored.
| |
| * '''Lot Number''' - An identifying number for an item’s batch it was received with.
| |
| * '''Expiration Date''' - The final day, month, and year (MM/DD/YYYY) that an item is considered fresh and available to sell.
| |
| * '''Status''' - The condition of an item. There are three possibilities:
| |
| ** '''Valid''' - The expiration date is at least 30 days away.
| |
| ** '''Expiring''' - The expiration date is less than 30 days away.
| |
| ** '''Expired''' - The expiration date has passed.
| |
| | |
| By default, you will be able to see all items with an expiration date on the report. But you can narrow down the results to just one of those items by using the '''Optional''' features on the right of the report.
| |
| | |
| === Optional ===
| |
| These are the '''Optional''' fields that you can use to modify the report:
| |
| | |
| * '''Order By''' - A dropdown menu that enables you to organize the information in this report by one of two criteria:
| |
| ** '''Location''' - This groups all of the items at a single location together where they are stored. This is the default option for this report.
| |
| ** '''Item Number''' - This groups all of the units of each item together, no matter which locations they’re stored at.
| |
| * '''Status''' - A dropdown menu to select the status of items to include on the report. All statuses appearing is the default, but you can choose one of the first three options to limit the results to a specific status:
| |
| ** Valid
| |
| ** Expiring
| |
| ** Expired
| |
| ** All
| |
| * '''Location''' - A dropdown menu to select a single location to narrow down the report to only items contained at that location. By default, this report includes all locations, but you can trim it down to just one by selecting it in this field. You can create a new location by entering a name for the location in the textbox and hitting Enter or clicking the '''+ Add''' option. Then fill out the '''New Location''' wizard that pops up.
| |
| * '''Item''' - A dropdown menu to select an item from the list of ones you created in the '''Items''' module under the '''Materials''' module group. You can create a new item by entering a name for the item in the textbox and hitting Enter or clicking the '''+ Add''' option. Then fill out the '''New Item''' wizard that pops up.
| |
| * '''Show All Inventory''' - A checkbox that ensures all inventory items appear in the report, regardless of date. Unlike most checkboxes on other reports, this checkbox is automatically checked when you first open the '''On Hand By Expiration''' report. If you uncheck this box, you will be able to select a date range in the textbox below.
| |
| * '''Date Range''' - A textbox for picking a time period that expiration dates must fall within in order for their corresponding items to appear on the report. Clicking this textbox brings up a calendar to select a start and end date for the report. In addition, you can select one of these options on the right of the calendar:
| |
| ** Today
| |
| ** Yesterday
| |
| ** This Week
| |
| ** Last Week
| |
| ** Last 7 Days
| |
| ** This Month
| |
| ** Last Month
| |
| | |
| To search for an option in a dropdown menu, click in that field and begin entering text. It will show all options that have that text in them.
| |
| | |
| To apply your changes and see what they look like in the report, click the '''GENERATE REPORT''' button on the bottom right. And follow the directions at the top of this article to save your changes to a '''Preset'''.
| |
| | |
| | |
| == Packing List report ==
| |
| The '''Packing List''' report includes information about items from an order that are contained within a package being shipped to a customer. This is often printed and included inside the package for the customer to see when it arrives.
| |
| | |
| In the '''Reports''' module, you will need to select a '''Ship Number''' and click the '''GENERATE REPORT''' button the first time you open this report to see anything. In addition to the '''Reports''' module, you can access this report in the '''Shipping''' module. Click on a shipment, and then click the {{Icon Button|More}} in the action bar. Click '''Reports''' to bring up two options. Select '''Packing List''', and it will generate a report for the shipment you clicked on.
| |
| | |
| The '''Packing List''' report initially displays the following sections by default:
| |
| | |
| * '''Order #''' - The order number this shipment is associated with. By default, this is the sales order number or purchase order number generated by Fishbowl Drive. But there is a feature in the '''Optional''' section that lets you use the customer PO/SO number instead.
| |
| * '''Date''' - The month, day, and year (MM/DD/YYYY) the order was shipped. If the shipment hasn’t yet been made, this section will be blank.
| |
| * '''Bill to''' - The customer’s address to send bills to for the order.
| |
| * '''Ship to''' - The final destination of the item(s) in the order. By default, this will be the '''Ship To''' address in the '''Shipping''' module. But there is a feature in the '''Optional''' section that lets you use the '''Ship To''' address in the '''Sales Orders''' module or '''Purchase Orders''' module the order was created in. Most likely, those two addresses will be the same, but you have the option to select one or the other if there is a discrepancy.
| |
| * '''Carton Count''' - The number of packages being shipped.
| |
| * '''Date Scheduled''' - The month, day, and year (MM/DD/YYYY) the order is scheduled to be shipped by.
| |
| * '''FOB Point''' - The Free On Board Point that was selected for the order.
| |
| * '''Shipping Terms''' - The timeframe in which the carrier is to be paid.
| |
| * '''Carrier''' - The party that is responsible for shipping the item(s) in the order.
| |
| * '''Order Num''' - The sales order number or purchase order number the shipment is associated with.
| |
| | |
| If you’ve set a logo and main contact phone number in the '''Company''' section of the '''Settings''' module, they will appear on the top left of the report. The month, day, and year (MM/DD/YYYY) on which the report was generated are on the bottom left. The page number appears on the bottom right.
| |
| | |
| To the right of the report, you will find a number of options to customize the information contained in the report.
| |
| | |
| === Required and optional ===
| |
| The '''Required''' section has a single dropdown menu: '''Ship Number'''. This allows you to generate a '''Packing List''' for any shipment you have created, even if it’s different than the one you’re currently looking at in the '''Shipping''' module. As mentioned above, this will have to be filled out first in the '''Reports''' module to generate a report.
| |
| | |
| The '''Optional''' section is below the '''Required''' section. It includes the following fields to modify the report:
| |
| | |
| * '''Contact to Show''' - A dropdown menu that lets you change the '''Ship to''' section above to contain one of two options:
| |
| ** '''Address Name''' - The '''Ship To''' address in the '''Shipping''' module. This option is the default if nothing is selected.
| |
| ** '''Sales Order Contact''' - The '''Ship To''' address on the sales order or purchase order the shipment is for.
| |
| * '''Order Number''' - A dropdown menu that lets you change the '''Order #''' section above to contain one of two options:
| |
| ** '''Customer PO Number''' - The customer PO/SO number associated with the order. This will most likely be different than the order number in Fishbowl Drive.
| |
| ** '''SO Number''' - The sales order number or purchase order number generated by Fishbowl Drive for this order. This option is the default if nothing is selected.
| |
| * '''Title''' - A textbox that lets you enter a report title. You can call it something generic like “Packing List” or something more specific like “[Customer]’s Packing List.” The title will appear on the top right of the report.
| |
| * '''Show Backordered Items''' - A checkbox that enables items that are not currently in stock, but have been reordered, to appear on the '''Packing List'''. However, this will only take effect if you click the '''Item Number''' checkbox in the '''Columns''' section below.
| |
| * '''Show Shipping Service''' - A checkbox that adds '''Ship Service''' in between '''Carrier''' and '''Order Num''' in the report. This identifies the shipping service provided by the carrier to deliver the item(s).
| |
| * '''Show Barcode''' - A checkbox that places a barcode near the top of the report, which can be scanned to pull up the '''Packing List''' report on a mobile device.
| |
| * '''Show Package Info''' - A checkbox that adds a variety of information to the report about the package(s):
| |
| ** '''Carton #''' - The identifying number of each package in the shipment.
| |
| ** '''Weight''' - The total mass of each package, along with its unit of measure.
| |
| ** '''Tracking #''' - The tracking number provided by the carrier for each package being shipped.
| |
| ** '''Total Weight''' - The total mass of all packages in the shipment, along with its unit of measure.
| |
| ** '''Carton Count''' - The total number of packages in the shipment.
| |
| * '''Show Company Name''' - A checkbox that places your company name on the top left of the report.
| |
| * '''Show Order Notes''' - A checkbox that adds a '''Notes''' line under the '''Bill to''' address containing any notes written in the '''Details''' tab of the order’s entry in the '''Sales Orders''' module or '''Purchase Orders''' module.
| |
| * '''Show Tracking''' - A checkbox that adds a '''Tracking''' column under the '''Carton Info''' section showing what tracking criteria have been assigned to each item.
| |
| | |
| You can click the '''Select All Optional''' checkbox to check all of the checkboxes in the '''Optional''' section. That will do everything listed above in the '''Optional''' section except for what is in the three textboxes/dropdown menus. Those can only be modified manually.
| |
| | |
| === Columns ===
| |
| The '''Columns''' section enables you to add the following parts to the report:
| |
| | |
| * '''Description''' - A checkbox that adds a column to the left of the '''Tracking''' column showing the description of the item from the '''Edit Sales Order Item''' wizard in the '''Sales Orders''' module or the '''Edit Purchase Order Item''' wizard in the '''Purchase Orders''' module.
| |
| * '''Qty Ordered''' - A checkbox that adds a column in between the '''Description''' and '''Tracking''' columns showing how many units of each item are in the shipment.
| |
| * '''Qty Shipped''' - A checkbox that adds a column in between the '''Qty Ordered''' and '''Tracking''' columns showing how many of the units in the order have been shipped.
| |
| * '''Line Number''' - A checkbox that adds a number to the left of each item in the shipment indicating its relative position and the total number of items in the shipment.
| |
| * '''Item Number''' - A checkbox that adds an '''Item''' column in between the '''Line #''' and '''Description''' columns showing each item’s name.
| |
| * '''Qty Remaining''' - A checkbox that adds a column in between the '''Qty Shipped''' and '''Tracking''' columns showing how many units of an item have yet to be shipped.
| |
| | |
| Click the '''Select All Columns''' checkbox to check all of the checkboxes in the '''Columns''' section. The '''Packing List''' report doesn’t have the option to add custom fields. Nor does it have the ability to create different themes and layouts, like you can in the '''Sales Order''' report.
| |
| | |
| To apply your changes and see what they look like in the report, click the '''GENERATE REPORT''' button on the bottom right. And follow the directions at the top of this article to save your changes to a '''Preset'''.
| |
| | |
| | |
| == Pick report ==
| |
| The '''Pick''' report displays a list of all of the items on a pick, as well as the pick’s priority and current status.
| |
| | |
| In the '''Reports''' module, you will need to select a '''Pick Number''' and click the '''GENERATE REPORT''' button the first time you open this report to see anything. In addition to the '''Reports''' module, you can access this report in the '''Picking''' module. Click on a pick, and then click the {{Icon Button|More}} in the action bar. Click '''Show Report''' to bring up a '''Pick''' report for the pick you clicked on.
| |
| | |
| This report can also be printed from the main '''Picking''' module page by clicking the checkbox next to a pick and clicking '''PRINT PICK TICKET''' in the action bar. This report initially has only one of the '''Optional''' checkboxes checked ('''Show Item'''), but if you were to unselect it, the report would have the following sections/columns by default:
| |
| | |
| * '''Priority''' - A pick’s level of importance or urgency. There are five priority levels a pick can have:
| |
| ** Highest
| |
| ** High
| |
| ** Normal
| |
| ** Low
| |
| ** Lowest
| |
| * '''Status''' - The condition of a pick. There are four statuses a pick can have:
| |
| ** '''OPEN''' - Picking has not started yet.
| |
| ** '''COMMITTED''' - Units are no longer available for use in other picks.
| |
| ** '''PARTIALLY PICKED''' - Units are committed, and at least one has been picked, but not all.
| |
| ** '''FINISHED''' - All units in the order are picked and ready to be packed and shipped.
| |
| * '''Scheduled''' - The month, day, and year (MM/DD/YYYY) a pick is scheduled to be completed by.
| |
| * '''Type''' - The purpose of the pick. There is currently a single type: Pick. In the future, there will likely be more types, such as Putaway and Move.
| |
| * '''Location''' - The '''Parent Location''' where the items are currently found.
| |
| * '''Carrier''' - The name of the shipper that will transport all of the items in the pick to their destination.
| |
| * '''Quantity''' - The number of units of each item that are being picked.
| |
| * '''Location''' - The specific '''Child Location''' (under the '''Parent Location''') where the items are currently found.
| |
| | |
| If you’ve set a logo and main contact phone number in the '''Company''' section of the '''Settings''' module, they will appear on the top left of the report. The month, day, and year (MM/DD/YYYY) on which the report was generated are on the bottom left. The page number appears on the bottom right.
| |
| | |
| To the right of the report, you will find a number of options to customize the information contained in the report.
| |
| | |
| === Required and optional ===
| |
| The '''Required''' section has a single dropdown menu: '''Pick Number'''. This allows you to generate a '''Pick''' report for any pick you have created, even if it’s different than the one you’re currently looking at in the '''Picking''' module. As mentioned above, this will have to be filled out first in the '''Reports''' module to generate a report.
| |
| | |
| The '''Optional''' section is below the '''Required''' section. It includes the following fields to modify the report:
| |
| | |
| * '''Show SO''' - A checkbox that adds an '''Order''' section above the '''Item'''-related columns. This section contains the order number the pick is associated with. Since picks are usually generated from sales orders, the option is called '''Show SO'''. But it could equally apply to purchase orders, as well.
| |
| * '''Show SKU''' - A checkbox that adds a column in between the '''Item''' and '''Quantity''' columns showing the stock-keeping unit number of the item(s) in the pick.
| |
| * '''Show Description''' - A checkbox that adds a column in between the '''SKU''' and '''Quantity''' columns showing the description of the item found in the '''Items''' module.
| |
| * '''Show Customer Name''' - A checkbox that adds a '''Customer''' section under the '''Order''' section displaying the name of the customer on the order.
| |
| * '''Show Item''' - A checkbox that is automatically checked by default. It adds an '''Item''' column to the left of '''Quantity''' identifying each item in the pick.
| |
| * '''Show Items in Stock''' - A checkbox that removes any items that haven’t yet been committed or finished in the pick.
| |
| * '''Show Item Status''' - A checkbox that adds a '''Status''' column to the right of the '''Location''' column showing each item’s pick status: '''Available''', '''Committed''', '''Finished''', or '''Hold'''.
| |
| * '''Show Inventory Status''' - A checkbox that adds an '''Inventory Status''' column to the right of the '''Status''' column showing whether or not there is sufficient inventory in stock to fully pick an item. The inventory status can be '''In stock''' or '''Short'''.
| |
| * '''Show Address''' - A checkbox that adds the '''Ship To''' address from the sales order or purchase order under the '''Order''' number. This doesn’t work unless you also click the '''Show SO''' checkbox.
| |
| * '''Show Barcode''' - A checkbox that places a barcode on the top right of the report, which can be scanned to pull up the pick ticket on a mobile device. It also adds the order number above the barcode.
| |
| * '''Show Country''' - A checkbox that adds the country under the '''Ship To''' address. This doesn’t work unless you also click both the '''Show SO''' and '''Show Address''' checkboxes.
| |
| * '''Show Tracking''' - A checkbox that adds a '''Tracking''' column to the right of '''Inventory Status''' showing what tracking criteria have been assigned to each item.
| |
| | |
| You can click the '''Select All Optional''' checkbox to check all of the checkboxes in the '''Optional''' section. That will do everything listed above in the '''Optional''' section.
| |
| | |
| The '''Pick''' report doesn’t have the option to add custom fields. Nor does it have the ability to create different themes and layouts, like you can in the '''Sales Order''' report.
| |
| | |
| To apply your changes and see what they look like in the report, click the '''GENERATE REPORT''' button on the bottom right. And follow the directions at the top of this article to save your changes to a '''Preset'''.
| |
| | |
| | |
| == Purchase Order report ==
| |
| The '''Purchase Order''' report generates a formatted purchase order to be sent to a vendor.
| |
| | |
| In the '''Reports''' module, you will need to select a '''Purchase Order Number''' and click the '''GENERATE REPORT''' button the first time you open this report to see anything. In addition to the '''Reports''' module, you can access this report in the '''Purchase Orders''' module. Click on a purchase order, and click the {{Icon Button|More}} in the action bar. Then click '''Show Report''' to bring up a '''Purchase Order''' report for the purchase order you clicked on.
| |
| | |
| This report initially has all of the columns selected, but if you were to unselect the columns, the report would have the following sections/columns by default:
| |
| | |
| * '''Order #''' - The order number, which distinguishes this purchase order from every other purchase order in the system.
| |
| * '''Date''' - The month, day, and year (MM/DD/YYYY) the purchase order was created.
| |
| * '''Vendor''' - The physical address of the vendor that will be shipping items to you.
| |
| * '''Ship to''' - The physical address the item(s) in the purchase order are to be shipped to.
| |
| * '''UOM''' - The unit of measure attached to all units of the item(s) in the purchase order.
| |
| | |
| The default title for the report is '''Purchase Order''', but this can be changed. Your logo and main contact phone number (both found in the '''Company''' section of the [[Settings|'''Settings''' module]]) are on the top left of the report. The page number appears on the bottom right.
| |
| | |
| To the right of the report, you will find a number of options to customize the information contained in the report.
| |
| | |
| === Required and optional ===
| |
| The '''Required''' section has a single dropdown menu: '''Purchase Order Number'''. This allows you to generate a '''Purchase Order''' report for any purchase order you have created, even if it’s different than the one you’re currently looking at in the '''Purchase Orders''' module. As mentioned above, this will have to be filled out first in the '''Reports''' module to generate a report.
| |
| | |
| The '''Optional''' section is below the '''Required''' section. It includes the following fields to modify the report:
| |
| | |
| * '''Report Title''' - A textbox for entering the title of the report. You can change the title on the top right of the report to anything you like by entering it here.
| |
| * '''Show Barcode''' - A checkbox that places a barcode at the top of the purchase order, which can be scanned to pull up the purchase order on a mobile device.
| |
| * '''Show Company Address''' - A checkbox that places your company’s address above the phone number on the top left of the report.
| |
| * '''Show Company Name''' - A checkbox that places your company’s name (as found in the '''Company''' section of the [[Settings|'''Settings''' module]]) above the address on the top left of the report.
| |
| * '''Show Line Item''' - A checkbox that places any notes you added in the '''Edit Purchase Order Item''' wizard under the description of the item(s) in the report.
| |
| * '''Show Contact''' - A checkbox that places the contact associated with the purchase order under the '''Ship to''' address in the report.
| |
| * '''Show Notes''' - A checkbox that places any notes you added in the '''Details''' tab of the purchase order under the '''Vendor''' box in the report.
| |
| * '''Show Vendor Item Name''' - A checkbox that replaces the names of all items in the purchase order with those found in the '''Vendor Items''' tab of the [[Items|'''Items''' module]].
| |
| * '''Show Status''' - A checkbox that places the purchase order’s current status under the '''Report Title''' on the top right of the report.
| |
| | |
| You can click the '''Select All Optional''' checkbox to check all of the checkboxes in the '''Optional''' section. That will do everything listed above in the '''Optional''' section except for changing the '''Report Title'''. That can only be done manually.
| |
| | |
| === Columns ===
| |
| The '''Columns''' section enables you to add the following parts to the report:
| |
| | |
| * '''Show Cost''' - A checkbox that adds a '''Unit Cost''' column to the left of the '''UOM''' column and a '''Total Cost''' column to the right, as well as the '''Total''' dollar amount underneath on the right.
| |
| * '''Item SKU''' - A checkbox that adds a column to left of the '''Unit Cost''' column showing the stock-keeping unit number of the item(s) in the purchase order.
| |
| * '''Item Description''' - A checkbox that adds a column in between the '''SKU''' and '''Unit Cost''' columns showing the description of each item as found in the '''Edit Purchase Order Item''' wizard.
| |
| * '''Show Row Number''' - A checkbox that adds a number to the left of each item contained in the purchase order indicating its relative position and the total number of items in the purchase order.
| |
| * '''Item Name''' - A checkbox that adds an '''Item''' column in between the '''Row Number''' and '''SKU''' columns showing each item’s name. It will either show the name in your system or the vendor’s, based on whether or not you clicked the '''Show Vendor Item Name''' checkbox in the '''Optional''' section.
| |
| * '''Item Quantity Ordered''' - A checkbox that adds a column in between the '''Unit Cost''' and '''UOM''' columns showing how many units of an item are on the purchase order.
| |
| * '''Item Type''' - A checkbox that adds a column in between the '''Row Number''' and '''Item Name''' columns showing which transaction type each item falls under.
| |
| * '''Order Buyer''' - A checkbox that adds a '''Buyer''' box under the '''Vendor''' and '''Ship to''' boxes showing the '''User''' responsible for creating the purchase order.
| |
| * '''Order Date Scheduled''' - A checkbox that adds a '''Date Scheduled''' box to the right of the '''Buyer''' box showing when the purchase order is scheduled to be fulfilled by.
| |
| * '''Order FOB Point''' - A checkbox that adds an '''FOB Point''' box in between the '''Buyer''' and '''Date Scheduled''' boxes showing the Free On Board Point that was selected for the purchase order.
| |
| * '''Order Payment Terms''' - A checkbox that adds a '''Payment Terms''' box in between the '''Buyer''' and '''FOB Point''' boxes showing the payment terms associated with the purchase order.
| |
| * '''Order Carrier''' - A checkbox that adds a '''Ship Via''' box in between the '''FOB Point''' and '''Date Scheduled''' boxes showing which carrier is attached to the purchase order.
| |
| * '''Order Ship Service''' - A checkbox that adds a '''Service''' box in between the '''Ship Via''' and '''Date Scheduled''' boxes showing the shipping service provided by the carrier selected for the purchase order.
| |
| * '''Order Shipping Terms''' - A checkbox that adds a '''Shipping Terms''' box in between the '''FOB Point''' and '''Ship Via''' boxes, showing the shipping terms for the purchase order.
| |
| | |
| Click the '''Select All Columns''' checkbox to check all of the checkboxes in the '''Columns''' section. Unlike the '''Sales Order''' report, the '''Purchase Order''' report doesn’t have the option to add custom fields. Nor does it have the ability to create different themes and layouts.
| |
| | |
| To apply your changes and see what they look like in the report, click the '''GENERATE REPORT''' button on the bottom right. And follow the directions at the top of this article to save your changes to a '''Preset'''.
| |
| | |
| | |
| == Purchase Order Summary report ==
| |
| The '''Purchase Order Summary''' report lists items on purchase orders by location and either item name or purchase order number. In addition to the '''Reports''' module, you can access this report in the '''Purchase Orders''' module. Click the {{Icon Button|More}} in the action bar on the main page. Then click '''Show Report''' to bring up the '''Purchase Order Summary''' report.
| |
| | |
| This report has the following column headers:
| |
| | |
| * '''Item''' - The name of an item on a purchase order.
| |
| * '''Description''' - The name of the vendor responsible for fulfilling a purchase order. You might think this would describe the item on the purchase order, but that’s not the case in this instance.
| |
| * '''Ordered''' - The quantity of units of an item that have been ordered from a vendor, along with their unit of measure.
| |
| * '''Cost''' - The amount of money you paid (or will pay) to obtain a single unit of an item.
| |
| * '''Status''' - The current condition of a purchase order, e.g., '''Bid Request''', '''Received''', '''Picked''', '''Fulfilled''', '''Reconciled''', etc. If you select '''Item''' in the '''Group By''' option, this will show the current condition of an item in a purchase order, e.g., '''Entered''', '''Received''', '''Picked''', '''Fulfilled''', '''Reconciled''', etc.
| |
| * '''Due''' - The month, day, and year (MM/DD/YYYY) an item is expected to be fulfilled by.
| |
| * '''Qty''' - The quantity of units of an item that have been entered, picked, fulfilled, or reconciled, along with their unit of measure. You can also use the '''Show Qty''' option to change this to show the number of units that have been received or not yet received.
| |
| * '''Total Cost''' - The total amount of money charged by a vendor for all units on a purchase order. If it’s a return purchase order, then this number will be negative, and the vendor will owe the amount to you.
| |
| | |
| The date range and total amount of money being charged in that date range are at the top under the report name. To the right of the report, you will find a number of options to customize the information contained in the report.
| |
| | |
| === Optional ===
| |
| The '''Optional''' section includes the following fields to modify the report:
| |
| | |
| * '''Date Range Option''' - A dropdown menu of date ranges you can apply to this report. By default, the date range will be when a sales order was created. But you can specify which dates you want to include by selecting one of the options below:
| |
| ** '''Date Created''' - The month, day, and year (MM/DD/YYYY) a purchase order was first saved, even if it wasn’t issued.
| |
| ** '''Date Issued''' - The month, day, and year (MM/DD/YYYY) a purchase order was finalized, and the fulfillment process began.
| |
| ** '''Date Last Modified''' - The most recent month, day, and year (MM/DD/YYYY) a purchase order was changed and saved by a user.
| |
| ** '''Date Scheduled''' - The month, day, and year (MM/DD/YYYY) a purchase order is estimated to be fulfilled by.
| |
| ** '''Date Completed''' - The month, day, and year (MM/DD/YYYY) a purchase order was fulfilled.
| |
| ** '''Item Date Scheduled''' - This is similar to '''Date Scheduled''', but it doesn’t apply to the entire purchase order, only to the item(s) contained within it.
| |
| * '''Group By''' - A dropdown menu that enables you to reorder the purchase orders in this report by one of two criteria:
| |
| ** '''Purchase Order''' - This organizes all of the items in a purchase order under that purchase order’s number. This is the default option if nothing is selected.
| |
| ** '''Item''' - This organizes all of the purchase orders that an item is in under that item’s name.
| |
| * '''Show Qty''' - A dropdown menu that modifies the '''Qty''' column to show one of three quantity options:
| |
| ** '''Received''' - The number of units that have been received so far.
| |
| ** '''Remaining''' - The number of units that have yet to be received.
| |
| ** '''Total''' - The total number of units that have been ordered, whether or not they have been received. This is the default if nothing is selected.
| |
| * '''Location''' - A dropdown menu to select a single location to list purchase orders for. By default, all locations will be listed on the report, but this option allows you to narrow down the results to just one. The location is the one found on the purchase orders where items are being shipped to or from. You can create a new location by entering a name for the location in the textbox and hitting Enter or clicking the '''+ Add''' option. Then fill out the '''New Location''' wizard that pops up.
| |
| * '''Vendor''' - A dropdown menu to select a single vendor to list purchase orders for. By default, all vendors will be listed on the report, but this option allows you to narrow down the results to just one. You can create a new vendor by entering their name in the textbox and hitting Enter or clicking the '''+ Add''' option. Then fill out the '''New Vendor''' wizard that pops up.
| |
| * '''Item''' - A dropdown menu to select a single item to list purchase orders for. By default, all items will be listed on the report, but this option allows you to narrow down the results to just one. You can create a new item by entering a name for the item in the textbox and hitting Enter or clicking the '''+ Add''' option. Then fill out the '''New Item''' wizard that pops up.
| |
| * '''Date Range''' - Clicking this textbox brings up a calendar to select a start and end date for the report. In addition, you can select one of these options on the right of the calendar:
| |
| ** Today
| |
| ** Yesterday
| |
| ** This Week
| |
| ** Last Week
| |
| ** Last 7 Days
| |
| ** This Month
| |
| ** Last Month
| |
| * '''Bid Request''' - A checkbox that enables you to limit the purchase orders that appear on this report to ones with the status '''Bid Request'''.
| |
| * '''Fulfilled''' - A checkbox that enables you to limit the purchase orders that appear on this report to ones with the status '''Fulfilled'''.
| |
| * '''Issued''' - A checkbox that enables you to limit the purchase orders that appear on this report to ones with the status '''Issued'''.
| |
| * '''Partial''' - A checkbox that enables you to limit the purchase orders that appear on this report to ones with the statuses '''Partially Received''', '''Partially Fulfilled''', and '''Partially Reconciled'''.
| |
| * '''Voided''' - A checkbox that enables you to limit the purchase orders that appear on this report to ones with the status '''Cancelled'''.
| |
| * '''Show Cost''' - A checkbox that currently doesn’t do anything because costs appear automatically on the report whether or not you click this checkbox. In the future, this will likely be remedied.
| |
| | |
| To select all of the status fields at once, click the '''Select All Optional''' checkbox. The '''Select All Optional''' checkbox won’t affect any of the dropdown menus or the textbox under the '''Optional''' header. Those will have to be updated manually. To search for an option in a dropdown menu, click in that field and begin entering text. It will show all options that have that text in them.
| |
| | |
| To apply your changes and see what they look like in the report, click the '''GENERATE REPORT''' button on the bottom right. And follow the directions at the top of this article to save your changes to a '''Preset'''.
| |
| | |
| | |
| == Receiving List report ==
| |
| The '''Receiving List''' report generates a list of items to be received for a specific purchase order or sales order.
| |
| | |
| When you click on this report in the '''Reports''' module, you will need to select a '''Receipt Number''' and click the '''GENERATE REPORT''' button to see the report. In addition to the '''Reports''' module, you can access this report in the '''Receiving''' module. Click on a receipt, and click the {{Icon Button|More}} in the action bar. Then click '''Show Report''' to bring up the '''Receiving List''' report. This will generate a report for the receipt you’re currently viewing.
| |
| | |
| The '''Receiving List''' report includes the following sections:
| |
| | |
| * '''Order Number''' - The purchase order number or sales order number this receipt is associated with.
| |
| * '''Order Name''' - The name of the customer on the purchase order or sales order.
| |
| * '''Location''' - The location on the purchase order or sales order that items are being shipped to.
| |
| * '''Status''' - The condition of the receipt as '''Open''', '''Partially Fulfilled''', '''Fulfilled''', etc.
| |
| * '''Type''' - The type of receipt this is. Generally, it will always be '''Standard'''.
| |
| | |
| Under these sections is a group of column headers:
| |
| | |
| * '''Item''' - The name of each item in the receipt.
| |
| * '''Default Location''' - The designated '''Parent Location''' or '''Child Location''' for each item.
| |
| * '''Qty To Receive''' - The number of units of each item that are expected to be received.
| |
| * '''Qty Received''' - A blank line for a warehouse worker to manually write the number of units of each item that have been received once they print the '''Receiving List''' report onto a piece of paper.
| |
| | |
| If you’ve set a logo, address, main contact phone number, fax number, and email address in the '''Company''' section of the '''Settings''' module, they will appear on the top left of the report. The month, day, and year (MM/DD/YYYY) the report was generated are on the bottom left. The page number appears on the bottom right.
| |
| | |
| To the right of the report, you will find a number of options to customize the information contained in the report.
| |
| | |
| === Required and optional ===
| |
| The '''Required''' section has a single dropdown menu: '''Receipt Number'''. This enables you to generate a '''Receiving List''' report for any receipt you have created, even if it’s different than the one you’re currently looking at in the '''Receiving''' module. As mentioned above, this will have to be filled out first in the '''Reports''' module to generate a report.
| |
| | |
| The '''Optional''' section is below the '''Required''' section. It includes the following fields to modify the report:
| |
| | |
| * '''Order By''' - A dropdown menu that enables you to group the information in this report by one of three criteria:
| |
| ** '''Item Name''' - List all items in alphabetical order according to their name in Fishbowl Drive. This is the default choice when nothing is selected from the dropdown menu.
| |
| ** '''Vendor Item Name''' - List all items in alphabetical order according to their name in the vendor’s system.
| |
| ** '''Line Item Number''' - List all items in the same order they are in within the receipt.
| |
| * '''Include Item Barcode''' - A checkbox that adds an '''Item Barcode''' column in between the '''Default Location''' and '''Qty To Receive''' columns. This column includes the item’s barcode number if it is available.
| |
| * '''Include Received Items''' - A checkbox that makes items that have already been received appear on the report. Bear in mind that there is nothing to indicate that those items have already been received in this report. By default, received items will not appear.
| |
| * '''Show Barcode''' - A checkbox that places a barcode near the top of the report, which can be scanned to pull up the '''Receiving List''' report on a mobile device. In addition, the purchase order number or sales order number appears on the top left of the barcode.
| |
| * '''Show Vendor Part Name''' - A checkbox that replaces each item name you have selected with the vendor’s name for it if that name is available.
| |
| | |
| You can click the '''Select All Optional''' checkbox to check all of the checkboxes in the '''Optional''' section. That will do everything listed above in the '''Optional''' section except for what is in the '''Order By''' dropdown menu. That can only be modified manually.
| |
| | |
| To apply your changes and see what they look like in the report, click the '''GENERATE REPORT''' button on the bottom right. And follow the directions at the top of this article to save your changes to a '''Preset'''.
| |
| | |
| | |
| == Reorder report ==
| |
| The '''Reorder''' report generates a list of items that have quantities below their reorder points.
| |
| | |
| In the '''Reports''' module, all inventory items that need to be reordered will appear in this report. In addition to the '''Reports''' module, you can access this report in the '''Inventory''' module. Click on an inventory item, and then click the {{Icon Button|More}} in the action bar. Click '''Show Report''' to bring up four options. Select '''Reorder''', and it will generate a report for the inventory item you clicked on.
| |
| | |
| * '''Item''' - The name of an item which has an '''Available''' quantity that is below its '''Min''' quantity in the '''Inventory''' module.
| |
| * '''Description''' - An explanation of an item from what is written in the '''General''' tab of the '''Items''' module.
| |
| * '''UOM''' - The unit of measure attached to an item.
| |
| * '''On Hand''' - The number of units of an item that are currently in stock.
| |
| * '''Available''' - The number of units of an item that can be sold. This quantity is calculated as '''On Hand''' - '''Allocated'''.
| |
| * '''On Order''' - The number of units of an item that are currently on a purchase order, but which haven’t been received yet.
| |
| * '''Allocated''' - The number of units of an item that are assigned to various orders. This includes inventory on issued sales orders and purchase orders.
| |
| * '''Min''' - The lowest number an item’s '''Available''' quantity can be at. Anything lower will trigger a notification that it’s time to reorder.
| |
| * '''Max''' - The highest number an item’s '''Available''' quantity can be at after it is reordered. This places a cap on the reorder quantity.
| |
| * '''To Order''' - The number of units that need to be reordered to bring an item back to an appropriate '''Available''' quantity.
| |
| | |
| By default, you will be able to see all items that need to be reordered at all locations in the '''Reports''' module. But you can narrow down the results to a single item and/or location by using the '''Optional''' features on the right of the report.
| |
| | |
| === Optional ===
| |
| These are the '''Optional''' fields that you can use to modify the report:
| |
| | |
| * '''Location''' - A dropdown menu to select a single location to see items that need to be reordered at it. You can create a new location by entering a name for the location in the textbox and hitting Enter or clicking the '''+ Add''' option. Then fill out the '''New Location''' wizard that pops up.
| |
| * '''Item''' - A dropdown menu to select a single item to see in the report. You can create a new item by entering a name for the item in the textbox and hitting Enter or clicking the '''+ Add''' option. Then fill out the '''New Item''' wizard that pops up.
| |
| * '''Show Default Vendor''' - A checkbox that adds a '''Vendor''' column header in between the '''Description''' and '''UOM''' columns.
| |
| * '''Show All Reorder Items''' - A checkbox that displays all items that are below their '''Max''' quantity, even if they are not below their '''Min''' quantity.
| |
| * '''Show Item Description''' - A checkbox that adds the '''Description''' column header to the report. This is checked by default.
| |
| | |
| To select all of the status fields at once, click the '''Select All Optional''' checkbox. The '''Select All Optional''' checkbox won’t affect the two dropdown menus under the '''Optional''' header. Those will have to be updated manually. To search for an option in a dropdown menu, click in that field and begin entering text. It will show all options that have that text in them.
| |
| | |
| To apply your changes and see what they look like in the report, click the '''GENERATE REPORT''' button on the bottom right. And follow the directions at the top of this article to save your changes to a '''Preset'''.
| |
| | |
| | |
| == Sales Order report ==
| |
| The '''Sales Order''' report generates a formatted sales order to be sent to customers.
| |
| | |
| When you click on this report in the '''Reports''' module, you will need to select a '''Sales Order Number''' and click the '''GENERATE REPORT''' button to see the report. In addition to the '''Reports''' module, you can access this report in the '''Sales Orders''' module. Click on a sales order, and click the {{Icon Button|More}} in the action bar. Then click '''Show Report''' to bring up the '''Sales Order''' report for the sales order you’re currently viewing.
| |
| | |
| Keep in mind as you read through the following sections of the '''Sales Order''' report that they are described in relation to the '''Standard''' layout. There are three other layouts, which we will talk about below. If you change the layout, the way the columns and boxes will be set up in the report will change somewhat.
| |
| | |
| This report initially contains the following sections/columns by default:
| |
| | |
| * '''Order #''' - The order number, which distinguishes the sales order from every other sales order in the system.
| |
| * '''Date''' - The month, day, and year (MM/DD/YYYY) the sales order was created.
| |
| * '''Bill to''' - The physical address to send the bill to for the sales order.
| |
| * '''Ship to''' - The physical address the item(s) in the sales order will be shipped to.
| |
| * '''Customer''' - The name of the recipient of the item(s) in the sales order.
| |
| * '''Item''' - The name of the item(s) in the sales order.
| |
| * '''Description''' - A brief description of the item(s) in the sales order.
| |
| * '''Subtotal''' - The amount of money due for all items in the sales order before discounts and taxes are applied.
| |
| * '''Order Discount''' - The dollar amount reduced from the subtotal, if applicable.
| |
| * '''Total''' - The amount of money due for all items in the sales order after discounts and taxes are applied.
| |
| * '''Paid''' - The amount of money the customer has already paid toward the sales order.
| |
| * '''Balance Due''' - The amount of money the customer has yet to pay toward the sales order.
| |
| | |
| In addition to these things, the report also includes the title of “Sales Order,” which can be changed, and the status of the sales order under it on the top right. The seller’s logo and main contact phone number (both found in the '''Company''' section of the '''Settings''' module) are on the top left of the report.
| |
| | |
| If you’ve set a footer in the same section as the logo and main contact phone number, it will appear on the bottom left of the report above the date and time the report was generated. The page number appears on the bottom right.
| |
| | |
| To the right of the report, you will find a number of options to customize the report. Under '''Theme''', you can click a dropdown menu to select one of the options. The one you choose will likely change the shading of the section and column headers in the report to a different hue. But that’s just scratching the surface of the customization you can add with a different theme. We’ll cover that a little below after we describe all the other aspects of the report.
| |
| | |
| === Required and optional ===
| |
| The '''Required''' section has a single dropdown menu: '''Sales Order Number'''. This allows you to generate a '''Sales Order''' report for any sales order you have created, even if it’s different than the one you’re currently looking at in the '''Sales Orders''' module. As mentioned above, this will have to be filled out first in the '''Reports''' module to generate a report.
| |
| | |
| The '''Optional''' section is below the '''Required''' section. It includes the following fields to modify the report:
| |
| | |
| * '''Report Title''' - A textbox for entering the title of the report. You can change the title on the top right of the report to anything you like by entering it here.
| |
| * '''Is Invoice''' - A checkbox that changes the sales order to an invoice. It also changes the report title to '''Invoice''', and that title can’t be modified.
| |
| * '''Date Option''' - A dropdown menu that lets you change the date listed on the sales order to one of these options:
| |
| ** '''Issued''' - The month, day, and year (MM/DD/YYYY) the sales order was issued.
| |
| ** '''Completed''' - The month, day, and year (MM/DD/YYYY) the sales order was fulfilled.
| |
| ** '''Created''' - The month, day, and year (MM/DD/YYYY) the sales order was created.
| |
| ** '''Scheduled''' - The month, day, and year (MM/DD/YYYY) the sales order is scheduled to be fulfilled by.
| |
| ** '''Today''' - The present month, day, and year (MM/DD/YYYY).
| |
| | |
| * '''Show Barcode''' - A checkbox that places a barcode at the top of the sales order, which can be scanned to pull up the sales order on a mobile device.
| |
| * '''Show Company Address''' - A checkbox that places your company’s address (as found in the '''Company''' section of the '''Settings''' module) above the phone number on the top left of the report.
| |
| * '''Show Company Name''' - A checkbox that places your company’s name (as found in the '''Company''' section of the '''Settings''' module) above the address on the top left of the report.
| |
| * '''Show Contact''' - A checkbox that places the contact associated with the sales order under the '''Ship To''' address in the report.
| |
| * '''Show Order Notes''' - A checkbox that places your sales order’s notes under the '''Customer''' box.
| |
| * '''Show Payments''' - A checkbox that places payment dates, amounts, and links under the list of items in the sales order.
| |
| * '''Show Tax''' - A checkbox that inserts any taxes due under the subtotal.
| |
| | |
| You can click the '''Select All Optional''' checkbox to click all of the checkboxes in the '''Optional''' section. That will turn the sales order into an invoice and do everything else listed above in the '''Optional''' section except for changing the '''Date Option'''. That can only be done manually.
| |
| | |
| === Columns ===
| |
| The '''Columns''' section enables you to add the following parts to the report:
| |
| | |
| * '''Order Date Scheduled''' - A checkbox that adds the date the sales order is scheduled to be fulfilled by under any notes and above the items and descriptions.
| |
| * '''Item Total Price''' - A checkbox that adds a '''Total''' or '''Total Price''' column to the right of the '''Description''' column showing the total price being charged for all units of each item.
| |
| * '''Item Discount''' - A checkbox that adds a '''Discount''' column to the right of the '''Total Price''' column showing any discount applied to all units of each item.
| |
| * '''Show Row Number''' - A checkbox that adds a number to the left of each item contained in the sales order, indicating its relative position and the total number of items in the sales order.
| |
| * '''Item Type''' - A checkbox that adds a '''Type''' column in between the '''Row Number''' and '''Item''' columns, showing which type each item is.
| |
| * '''Item Unit Price''' - A checkbox that adds a '''Price''' or '''Unit Price''' column in between the '''Description''' and '''Total Price''' columns showing how much was charged for a single unit of an item.
| |
| * '''Item Quantity Ordered''' - A checkbox that adds a '''Qty''' or '''Qty Ordered''' column in between the '''Unit Price''' and '''Total Price''' columns showing how many units of an item are on the sales order.
| |
| * '''Order Carrier''' - A checkbox that adds a '''Carrier''' box to the left of the '''Date Scheduled''' box showing which carrier is attached to the sales order.
| |
| * '''Order FOB Point''' - A checkbox that adds an '''FOB Point''' box to the left of the '''Carrier''' box showing what Free On Board Point was selected for the order.
| |
| * '''Order Payment Term''' - A checkbox that adds a '''Payment Terms''' box to the left of the '''FOB Point''' box showing the payment terms associated with the sales order.
| |
| * '''Order Seller''' - A checkbox that adds a '''Sales Rep''' box to the left of the '''Payment Terms''' box showing the '''Sales Representative''' responsible for creating the sales order.
| |
| * '''Order Ship Service''' - A checkbox that adds a '''Ship Service''' box in between the '''Carrier''' and '''Date Scheduled''' boxes showing the shipping service provided by the carrier selected for the sales order.
| |
| * '''Order Shipping Terms''' - A checkbox that is supposed to display the shipping terms for the order to the report. However, it doesn’t appear to be working at this time. In the future, it will likely be fixed.
| |
| * '''PO Number''' - A checkbox that adds a '''Customer PO''' box in between the '''Order #''' and '''Date''' boxes near the top of the sales order showing the '''Customer PO''' number that corresponds with the sales order.
| |
| * '''Tags''' - A checkbox that adds a column in between the '''Total Price''' and '''Discount''' columns showing any tags associated with each item on the sales order.
| |
| | |
| === Custom fields ===
| |
| If you have set up custom fields for your sales orders, you will be able to add them to the report using this section. When you click the checkbox next to at least one custom field, '''Additional Information''' appears under the '''Ship To''' and '''Contact''' boxes on the sales order, and the custom field(s) will be under that header. It may also appear just above the '''Items''' section of the sales order, depending on the '''Theme''' you selected.
| |
| | |
| === Theme ===
| |
| When you first open the '''Sales Order''' report, you will find no options in the dropdown menu under the '''Theme''' section. Once you create a theme, it will be included in the list when you click on the dropdown menu. You don’t have to click the '''GENERATE REPORT''' button after you select one of the themes you’ve created. The report will automatically update to reflect your selection.
| |
| | |
| To create a new theme, click the '''ADD''' button next to the dropdown menu. This is where you can create a different layout for this report, among other things.
| |
| | |
| There are four options to customize the report, which you will find below:
| |
| | |
| * '''Layout''' - This changes the way the report’s contents are organized. There are four options for the layout:
| |
| ** '''Standard''' - This is the default layout, and it separates most information into boxes and clearly defined columns.
| |
| ** '''Modern''' - Less boxy than '''Standard''', with information put in different places and combined into larger boxes.
| |
| ** '''Fresh''' - Similar to the '''Modern''' layout, but with some information moved around slightly.
| |
| ** '''Bold''' - Very similar to the '''Fresh''' layout, with a few slight alterations.
| |
| * '''Color''' - This allows users to add shading to parts of the report. There are five options for the color of the report:
| |
| ** '''Initial''' - This is the default. Everything in the report is black and white and sometimes shaded in gray.
| |
| ** '''Orange''' - Headers or some key lines are shaded in light orange.
| |
| ** '''Blue''' - Headers or some key lines are shaded in metallic blue.
| |
| ** '''Green''' - Headers or some key lines are shaded in light green.
| |
| ** '''Picker''' - Headers or some key lines are shaded in whatever color you choose. You will need to click the '''CREATE NEW THEME''' or '''UPDATE''' button after picking a new color in order to save it. So it’s a good idea to select a font family and size before selecting a custom color.
| |
| * '''Font Family''' - This changes the font of the text in the report. Keep in mind that if you don’t select any font, it will default to Times New Roman. But you won’t be able to save the report in that font. You will have to select one of these three options:
| |
| ** Arial
| |
| ** Verdana
| |
| ** Inter
| |
| * '''Font Size''' - This gives the option to adjust the size of the text in the report:
| |
| ** '''9pt'''
| |
| ** '''10pt''' - The default font size.
| |
| ** '''11pt'''
| |
| ** '''12pt'''
| |
| | |
| Once you’re done creating a theme, or making adjustments to an existing one, click the '''CREATE NEW THEME''' or '''UPDATE''' button to save it. Then it will appear in the dropdown menu of themes. Simply click the X to return to the report. It won’t automatically have the new theme applied to the report, so you’ll have to pick it from the dropdown menu if you want to use it.
| |
| | |
| To delete a theme, first click the '''EDIT''' button after selecting the theme in the dropdown menu. Then click the trashcan icon to the right of the '''UPDATE''' button in the window that pops up. You will be asked if you really want to delete the theme, and all you have to do is click the red '''DELETE''' button. It will be erased and removed from the '''Theme''' dropdown menu.
| |
| | |
| For everything other than the '''Theme''' section of this report, to apply your changes and see what they look like in the report, click the '''GENERATE REPORT''' button on the bottom right. And follow the directions at the top of this article to save your changes to a '''Preset'''.
| |
| | |
| | |
| == Sales Order Summary report ==
| |
| The '''Sales Order Summary''' report generates a summary of sales orders for the filters and date range specified. Sales tax is not included.
| |
| | |
| In addition to the '''Reports''' module, you can access this report in the '''Sales Orders''' module. Click the {{Icon Button|More}} in the action bar on the main page. Then click '''Show Report''' to bring up the '''Sales Order Summary''' report.
| |
| | |
| This report initially has the following columns:
| |
| | |
| * '''SO #''' - The identifying number of each sales order, along with a list of all items in that sales order and their descriptions and quantities.
| |
| * '''Customer''' - The name of the recipient of the item(s) in a sales order.
| |
| * '''Sales Rep''' - The salesperson responsible for selling the item(s) in a sales order.
| |
| * '''Date Issued''' - The month, day, and year a sales order was changed from an '''Estimate''' to an '''Issued''' status.
| |
| * '''Status''' - The condition of the sales order within the system. There are seven statuses:
| |
| ** '''Estimate''' - The sales order has been saved, but it hasn’t been issued or fulfilled yet.
| |
| ** '''Fulfilled''' - All items in the sales order are delivered. However, an order can be fulfilled and not yet be paid for in full by the customer.
| |
| ** '''Issued''' - Inventory is allocated and shipments are being prepared, but none of the items in the sales order have been fulfilled yet.
| |
| ** '''Cancelled''' - The sales order has been voided at some point before it could be marked as fulfilled.
| |
| ** '''Partially Fulfilled''' - At least one of the items in the sales order has been fulfilled, but not all of them. This is referred to as '''In Progress''' in the '''Optional''' section below.
| |
| ** '''Voided''' - This applies to orders that were issued (and perhaps even fulfilled) and then later had that action undone.
| |
| ** '''Entered''' - This means an item has been added to a sales order, but it hasn’t been fulfilled, nor has it necessarily been allocated yet.
| |
| * '''Ordered''' - The total price a customer has agreed to pay for the item(s) in a sales order.
| |
| * '''Shipped''' - The total value (in U.S. dollars) of all items that have been shipped to the customer.
| |
| * '''Remaining''' - The sum of the '''Ordered''' - '''Shipped''' amounts. This is the value of all items that have not yet been delivered to the customer.
| |
| | |
| === Optional ===
| |
| By default, you will be able to see all sales orders (in a specified date range) that fall under every status. To narrow down which sales order(s) you want to include in this report, look at the settings on the right of the report and go to the bottom of the '''Optional''' section. You will find checkboxes for each of the statuses listed above. If you only check the box next to '''Estimate''', for example, you will only see sales orders that are estimates. You won’t see any fulfilled, issued, or any other type of sales order. Be sure to click the '''GENERATE REPORT''' button at the bottom to make the report reflect your changes.
| |
| | |
| To select all of the status fields at once, click the '''Select All Optional''' checkbox. However, if you leave that unchecked, the report will still display all of them. The '''Select All Optional''' checkbox won’t affect any of the dropdown menus you see under the '''Optional''' header. Those will have to be updated manually.
| |
| | |
| The following fields enable you to customize the report in a variety of ways:
| |
| | |
| * '''Date Range Option''' - A dropdown menu of date ranges you can apply to this report. By default, the date range will be when a sales order was created. But you can specify which dates you want to include by selecting one of the options below:
| |
| ** '''Date Created''' - The month, day, and year (MM/DD/YYYY) a sales order was first saved, even if it wasn’t issued.
| |
| ** '''Date Issued''' - The month, day, and year (MM/DD/YYYY) a sales order was finalized, and the fulfillment process began.
| |
| ** '''Date Last Modified''' - The most recent month, day, and year (MM/DD/YYYY) a sales order was changed and saved by a user.
| |
| ** '''Date Scheduled''' - The month, day, and year (MM/DD/YYYY) a sales order is estimated to be fulfilled by.
| |
| ** '''Date Completed''' - The month, day, and year (MM/DD/YYYY) a sales order was fulfilled.
| |
| ** '''Sales Order Item Date Fulfilled''' - This doesn’t apply to the entire sales order, but to the item(s) contained within it.
| |
| * '''Group By''' - A dropdown menu that enables you to reorder the sales orders in this report by one of three criteria:
| |
| ** '''Location''' - The place within your company where items are shipped from.
| |
| ** '''Sales Person''' - The sales representative responsible for creating a sales order and possibly overseeing it to its fulfillment.
| |
| ** '''Ship To State/Province''' - The location of the buyer where the item(s) in a sales order is/are being shipped to.
| |
| * '''Ship To State/Province''' - The location of the customers you’re shipping items to on a sales order. The dropdown menu includes a list of all 50 states in the U.S., plus:
| |
| ** American Samoa
| |
| ** District of Columbia
| |
| ** Federated States of Micronesia
| |
| ** Guam
| |
| ** Marshall Islands
| |
| ** Northern Mariana Islands
| |
| ** Palau
| |
| ** Puerto Rico
| |
| ** Virgin Islands
| |
| * '''Sales Representative''' - The person responsible for the creation of a sales order. You can select a sales representative from the list you created in the [[Representatives|'''Representatives''' module]] under the '''Setup''' group. You can’t create a new sales rep from here, nor can you select more than one.
| |
| * '''Location''' - The physical place or area where the item(s) in a sales order is/are being shipped from. You can select a '''Parent Location''' or '''Child Location''' from the list of ones you created in the [[Locations|'''Locations''' module]] under the '''Setup''' group. You can create a new location by entering a name for the location in the textbox and hitting Enter or clicking the '''+ Add''' option. Then fill out the '''New Location''' wizard that pops up.
| |
| * '''Customer''' - The individual listed as the recipients of items on sales orders. By default, all customers are included in this report, but you can narrow down the results to a single customer by selecting one from the list you created in the [[Customers|'''Customers''' module]] under the '''Sales''' group. You can create a new customer by entering their name in the textbox and hitting Enter or clicking the '''+ Add''' option. Then fill out the '''New Customer''' wizard that pops up.
| |
| * '''Sale Item''' - The item in a sales order. There can be other items in the sales order, but if you select this, only sales orders containing this sale item will be listed. You can select an item from the list of ones you created in the [[Items|'''Items''' module]] under the '''Materials''' group. You can’t create a new sale item from here, nor can you select more than one.
| |
| * '''Date Range''' - Clicking this textbox brings up a calendar to select a start and end date for the report. In addition, you can select one of these options on the right of the calendar:
| |
| ** Today
| |
| ** Yesterday
| |
| ** This Week
| |
| ** Last Week
| |
| ** Last 7 Days
| |
| ** This Month
| |
| ** Last Month
| |
| | |
| In addition, you can click the '''Columns''' dropdown menu under the '''Optional''' section. This will open the following column headers that you can add to the report:
| |
| | |
| * '''Date Fulfilled''' - A checkbox that adds a '''Date Fulfilled''' column in between the '''Sales Rep''' and '''Date Issued''' columns. It shows the month, day, and year (MM/DD/YYYY) a sales order was marked as fulfilled. However, this doesn’t necessarily mean that the items have been shipped or that payment has been received.
| |
| * '''Ship To State/Province''' - A checkbox that adds a '''Ship To State/Province''' column in between the '''Date Issued''' and '''Status''' columns. It shows the place within the U.S. or one of its territories that the item(s) in a sales order is/are being shipped to.
| |
| * '''Customer PO''' - A checkbox that adds a '''Customer PO''' column in between the '''Customer''' and '''Sales Rep''' columns. It shows the number of the corresponding purchase order a customer generated when their sales order was created, if applicable.
| |
| * '''Order Payment Term''' - A checkbox that adds a '''Payment Term''' column in between the '''Date Issued''' and '''Ship To State/Province''' columns. It shows the timeframe in which a customer will pay for a sales order.
| |
| * '''Date Issued''' - A checkbox that is supposed to add a '''Date Issued''' column. However, the '''Date Issued''' column is there whether or not this checkbox is clicked. So it doesn’t serve a purpose right now. In the future, it will likely be fixed.
| |
| | |
| If you want to add all of these columns to the report, click the '''Select All Columns''' checkbox. If you only want certain ones on the report, click the checkbox next to them, and they will be added.
| |
| | |
| To apply your changes and see what they look like in the report, click the '''GENERATE REPORT''' button on the bottom right. And follow the directions at the top of this article to save your changes to a '''Preset'''.
| |
| | |
| | |
| == Shipping Invoice report ==
| |
| The '''Shipping Invoice''' report shows information about a single sales order or credit return purchase order pertaining to its shipment to a customer or vendor. It includes the order’s payment terms, descriptions of items in the shipment, dates, and prices.
| |
| | |
| In the '''Reports''' module, you will need to select a '''Ship Number''' and click the '''GENERATE REPORT''' button the first time you open this report to see anything. In addition to the '''Reports''' module, you can access this report in the '''Shipping''' module. Click on a shipment, and then click the {{Icon Button|More}} in the action bar. Click '''Reports''' and to bring up two options. Select '''Shipping Invoice''' to bring up a '''Shipping Invoice''' report for the shipment you clicked on.
| |
| | |
| Unlike the '''Packing List''' report, the '''Shipping Invoice''' report has its title automatically on the top right of the page. And it can’t be changed or removed. The '''Shipping Invoice''' report initially displays the following sections and columns by default:
| |
| | |
| * '''Order #''' - The order number this shipment is associated with. By default, this is the sales order number or purchase order number generated by Fishbowl Drive. But there is a feature in the '''Optional''' section that lets you use the customer PO/SO number or ship number instead.
| |
| * '''Date''' - The month, day, and year (MM/DD/YYYY) the order was shipped. If the shipment hasn’t yet been made, this section will be blank.
| |
| * '''Bill to''' - The customer’s address to send bills to for the order.
| |
| * '''Ship to''' - The final destination of the item(s) in the order.
| |
| * '''Sales Person''' - The name of the individual responsible for the sale. It will be someone listed in the '''Representatives''' module.
| |
| * '''Payment Terms''' - The terms on which the order is to be paid, as denoted in the '''Payment Terms''' module.
| |
| * '''FOB Point''' - The Free On Board Point that was selected for the order.
| |
| * '''Shipping Terms''' - The timeframe in which the carrier is to be paid.
| |
| * '''Carrier''' - The party responsible for shipping the item(s) in the order.
| |
| * '''Date Scheduled''' - The month, day, and year (MM/DD/YYYY) the order is scheduled to be shipped by.
| |
| * '''Item #''' - The number of each item in the shipment. This shows not only the relative position of each item in the shipment, but the total number of items contained in it. However, there may be more units than the number of items.
| |
| * '''Type''' - The type of transaction the shipment is for, such as '''Sale''' or '''Return'''.
| |
| * '''Item''' - The name of each item in the shipment, as it is recorded in the '''General''' tab of the '''Items''' module.
| |
| * '''Description''' - Information about the item from the '''Edit Sales Order Item''' wizard in the '''Sales Orders''' module or the '''Edit Purchase Order Item''' wizard in the '''Purchase Orders''' module.
| |
| * '''Unit Price''' - The amount of money charged to the customer for each unit.
| |
| * '''Qty Shipped''' - The number of units in the order that have been shipped.
| |
| * '''Extended Price''' - The total price for all units on a line item. It is calculated using the following equation: '''Unit Price''' x '''Quantity Shipped'''.
| |
| | |
| If you’ve set a logo and main contact phone number in the '''Company''' section of the '''Settings''' module, they will appear on the top left of the report. The month, day, and year (MM/DD/YYYY) on which the report was generated are on the bottom left. The page number appears on the bottom right.
| |
| | |
| To the right of the report, you will find a number of options to customize the information contained in the report.
| |
| | |
| === Required and optional ===
| |
| The '''Required''' section has a single dropdown menu: '''Ship Number'''. This allows you to generate a '''Shipping Invoice''' for any shipment you have created, even if it’s different than the one you’re currently looking at in the '''Shipping''' module. As mentioned above, this will have to be filled out first in the '''Reports''' module to generate a report.
| |
| | |
| The '''Optional''' section is below the '''Required''' section. It includes the following fields to modify the report:
| |
| | |
| * '''Order Number''' - A dropdown menu that lets you change the '''Order #''' section above to contain one of three options:
| |
| ** '''Customer PO Number''' - The customer PO/SO number associated with the order. This will most likely be different than the order number in Fishbowl Drive.
| |
| ** '''SO Number''' - The sales order number or purchase order number generated by Fishbowl Drive for this order. This option is the default if nothing is selected.
| |
| ** '''Ship Number''' - The number assigned to the shipment, which is usually identical to the sales order number or purchase order number.
| |
| * '''Show Barcode''' - A checkbox that places a barcode near the top of the report, which can be scanned to pull up the '''Shipping Invoice''' report on a mobile device.
| |
| * '''Show Shipping Service''' - A checkbox that adds a '''Ship Service''' column header in between the '''Carrier''' and '''Date Scheduled''' columns in the report. This identifies the delivery service provided by the carrier.
| |
| * '''Show Package Info''' - A checkbox that adds a variety of information to the report about the packages:
| |
| ** '''Carton #''' - The identifying number of each package in the shipment.
| |
| ** '''Weight''' - The total mass of each package, along with its unit of measure.
| |
| ** '''Tracking #''' - The tracking number provided by the carrier for each package being shipped.
| |
| ** '''Total Weight''' - The total mass of all packages in the shipment, along with its unit of measure.
| |
| ** '''Carton Count''' - The total number of packages in the shipment.
| |
| * '''Show Company Name''' - A checkbox that places your company name on the top left of the report.
| |
| * '''Show Totals''' - A checkbox that adds the following fields to the bottom right of the report underneath all items:
| |
| ** '''Subtotal''' - The total amount due before taxes are added.
| |
| ** '''Sales Tax''' - The total amount of taxes due for all items in the order.
| |
| ** '''Total''' - A combination of the '''Subtotal''' and '''Sales Tax'''.
| |
| * '''Show Notes''' - A checkbox that adds a '''Notes''' line under the '''Carton Info''' section containing any notes written in the '''Details''' tab of the order’s entry in the '''Sales Orders''' or '''Purchase Orders''' module.
| |
| * '''Show Tracking''' - A checkbox that adds a '''Tracking''' column to the right of the '''Extended Price''' column showing what tracking criteria have been assigned to each item. It can be the lot number, expiration date, and/or serial number.
| |
| | |
| You can click the '''Select All Optional''' checkbox to check all of the checkboxes in the '''Optional''' section. That will do everything listed above in the '''Optional''' section except for selecting the '''Order Number'''. That dropdown menu can only be modified manually.
| |
| | |
| To apply your changes and see what they look like in the report, click the '''GENERATE REPORT''' button on the bottom right. And follow the directions at the top of this article to save your changes to a '''Preset'''.
| |
| | |
| | |
| == Total Item Sales report ==
| |
| Fishbowl Drive has its very own T.P.S Report. This report generates a list of gross sales for the date range specified, ordered from greatest to least. An empty date range will report on gross sales to date. T.P.S normally stands for Total Product Sales, and the lack of a third period is deliberate. Since there are no products in Fishbowl Drive, only items, the report’s name was changed to '''Total Item Sales'''. But we kept the abbreviation the same.
| |
| | |
| In addition to the '''Reports''' module, you can access this report in the '''Items''' module. Click on an item, and then click the {{Icon Button|More}} in the action bar. Click '''Show Report''' to bring up three options. Select '''Total Item Sales''', and it will generate a report for all sales.
| |
| | |
| The '''Total Item Sales''' report includes the following column headers by default:
| |
| | |
| * '''Sale Item''' - The name of a sale item from the '''Items''' module.
| |
| * '''Description''' - An explanation of what the sale item is from the '''Items''' module.
| |
| * '''Sales''' - The gross dollar amount of sales for an item over a certain time period. If no '''Date Range''' is selected, this will include all sales.
| |
| | |
| === Optional ===
| |
| These are the '''Optional''' fields that you can use to modify the report:
| |
| | |
| * '''Date Range''' - A textbox that brings up a calendar to select a start and end date for the report. In addition, you can select one of these options on the right of the calendar:
| |
| ** Today
| |
| ** Yesterday
| |
| ** This Week
| |
| ** Last Week
| |
| ** Last 7 Days
| |
| ** This Month
| |
| ** Last Month
| |
| * '''Include Cover Sheet''' - A checkbox that adds a cover sheet to the report that makes it look incredibly professional and confidential.
| |
| * '''Show UOM''' - A checkbox that adds a '''UOM''' column header in between the '''Description''' and '''Sales''' columns. It displays the unit of measure for each item in the report.
| |
| * '''Show Quantity''' - A checkbox that adds a '''Quantity''' column header in between the '''Description''' and '''UOM''' columns. It displays the number of units of each item that have been sold.
| |
| | |
| To select all of the status fields at once, click the '''Select All Optional''' checkbox. The '''Select All Optional''' checkbox won’t affect the '''Date Range'''. That will have to be updated manually.
| |
|
| |
|
| To apply your changes and see what they look like in the report, click the '''GENERATE REPORT''' button on the bottom right. And follow the directions at the top of this article to save your changes to a '''Preset'''.
| | {{Report|Barcode|This report generates barcodes for your items}} |
| | {{Report|Customer History|This report shows details on sales by customer}} |
| | {{Report|Cycle Count|This report generates a list of items to check their quantities on the shelves}} |
| | {{Report|Inventory Availability|This report displays the following inventory quantities: '''On Hand''', '''Allocated''', '''Not Available''', '''Drop Ship''', '''Available''', '''Incoming''', '''Committed''', and '''Short'''}} |
| | {{Report|Inventory Event History|This report lists when new items were received into your inventory or rejected}} |
| | {{Report|Inventory On Hand|This report shows how many items are in stock by location}} |
| | {{Report|Inventory Valuation Summary|This report shows the value of assets in stock}} |
| | {{Report|Item Barcode Label|This report displays barcodes for all of the items on a purchase order}} |
| | {{Report|Item Barcode One Off|This report generates barcodes for your items on individual pages}} |
| | {{Report|Item Price List|This report lists sale items and their prices}} |
| | {{Report|Location Barcode|This report generates barcodes for your [[Locations#Parent and child locations|'''Parent Locations''' and '''Child Locations''']]}} |
| | {{Report|Margin|This report displays profit margins by sale item, customer, or tag}} |
| | {{Report|On Hand By Expiration|This report lists items by their expiration date}} |
| | {{Report|Packing List|This report generates a packing list by Ship Number}} |
| | {{Report|Pick|This report shows information on a pick based on a sales order number}} |
| | {{Report|Purchase Order|This report shows information in a specific purchase order}} |
| | {{Report|Purchase Order Summary|This report lists all purchase orders in a date range}} |
| | {{Report|Receiving List|This report generates a receiving list by Receipt Number}} |
| | {{Report|Reorder|This report generates a list of items that have fallen below their reorder point}} |
| | {{Report|Sales Order|This report shows information in a specific sales order}} |
| | {{Report|Sales Order Summary|This report lists all sales orders in a date range}} |
| | {{Report|Shipping Invoice|This report generates a shipping invoice by Ship Number}} |
| | {{Report|Total Item Sales|This report lists all of your sales by item and dollar amount}} |

 More button in an individual receipt. That is, until you select a report preset as the default or create a new one.