Sales Orders

- The Sales Orders module allows items to be sold to customers.
- To create a new sales order, click the
 New button. Each existing sales order is displayed in the search area on the left.
- After all items have been added to the order, click the ISSUE button in the action bar at the top of the order.

Saved views

The sales orders that are listed in the Sales Orders module will change depending on the selection in the Saved Views dropdown menu on the top-right of the window. There are two options:
- All Open View (Default) - Sales orders with every status, except for Fulfilled and Cancelled, will appear.
- All View - Sales orders with every status will appear.
To create a new saved view, click the Advanced Search button on the top-left of the interface and select at least one search parameter. Click the blue SEARCH button on the bottom-right of the popup. Then click the Save View button under the Search bar. Enter a name for it, and save it.
Once you have done that, the new option will appear in the Saved Views dropdown menu under the first two options. You can repeat these steps to add as many as you like.
Sales Orders details

When you first open the Sales Orders module, it will be blank. But as you add sales orders, you will see them appear in the main section under the following headers:
- No. - The order number, which distinguishes each sales order from every other sales order in the system. This number can only be changed when an order is an estimate.
- Status - The current condition of a sales order. There are seven statuses a sales order can have:
- Estimate - The sales order has been saved, but it hasn't been issued or fulfilled yet.
- Issued - Inventory is allocated and shipments are being prepared, but none of the items in the sales order have been fulfilled yet.
- Partially Picked - At least one of the items in the order has been picked, but not all of them.
- Picked - All items have been picked for the order in the Picking module and are ready to be shipped.
- Partially Fulfilled - At least one of the items in the sales order has been fulfilled, but not all of them.
- Fulfilled - All items in the sales order are delivered. However, an order can be fulfilled and not yet be paid for in full by the customer.
- Cancelled - The sales order has been voided at some point before it could be marked as fulfilled.
- Customer - The name of the customer being billed for the order. You can select a customer name from the list you created in the Customers module. You can only change the customer when the sales order is an estimate.
- Sales Rep - The sales representative in your organization who is responsible for this sale. They may also be responsible for its fulfillment. You can only change the sales rep when the sales order is an estimate.
- Location - The place where the items in the sales order are coming from. You can only change the location when the sales order is an estimate.
- Date Created - The month, day, and year (MM/DD/YYYY) the sales order was created. Note that this is different than the Scheduled date in the sales order on which it is to be fulfilled.
- Date Last Modified - The month, day, and year (MM/DD/YYYY) the sales order was most recently saved.
- Date Issued - The month, day, and year (MM/DD/YYYY) the sales order's status was changed from Estimate to Issued.
- Order Type - The deal(s) being transacted by the sales order. This simply reflects the types of transactions occurring in a sales order and isn't something a user can select. There are four order types a sales order can fall under:
- Sale - A regular transaction in which you receive money from a customer in exchange for an item or service.
- Credit Return - A transaction that returns money to a customer for a defective or unused item/service.
- Drop Ship - A transaction that relies on a third-party vendor to deliver an item to a customer.
- Mixed - A combination of at least two of the order types above in a single sales order. For example, you may have a credit return for one item and a sale for a replacement item on the same sales order. Thus, it wouldn't be purely a sale or credit return but a mixed transaction.
- Total - The sum of all the charges in a sales order. If it contains credit returns, the total may be negative. But most sales orders will have a positive total amount.
- Paid Amount - The amount of money that has been paid toward the sales order. Even if a sales order is an estimate, you can accept payments for items in it via the PAYMENTS button. In the end, the Paid Amount should match the Total.
In addition, there is a  More button to the right of each sales order. It contains two options:
- Duplicate Order - This creates an exact copy of a sales order with a different identifying number.
- Delete Order - This deletes a sales order, but it only works if the sales order has an Estimate status.
Sales order information is separated into four tabs:
General tab

The following fields can be filled in the General tab when creating a new sales order. Required fields are marked by an asterisk:
- Customer* - A dropdown menu of all of your customers. You can narrow down the customers by typing all or part of an existing one's name into the textbox. In addition, you can create a new customer by typing their name into the textbox and then hitting Enter or clicking the option below the textbox. The New Customer wizard will appear with the name you just added. You can then set the customer's Payment Terms and click SAVE. You can only change the customer when the sales order is an estimate.
- Order No.* - A textbox containing the identifying number for the sales order. It will be auto-populated with the next order number, according to what is designated in the Settings module. You can only change the order number when the sales order is an estimate.
- Scheduled - A textbox containing the month, day, and year (MM/DD/YYYY) the sales order is scheduled to be fulfilled by. It will be auto-populated with the current date, but you can change it to any other date you like by clicking the textbox or the calendar icon. You can change the scheduled date at any point until the sales order is fulfilled.
- Bill To - A dropdown menu for selecting a physical address to send the bill to for the sales order. Click the arrow on the right side of the textbox to select one of the options. If there are no addresses for the customer, you can click Custom and fill in the Custom Address wizard that pops up. Clicking the Add to Customer checkbox at the bottom of that wizard will add the information to the customer in the Customers module under the Addresses tab. If you already added one or more addresses in that module, you will see them in the dropdown menu options. Click Clear to remove the address from this field without deleting the address outright in the Customers module. You can change this address at any point until the sales order is fulfilled.
- Ship To - A dropdown menu for selecting a physical address to send the items in the sales order to. Click the arrow on the right side of the textbox to select one of the options. If this address is the same as the Bill To address, you can select Same As Billing. If it's different, and there are no addresses for the customer, you can click Custom and fill in the Custom Address wizard that pops up. Clicking the Add to Customer checkbox at the bottom of that wizard will add the information to the customer in the Customers module under the Addresses tab. If you already added one or more addresses in that module, you will see them in the dropdown menu options. Click Clear to remove the address from this field without deleting the address outright in the Customers module. You can change this address at any point until the sales order is fulfilled.
- Customer PO - A textbox for you to type the reference number provided by your customer, most likely in a B2B transaction. Typically, it is the purchase order number generated from the customer's inventory management system. You can change the customer PO at any point until the sales order is fulfilled.
- Vendor PO - A textbox for you to type the reference number provided by your vendor. Typically, it is the purchase order number generated from the vendor's inventory management system. You can change the vendor PO at any point until the sales order is fulfilled.
- Location* - A dropdown menu of all of your Primary locations. You can narrow down the locations by typing all or part of an existing one's name into the textbox. In addition, you can create a new location by typing its name into the textbox and then hitting Enter or clicking the option below the textbox. The New Location wizard will appear with the name you just added. You can then set its Type, Location Path, and address and click SAVE. You can only change the location when the sales order is an estimate.
- Carrier - A dropdown menu of all of your carriers. You can narrow down the carriers by typing all or part of an existing one's name into the textbox. In addition, you can create a new carrier by typing its name into the textbox and then hitting Enter or clicking the option below the textbox. The New Carrier wizard will appear with the name you just added. You can then add its SCAC and Description and click SAVE. However, there won't be any Service attached to a carrier you create in this manner. You'll have to add services to the carrier in the Carriers module. You can change the carrier at any point until the sales order is fulfilled.
- Service - A dropdown menu of all of the delivery services or methods provided by the Carrier you selected. You can narrow down the services by typing all or part of an existing one's name into the textbox. You can't create a new service from here. You can only add services to a carrier in the Carriers module, as mentioned above. You can change the service at any point until the sales order is fulfilled.
- Custom Fields - If you have any custom fields, you will see them below the main group of textboxes atop the sales order. Up to three custom fields will appear automatically. If you have more than that, you can click the SHOW MORE button to display all of them. The order they appear in will depend on what you set in the Custom Fields wizard of the Sales Orders module. To hide the extra custom fields, click HIDE FIELDS, and then only the first three will be visible again. You can change the information in these custom fields at any point until the sales order is fulfilled.
- Class - A dropdown menu containing means of categorizing transactions. You can select a class to categorize a sales order by its location, size, use, or a variety of other criteria. You can create a new class by typing its name into the textbox and then hitting Enter or clicking the +Create New option above the textbox. The New Class wizard will appear with the name you just added. Click SAVE to create it. You can only change the class when the sales order is an estimate.
- Tax - A dropdown menu that enables you to select a tax rate that applies to a sales order. There are many tax rates you can choose from, such as Sales Tax or Service Tax. You can find an existing tax rate by typing all or part of its name into the textbox. In addition, you can create a new tax rate by typing its name into the textbox and then hitting Enter or clicking the +Create New option above the textbox. A New Tax wizard will appear with the name you just added. You can then set its Code, Vendor, and Amount and click SAVE. You can only change the tax rate when the sales order is an estimate.
- Currency - If the customer uses a different currency than your home currency in their profile, your home currency will appear here in the form of a single dollar, yuan, etc. This cannot be changed from here, and it serves as the basis point for conversions.
- Rate - If the customer uses a different currency than your home currency in their profile, this will show the exchange rate of a single unit of the customer's currency into your home currency.
- Discount - A textbox that lets you add a dollar amount or percent discount to a sales order. Click the number to edit it, and then click the ADD button. You can change this field when the sales order is an estimate or issued. But you won't be able to change it when the sales order is partially fulfilled or fulfilled.
- Total - The total amount of money due from the customer for all of the items on the sales order.
- PLEASE NOTE - If the customer on the sales order uses a different currency than your home currency in their profile, another section will appear showing what the total will be in their currency.
Details tab

The Details tab is just to the right of the General tab in a sales order. Click it to find the following textboxes, dropdown menus, and other information. For all of the dropdown menus, you can type text into them to search for values to select. All of these can be modified until a sales order is marked as Fulfilled:
- Priority - The level of importance this specific sales order has in relation to all others. There are five priorities a sales order can have: Lowest, Low, Normal, High, or Highest. Normal is the default priority.
- Expires - The month, day, and year (MM/DD/YYYY) the sales order needs to be fulfilled by. This only applies to orders with an Estimate status. An expired order can be activated by clicking the ISSUE button.
- Created - The month, day, and year (MM/DD/YYYY) the sales order was first saved. This date won't appear until you click the SAVE or SAVE AND CLOSE button for the first time on a sales order.
- Modified - The month, day, and year (MM/DD/YYYY) the sales order was most recently updated.
- Issued - The month, day, and year (MM/DD/YYYY) the sales order's status was changed from Estimate to Issued.
- Completed - The month, day, and year (MM/DD/YYYY) the sales order's status was changed to Fulfilled.
- Sales Representative - A dropdown menu of all of your sales representatives. You can narrow down the sales reps by typing all or part of an existing one's name into the textbox. In addition, you can create a new sales rep by typing his or her name into the textbox and then hitting Enter or clicking the option below the textbox. The New Representative wizard will appear with the name you just added. Then you simply have to enter the sales rep's initials and click SAVE. You can only change the sales rep when the sales order is an estimate.
- FOB - Free On Board, a shipping term referring to the point at which international shipping costs are charged. There are three options: Destination, Origin, or Port of Entry. Origin is the default.
- Payment Terms - The timeframe in which you will be paid by a customer for the sales order. This dropdown menu includes all payment terms you previously created in the Payment Terms module.
- Shipping Terms - The payment method to the carrier for their shipping services. There are three shipping terms you can use: Prepaid & Billed, Prepaid, or Freight Collect. You can set the default shipping term in the Company section of the Settings module.
- Bill To - This comes from the Bill To field in the General tab.
- Ship To - This comes from the Ship To field in the General tab.
Documents tab

To add files to a sales order, click the Documents tab, and then click the UPLOAD button on the top-right. The Upload Documents wizard will appear. You can either drag and drop files into the window, or you can click the BROWSE button on the bottom-left to select files to add and then click the ADD button. You can add virtually any file type in here, not just documents. In addition to DOC and DOCX files, you'll find that JPG, GIF, PDF, XLSX, PPTX, and many other file types are permissible. Once you add a file, you won't be able to edit it. All you can do is download a copy of it. If you want to edit a file, you'll need to download it, edit it, and upload the revised version.
To delete a file, click the trashcan icon with an X in it to the right of the file, and then click DELETE in the popup window.
Once you make a change, whether adding or deleting a file, be sure to click SAVE or SAVE AND CLOSE to preserve your work.
Notes tab

The Notes tab enables you to add information (with no character limit) about the sales order that will only be visible within Fishbowl Drive. Any notes you add to this tab will not be included in the sales order if you email it to the customer or anyone else.
You may want to type in information about the items being sold, the customer's relationship to your company, or how to handle other aspects of the transaction. The possibilities are limitless.
How to create a sales order
To create a sales order, click the ADD NEW button. It will shrink the list of sales orders to a small window on the left, and the larger section on the right is where you can add information to the new sales order.
Adding items to a sales order
While a sales order is an estimate or issued, you can add and update items and their quantities to it. Click in the Items textbox to see a dropdown menu of all of your sale items. Enter all or part of a sale item's name, description, or SKU to search for it. Then click the item you want to add to the sales order. You will then be asked to enter the Quantity.
Once you're ready to add the item, you can either click the ADD ITEM button to add it as a sale item, or you can click the arrow on the right of that button and choose one of these three options:
- Sale - This is a regular item or service you're selling to a customer.
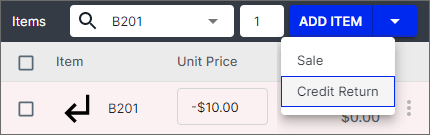
- Credit Return - This is an item a customer wishes to return for a refund.
- Drop Ship - This is an item you will have a vendor ship to the customer. This won't be an option if the item being sold is a service.
If you leave the Items dropdown menu blank and click the arrow next to ADD ITEM, you will find that it has four additional options:
- Miscellaneous Sale - If you don't want to include a particular item on a sales order, but still want to accept payment for something, you can use this option. You can add a Name, Unit Price, Quantity, Total Cost, Description, and Notes to the miscellaneous sale item.
- Miscellaneous Credit Return - This is basically the opposite of a Miscellaneous Sale. You can enter all the same information, but it will be used to pay back a customer for a miscellaneous item.
- Flat Rate Tax - This enables you to select a Flat Rate Tax you previously created in the Tax Rates module and add it as a line item.
- Note - This enables you to add a note (up to 255 characters) to a sales order as a line item.
Once you add an item, you will find it as a line item in the sales order with the following column headers:
- Item - The item name, description, and an image, if available.
- Unit Price USD - The price you are charging (or refunding) for the item, as set in the Sale Items tab of the Items module. You can manually change the unit price from here, and it won't affect the price in other sales orders or in the Items module.
- PLEASE NOTE - If the customer on the sales order uses a different currency than your home currency in their profile, another column header will appear showing what the unit price will be in their currency.
- Quantity - The number of units attached to the sales order. You can set the quantity to any number above zero. If you modify the quantity after using a different Unit Price than the one listed for the sale item, you will receive a prompt asking if you want to change the Unit Price to apply the original price to all of the units.
- Tax - The rate the unit(s) will be taxed at. This can be None, Not Taxable, or any rate above 0% that you have created in the Tax Rates module.
- Discount - A dollar amount or percent discount that applies to a sale item. The difference between this and the Discount mentioned above in the General tab section is that this doesn't apply to the entire sales order, but only one line item in it.
- Status - The condition of an item as either Entered or Fulfilled. This won't tell you if there is an adequate quantity on hand to fulfill the item. You will have to check the Picking module (if the sales order is issued) or the Inventory module to see whether the Allocated quantity exceeds the Available quantity or not.
- Subtotal USD - The sum of this equation: Unit Price USD x Quantity - Discount. This is the amount of money you expect to receive for the unit(s) in a particular line item. There is also a number below the main one that shows how much tax money needs to be collected, based on the tax rate.
- PLEASE NOTE - If the customer on the sales order uses a different currency than your home currency in their profile, another column header will appear showing what the subtotal will be in their currency.
When you click a sale item in a sales order, the Edit Sales Order Item wizard will pop up. Most of the information is the same as what's found above with three notable additions:
- SKU - The stock-keeping unit for the item. It can't be changed from here, only from the Items module.
- Total Cost - The total amount of money it cost you to purchase the sale item unit(s).
- Notes - A place to add information or instructions about an item on the sales order. There is no character limit.
When you click the More button next to an item, you will see the following options:
- Move Up - If you have multiple line items, you can reorganize one higher on the list with this button.
- Move Down - If you have multiple line items, you can reorganize one lower on the list with this button.
- Fulfill - If the sales order is issued, you can click this button to fulfill a line item in it.
- Duplicate - This button adds an exact copy of a line item to the bottom of the sales order.
- Duplicate To Credit Return - This button adds a copy of a line item to the bottom of the sales order, but it will be a refund for that item.
- Edit - This does the same thing as when you click a line item. It opens the Edit Sales Order Item wizard.
- Remove - This deletes a line item from the sales order.
Credit Return
Follow the steps below to create a credit return. Additional instructions are also available in this PDF and in the video to the right.
- To add a credit return item to a sales order, type or select the product in the Items field. Then click the arrow on the ADD ITEM button and select Credit Return.
- Click the ISSUE button and then click To Receiving in the Flow bar at the top of the order.

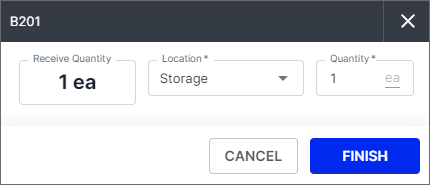
- Click the RECEIVE button and then click the FINISH button to receive the credit return item back into inventory.


Main header options

Once you have added all the information you need to a sales order, you're ready to save it, issue it, and accept payments. You can do that with these buttons at the top in the action bar:
- QUICK FULFILL - This will automatically issue a sales order and fulfill as many items as possible in it until it can be marked as Fulfilled. If any items are short, this tool will fulfill all units that are available and mark the sales order as Partially Fulfilled.
- ISSUE/UNISSUE - Issuing a sales order changes the status of all the items in it from Available to Allocated in the Inventory module. You can unissue a sales order if none of the items in it have been fulfilled. If a sales order is Partially Fulfilled, you won't be able to unissue it, though you can cancel it.
- PAYMENTS - This enables you to request and add payment(s) for a sales order in the form of credit card, cash, and/or check.
- SAVE - This saves a sales order to the system and lets you continue working on it.
- SAVE AND CLOSE - This saves a sales order to the system and returns you to the main section of the Sales Orders module where you can see all of your sales orders.
- More - This allows you to select one of the following options:
- Show Report
- Send Email
- Create Purchase Order
- Duplicate Order
- Duplicate Order As Credit Return
- Shipping Quote
- Cancel Sales Order
- Delete Order
More button
As you can see from the previous section, there are a lot of options in the More button in the action bar of a sales order. We will thoroughly explore each of those options below.
Show Report (Sales Order report)
Clicking Show Report will bring up the Sales Order report. Keep in mind as you read through the following sections of the Sales Order report that they are described in relation to the Standard layout. There are three other layouts, which we will talk about below. If you change the layout, the way the columns and boxes will be set up in the report will change somewhat.
This report initially contains the following sections/column headers by default:
- Order # - The order number, which distinguishes the sales order from every other sales order in the system.
- Date - The month, day, and year (MM/DD/YYYY) the sales order was created.
- Bill to - The physical address to send the bill to for the sales order.
- Ship to - The physical address the item(s) in the sales order will be shipped to.
- Customer - The name of the recipient of the item(s) in the sales order.
- Item - The name of the item(s) in the sales order.
- Description - A brief description of the item(s) in the sales order.
- Subtotal - The amount of money due for all items in the sales order before discounts and taxes are applied.
- Order Discount - The dollar amount reduced from the subtotal, if applicable.
- Total - The amount of money due for all items in the sales order after discounts and taxes are applied.
- Paid - The amount of money the customer has already paid toward the sales order.
- Balance Due - The amount of money the customer has yet to pay toward the sales order.
In addition to these things, the report also includes the title of “Sales Order,” which can be changed, and the status of the sales order under it on the top-right. The seller’s logo and main contact phone number (both found in the Company section of the Settings module) are on the top-left of the report.
If you’ve set a footer in the same section as the logo and main contact phone number, it will appear on the bottom-left of the report above the date and time the report was generated. The page number appears on the bottom-right.
To the right of the report, you will find a number of options to customize the report. Under Theme, you can click a dropdown menu to select one of the options. The one you choose will likely change the shading of the section and column headers in the report to a different hue. But that’s just scratching the surface of the customization you can add with a different theme. We’ll cover that a little below after we describe all the other aspects of the report.
Required and optional
The Required section has a single dropdown menu: Sales Order Number. This allows you to generate a Sales Order report for any sales order you have created, even if it’s different than the one you’re currently looking at in the Sales Orders module.
The Optional section is below the Required section. It includes the following fields to modify the report:
- Report Title - A textbox for entering the title of the report. You can change the title on the top-right of the report to anything you like by entering it here.
- Is Invoice - A checkbox that changes the sales order to an invoice. It also changes the report title to Invoice, and that title can’t be modified.
- Date Option - A dropdown menu that lets you change the date listed on the sales order to one of these options:
- Issued - The month, day, and year (MM/DD/YYYY) the sales order was issued.
- Completed - The month, day, and year (MM/DD/YYYY) the sales order was fulfilled.
- Created - The month, day, and year (MM/DD/YYYY) the sales order was created.
- Scheduled - The month, day, and year (MM/DD/YYYY) the sales order is scheduled to be fulfilled by.
- Today - The present month, day, and year (MM/DD/YYYY).
- Show Barcode - A checkbox that places a barcode at the top of the sales order, which can be scanned to pull up the sales order on a mobile device.
- Show Company Address - A checkbox that places your company’s address (as found in the Company section of the Settings module) above the phone number on the top-left of the report.
- Show Company Name - A checkbox that places your company’s name (as found in the Company section of the Settings module) above the address on the top-left of the report.
- Show Contact - A checkbox that places the contact associated with the sales order under the Ship To address in the report.
- Show Order Notes - A checkbox that places your sales order’s notes under the Customer box.
- Show Payments - A checkbox that places payment dates, amounts, and links under the list of items in the sales order.
- Show Tax - A checkbox that inserts any taxes due under the subtotal.
- Show Home Currency - A checkbox that shows all monetary amounts in your home currency as selected in the Settings module. This is automatically checked, and it can't be unchecked, so consider it a required setting.
- Show Line Item Notes - A checkbox that lets the report show any notes a user has added to individual line items in the sales order from the Edit Sales Order Item wizard.
You can click the Select All Optional checkbox to click all of the checkboxes in the Optional section. That will turn the sales order into an invoice and do everything else listed above in the Optional section except for changing the Date Option. That can only be done manually.
Columns
The Columns section enables you to add the following parts to the report:
- Order Date Scheduled - A checkbox that adds the date the sales order is scheduled to be fulfilled by under any notes and above the items and descriptions.
- Item Total Price - A checkbox that adds a Total or Total Price column to the right of the Description column showing the total price being charged for all units of each item.
- Item Discount - A checkbox that adds a Discount column to the right of the Total Price column showing any discount applied to all units of each item.
- Show Row Number - A checkbox that adds a number to the left of each item contained in the sales order, indicating its relative position and the total number of items in the sales order.
- Item Type - A checkbox that adds a Type column in between the Row Number and Item columns, showing which type each item is.
- Item Unit Price - A checkbox that adds a Price or Unit Price column in between the Description and Total Price columns showing how much was charged for a single unit of an item.
- Item Quantity Ordered - A checkbox that adds a Qty or Qty Ordered column in between the Unit Price and Total Price columns showing how many units of an item are on the sales order.
- Order Carrier - A checkbox that adds a Carrier box to the left of the Date Scheduled box showing which carrier is attached to the sales order.
- Order FOB Point - A checkbox that adds an FOB Point box to the left of the Carrier box showing what Free On Board Point was selected for the order.
- Order Payment Term - A checkbox that adds a Payment Terms box to the left of the FOB Point box showing the payment terms associated with the sales order.
- Order Seller - A checkbox that adds a Sales Rep box to the left of the Payment Terms box showing the Sales Representative responsible for creating the sales order.
- Order Ship Service - A checkbox that adds a Ship Service box in between the Carrier and Date Scheduled boxes showing the shipping service provided by the carrier selected for the sales order.
- PO Number - A checkbox that adds a Customer PO box in between the Order # and Date boxes near the top of the sales order showing the Customer PO number that corresponds with the sales order.
- Tags - A checkbox that adds a column in between the Total Price and Discount columns showing any tags associated with each item on the sales order.
Default selections in the Sales Order report
If no presets are saved, the following Optional and Columns checkboxes will be clicked by default when you open the Sales Order report:
Optional
- Show Company Address
- Show Company Name
- Show Payments
- Show Tax
- Show Home Currency
Columns
- Order Date Scheduled
- Item Total Price
- Item Discount
- Item Unit Price
- Item Quantity Ordered
- Order Carrier
- Order Ship Service
These defaults enable you to have all of the information that needs to be included in a sales order. You can also click other checkboxes to add more details if you like.
Custom fields
If you have set up custom fields for your sales orders, you will be able to add them to the report using this section. When you click the checkbox next to at least one custom field, Additional Information appears under the Ship To and Contact boxes on the sales order, and the custom field(s) will be under that header. It may also appear just above the Items section of the sales order, depending on the Theme you selected.
Theme
When you first open the Sales Order report, you will find no options in the dropdown menu under the Theme section. Once you create a theme, it will be included in the list when you click the dropdown menu. You don’t have to click the GENERATE REPORT button after you select one of the themes you’ve created. The report will automatically update to reflect your selection.
To create a new theme, click the ADD button next to the dropdown menu. This is where you can create a different layout for this report, among other things.
There are four options to customize the report, which you will find below:
- Layout - This changes the way the report’s contents are organized. There are four options for the layout:
- Standard - This is the default layout, and it separates most information into boxes and clearly defined columns.
- Modern - Less boxy than Standard, with information put in different places and combined into larger boxes.
- Fresh - Similar to the Modern layout, but with some information moved around slightly.
- Bold - Very similar to the Fresh layout, with a few slight alterations.
- Color - This allows users to add shading to parts of the report. There are five options for the color of the report:
- Initial - This is the default. Everything in the report is black and white and sometimes shaded in gray.
- Orange - Headers or some key lines are shaded in light orange.
- Blue - Headers or some key lines are shaded in metallic blue.
- Green - Headers or some key lines are shaded in light green.
- Picker - Headers or some key lines are shaded in whatever color you choose. You will need to click the CREATE NEW THEME or UPDATE button after picking a new color in order to save it. So it’s a good idea to select a font family and size before selecting a custom color.
- Font Family - This changes the font of the text in the report. Keep in mind that if you don’t select any font, it will default to Times New Roman. But you won’t be able to save the report in that font. You will have to select one of these three options:
- Arial
- Verdana
- Inter
- Font Size - This gives the option to adjust the size of the text in the report:
- 9pt
- 10pt - The default font size.
- 11pt
- 12pt
Once you’re done creating a theme, or making adjustments to an existing one, click the CREATE NEW THEME or UPDATE button to save it. Then it will appear in the dropdown menu of themes. Simply click the X to return to the report. It won’t automatically have the new theme applied to the report, so you’ll have to pick it from the dropdown menu if you want to use it.
To delete a theme, first click the EDIT button after selecting the theme in the dropdown menu. Then click the trashcan icon to the right of the UPDATE button in the window that pops up. You will be asked if you really want to delete the theme, and all you have to do is click the red DELETE button. It will be erased and removed from the Theme dropdown menu.
For everything other than the Theme section of this report, to apply your changes and see what they look like in the report, click the GENERATE REPORT button on the bottom-right.
You can find all of the other options and features in the report, including how to create presets and use the tools above the report in the Sales Order Summary report section below in this article.
Send Email
While viewing an order, click the More button and select Send Email to compose an email. The To email auto-populates with the email address you added in the Details tab of the order. In addition, you can click the checkbox next to Send report to attach a PDF of the default report you've created in the Show Report section above.

Currently, if you hit Enter on your keyboard (as long as the required fields are filled in), the email will be sent. So we recommend keeping the message simple and to one paragraph. Don't hit Enter or click the SEND button until you're ready to send it. This issue will be resolved soon.
After you click SEND you will get a confirmation that the email has been sent. If the recipient doesn't receive the email, they will need to check their junk folder and add fishbowl@fishbowlonline.com to their address book so that future emails aren't marked as spam.
Create Purchase Order
Clicking Create Purchase Order opens a wizard that lets you create a purchase order containing the items sold in the sales order. This is a helpful tool to quickly replenish your inventory.
There are four headers in the wizard that are used to determine what to add to the purchase order:
- Item - The name of the item in the sales order.
- On Hand - The number of units currently in stock.
- Qty To Order - The number of units to be ordered, reflecting the number of units in the sales order.
- Vendor On Order - A dropdown menu to select the vendor to order each item from.
Once you click the NEXT button, you will be taken to another screen to confirm the quantity and unit of measure for each item you intend to create a purchase order for. Once you click the CREATE ORDERS button, a new purchase order will be created with the information you added in the wizard. That purchase order’s initial status will be Bid Request.
Duplicate Order
As soon as you click Duplicate Order, a new sales order will be created with the exact specifications of the one you were just on. The only difference is that it will have a new identifying number. All you have to do is save it, and it will appear among your list of sales orders.
Duplicate Order As Credit Return
As soon as you click Duplicate Order As Credit Return, a new sales order will be created with almost exactly the same specifications as the one you were just on. It will even have the same identifying number, but it will be marked as a return next to its number. The big difference is that this sales order will have a negative total amount of money due because every item will be a return instead of a sale.
Shipping Quote
Clicking Shipping Quote opens the Shipping Quotes wizard. This option will only be available if you have set up an integration with a shipping solution in the Integrations module. Otherwise, it won’t be clickable. Initially, at the top of the wizard there is a single package with the following textboxes to be filled in:
- Insured amt - The value of the package contents that the shipper will reimburse if something goes wrong on their end during the delivery process.
- Dimensions - The length, width, and height of the package being used to ship items in.
- Weight - The total mass of all items in the package.
You can add more packages by clicking the ADD PACKAGE button. And you can delete a package by clicking the trashcan icon to the right of it.
Ship Address tab
There are two tabs in the Shipping Quote wizard. Most of the textboxes in the Ship Address tab are required fields, but everything in the Shipping Extras tab is optional. The Ship From Address and Ship To Address have the same textboxes to fill in:
- Name*
- Company Name
- Attention
- Street*
- Street 2
- City*
- State*
- ZIP*
- Country*
Shipping Extras tab
The Shipping Extras tab enables you to add a variety of optional criteria to a sales order’s shipping service. There are two checkboxes that enable you to use retail rates and allow Saturday delivery. And there are four other options you can select or unselect. The first three are only available for UPS and FedEx shipping:
- Contains Dry Ice - Enter a dry ice weight, and select a unit of measure to attach to the number.
- Contains Alcohol - Select a recipient type:
- Licensee
- Consumer
- COD - For a cash on delivery payment method, first select a method, and then enter the amount and currency. The methods are:
- Secured Funds
- Cash
- Any
- Signature Confirmation - Select a type of signature confirmation for the delivery:
- Standard - Anyone at the destination can sign for the package.
- Adult - Only someone 21 years of age or older can sign for the package.
- Certified - Only a specified person can sign for the package.
- Indirect - The package can be signed for by someone at a neighboring address if no one is available at the destination.
- Carrier Confirmation - A document sent to the carrier with prices, terms and conditions, and detailed instructions on how to deliver items.
When you’ve added all the information in both tabs, you can click the GET RATES button. This will generate shipping quotes from all shippers you are integrated with. Select one and then click the ADD TO SALES ORDER button to add that shipping service to the sales order.
Cancel Sales Order
Clicking Cancel Sales Order instantly changes the sales order’s status to Cancelled, which freezes everything in it. Once done, this can’t be undone. So be very careful about selecting this option. You can’t even delete the sales order after performing this action.
Delete Order
Clicking Delete Order brings up a message asking if you really want to delete the sales order. If you click the red DELETE button, the sales order will be deleted. However, this only works if the sales order has an Estimate status. If you try to delete a sales order with any other status, you will receive an error message.
Requesting, adding, and refunding payments
At the top of a sales order, you will not only see its fulfillment status, but you will also see whether or not it has been paid. This payment status doesn't appear in the main section that lists all of the sales orders. You will only see it once you click a sales order. There are three options, which are fairly self-explanatory:
- UNPAID - No money has been received from the customer in payment for items in a sales order.
- PARTIALLY PAID - Some money has been received from the customer, but not the full amount owed for a sales order.
- PAID - The full amount has been paid by the customer for all items in a sales order.
You can receive payments for sales orders with any status, including Cancelled. If a sales order is cancelled, the only thing you can't do is request payment. Clicking the PAYMENTS button mentioned above brings up the Payments wizard. Click the REQUEST PAYMENT button to create an invoice to be sent to the customer on the sales order. It will ask you for the following information:
- AMOUNT - All or part of the total amount due for a sales order.
- DUE DATE - The month, day, and year (MM/DD/YYYY) payment must be received before it will be considered overdue.
Once you click SAVE, it will generate an invoice via Stripe with a unique URL, which you can email to a customer. They can then pay for the sales order via credit card or bank transfer.
To manually enter a payment from a customer, click the ADD PAYMENT button to open a separate window. It will show the Total Due, Total Payments already made, Current Payment that you're about to add, and Balance after any payments are made. You can add payment via Card, Cash, and/or Check.
- Card - Enter the following information:
- Payment Amount
- Name On Card
- Card Number
- Expiration Date
- CVC
- Cash - Enter the following information:
- Payment Amount
- Check - Enter the following information:
- Payment Amount
- Reference Number (or check number)
Once you finish adding and/or requesting payments, you will see them listed under the following headers:
- Date - The month, day, and year (MM/DD/YYYY) a payment was created.
- Payment Type - Cash, Card, Check, or Request Link.
- Transaction Type - Charge or Refund.
- Status - PAID, PENDING, or REFUNDED.
- Amount - The dollar amount paid, billed, or refunded.
Once payments are marked as PAID, you will have the option to refund them by clicking the Refund Payment button on the right of them. When you click that button, a new window will pop up where you can add a Refund Amount. It will be automatically populated with the full amount of the payment on that line. If you have previously refunded part of that amount, the Refund Amount will reflect how much was already refunded.
How to quickly go to the Picking module

After you click the ISSUE button in a sales order, you will notice that the Picking part of the Flow bar tool on the top-left of the window lights up. Clicking it will take you directly to that sales order in the Picking module. If you have any unsaved changes, you will receive a prompt asking if you want to save before leaving.
This is a smooth way to move through the fulfillment process. Once a sales order is ready for picking, you can click that button to go right there and then go on to shipping. If there are any credit return items in the sales order, you will also see a To Receiving link next to the Flow bar. This takes you to the Receiving module to receive the returned items.
You can return to the sales order in the Sales Orders module by clicking Sales Order in the Flow bar.
One thing to keep in mind is that when you return to the Sales Orders module, you will technically be in a search. So if you close the sales order, you will only see that one listed on the main Sales Orders module page. To get out of the search and list all of your sales orders, click the Show All Orders button on the top-left under the search bar.
More button
On the top-right of the Sales Orders module, just to the left of the ADD NEW button, you will see a More button. Click it to open a dropdown menu containing the following options:
- Show Report
- Export Orders
- Import Orders
- Custom Fields
- Change Dates
You will find explanations of everything contained in these options below.
Sales Order Summary report
The Sales Order Summary report generates a summary of sales orders for the filters and date range specified. Sales tax is not included.
Clicking Show Report will bring up the Sales Order Summary report. This report initially has the following columns:
- SO # - The identifying number of each sales order, along with a list of all items in that sales order and their descriptions and quantities.
- Customer - The name of the recipient of the item(s) in a sales order.
- Sales Rep - The salesperson responsible for selling the item(s) in a sales order.
- Date Issued - The month, day, and year (MM/DD/YYYY) the sales order was changed from an Estimate to an Issued status.
- Status - The condition of the sales order within the system. There are seven statuses:
- Estimate - The sales order has been saved, but it hasn’t been issued or fulfilled yet.
- Fulfilled - All items in the sales order are delivered. However, an order can be fulfilled and not yet be paid for in full by the customer.
- Issued - Inventory is allocated and shipments are being prepared, but none of the items in the sales order have been fulfilled yet.
- Cancelled - The sales order has been voided at some point before it could be marked as fulfilled.
- Partially Fulfilled - At least one of the items in the sales order has been fulfilled, but not all of them. This is referred to as In Progress in the Optional section below.
- Voided - This applies to orders that were issued (and perhaps even fulfilled) and then later had that action undone.
- Entered - This means an item has been added to a sales order, but it hasn’t been fulfilled, nor has it necessarily been allocated yet.
- Ordered - The total price a customer has agreed to pay for the item(s) in a sales order.
- Shipped - The total value (in U.S. dollars) of all items that have been shipped to the customer.
- Remaining - The sum of the Ordered - Shipped amounts. This is the value of all items that have not yet been delivered to the customer.
Optional
By default, you will be able to see all sales orders (in a specified date range) that fall under every status. To narrow down which sales order(s) you want to include in this report, look at the settings on the right of the report and go to the bottom of the Optional section. You will find checkboxes for each of the statuses listed above. If you only check the box next to Estimate, for example, you will only see sales orders that are estimates. You won’t see any fulfilled, issued, or any other type of sales order. Be sure to click the GENERATE REPORT button at the bottom to make the report reflect your changes.
To select all of the status fields at once, click the Select All Optional checkbox. However, if you leave that unchecked, the report will still display all of them. The Select All Optional checkbox won’t affect any of the dropdown menus you see under the Optional header. Those will have to be updated manually.
The following fields enable you to customize the report in a variety of ways:
- Date Range Option - A dropdown menu of date ranges you can apply to this report. By default, the date range will be when a sales order was created. But you can specify which dates you want to include by selecting one of the options below:
- Date Created - The month, day, and year (MM/DD/YYYY) a sales order was first saved, even if it wasn’t issued.
- Date Issued - The month, day, and year (MM/DD/YYYY) a sales order was finalized, and the fulfillment process began.
- Date Last Modified - The most recent month, day, and year (MM/DD/YYYY) a sales order was changed and saved by a user.
- Date Scheduled - The month, day, and year (MM/DD/YYYY) a sales order is estimated to be fulfilled by.
- Date Completed - The month, day, and year (MM/DD/YYYY) a sales order was fulfilled.
- Sales Order Item Date Fulfilled - This doesn’t apply to the entire sales order, but to the item(s) contained within it.
- Group By - A dropdown menu that enables you to reorder the sales orders in this report by one of three criteria:
- Location - The place within your company where items are shipped from.
- Sales Person - The sales representative responsible for creating a sales order and possibly overseeing it to its fulfillment.
- Ship To State/Province - The location of the buyer where the item(s) in a sales order is/are being shipped to.
- Ship To State/Province - The location of the customers you’re shipping items to on a sales order. The dropdown menu includes a list of all 50 states in the U.S., plus:
- American Samoa
- District of Columbia
- Federated States of Micronesia
- Guam
- Marshall Islands
- Northern Mariana Islands
- Palau
- Puerto Rico
- Virgin Islands
- Sales Representative - The person responsible for the creation of a sales order. You can select a sales representative from the list you created in the Representatives module under the Setup group. You can’t create a new sales rep from here, nor can you select more than one.
- Location - The physical place or area where the item(s) in a sales order is/are being shipped from. You can select a Parent Location or Child Location from the list of ones you created in the Locations module under the Setup group. You can create a new location by entering a name for the location in the textbox and hitting Enter or clicking the + Add option. Then fill out the New Location wizard that pops up.
- Customer - The individual listed as the recipients of items on sales orders. By default, all customers are included in this report, but you can narrow down the results to a single customer by selecting one from the list you created in the Customers module under the Sales group. You can create a new customer by entering their name in the textbox and hitting Enter or clicking the + Add option. Then fill out the New Customer wizard that pops up.
- Sale Item - The item in a sales order. There can be other items in the sales order, but if you select this, only sales orders containing this sale item will be listed. You can select an item from the list of ones you created in the Items module under the Materials group. You can’t create a new sale item from here, nor can you select more than one.
- Date Range - Clicking this textbox brings up a calendar to select a start and end date for the report. In addition, you can select one of these options on the right of the calendar:
- Today
- Yesterday
- This Week
- Last Week
- Last 7 Days
- This Month
- Last Month
Columns
In addition, you can click the Columns dropdown menu under the Optional section. This will open the following column headers that you can add to the report:
- Date Fulfilled - A checkbox that adds a Date Fulfilled column in between the Sales Rep and Date Issued columns. It shows the month, day, and year (MM/DD/YYYY) a sales order was marked as fulfilled. However, this doesn’t necessarily mean that the items have been shipped or that payment has been received.
- Ship To State/Province - A checkbox that adds a Ship To State/Province column in between the Date Issued and Status columns. It shows the place within the U.S. or one of its territories that the item(s) in a sales order is/are being shipped to.
- Customer PO - A checkbox that adds a Customer PO column in between the Customer and Sales Rep columns. It shows the number of the corresponding purchase order a customer generated when their sales order was created, if applicable.
- Order Payment Term - A checkbox that adds a Payment Term column in between the Date Issued and Ship To State/Province columns. It shows the timeframe in which a customer will pay for a sales order.
- Date Issued - A checkbox that is supposed to add a Date Issued column. However, the Date Issued column is there whether or not this checkbox is clicked. So it doesn’t serve a purpose right now. In the future, it will likely be fixed.
If you want to add all of these columns to the report, click the Select All Columns checkbox. If you only want certain ones on the report, click the checkbox next to them, and they will be added.
Create a new preset
To apply your changes and see what they will look like in the report, click the GENERATE REPORT button on the bottom-right.
To save a report for later use, click the CREATE NEW PRESET button on the top-right of the wizard. A popup will appear asking for just one thing: Preset Name. Add any name you like. For example, it can be the name of the customers and/or date range the report includes. Then click the SAVE button. You can either do this before you begin making changes to the report, or you can do it at the end. If you want to make additional changes to the report, click the UPDATE button. The CREATE NEW PRESET button changes to UPDATE when you're in a preset report.
Additional presets
To create another preset report, first click the X to the right of the dropdown menu containing the current one's name. Then you can go through the same steps above to create a new preset.
The first preset report you create will automatically be the default. Once it's saved, there will be a Default checkbox option above the UPDATE button.
If this isn't the first time you've opened this wizard, and you previously created at least one preset, you will see the default preset report first thing. And you will be able to see all of the preset reports listed in the dropdown menu on the top-right.
To set a new default preset report, click the Default checkbox in it and click the UPDATE button. If you uncheck the Default checkbox on the default preset report and click the UPDATE button, you'll receive an error message. That's because there usually has to be a default. However, if you delete the default preset report, there won't be a default report, and it will show all items and locations when you click the REPORT button. That is, until you pick a preset report as the default or create a new one.
To delete a preset report, first click the trashcan icon next to the UPDATE button. Then click the red DELETE button in the message that pops up.
Report options
The following buttons are at the top of the Sales Order Summary report to allow you to make adjustments and send it to other people. Tooltips appear when you mouse over these buttons for a couple seconds. They succinctly explain what each one does.
- Zoom Out - This makes the text in the report appear smaller.
- Reset - This restores the report to its original size.
- Zoom In - This makes the text in the report appear larger.
- Next Page - If a report has multiple pages, this button enables you to move to the next page.
- Previous Page - If a report has multiple pages, this button enables you to move to the previous page.
- Download XLSX File - This enables you to download the report into an XLSX file, which you can open in Excel.
- Download PDF - This enables you to download a report into a PDF, which you can open with Adobe Acrobat.
- Print Report - This enables you to print a hard copy of a report.
- E-mail Report - This enables you to email a report to as many recipients as you like. It opens a popup where you can add email addresses in the To, Cc, and Bcc textboxes. Then you can add a subject and message. Click the SEND button to send the email with the report as a PDF attachment. If the recipient doesn't receive the email, they will need to check their junk folder and add fishbowl@fishbowlonline.com to their address book so that future emails aren't marked as spam.
- Expand - This expands the report to the full size of your browser window. When you click this button, it changes to a Contract button, which you can click to return the report to its previous smaller size.
Import sales orders
Clicking the Import Orders button allows you to import sales orders and their associated data into your Fishbowl Drive database. To get an import template, click Export Orders and download a CSV file. It will have all the columns formatted correctly. You can just populate them with your own information.
If the import of at least one sales order fails, you will receive an error message. Then you can go to the Downloads page and download a CSV file containing the item(s) that failed to be imported. In the first column of the spreadsheet, it will tell you where the error occurred. That way, you can fix it and try to import the revised file again.
All of your imported and exported files will be listed by date in the History column on the right side of the Downloads page. You can download your exported files from the column on the left marked Downloads. Imports that are successful will be marked as Completed in the History column, and they won't be able to be downloaded. But imports that fail (in full or in part) will be marked as Failed, and they can be downloaded.
- To import sales orders from a spreadsheet or CSV file, click the
 More button at the top of the item list and choose Import Sales Orders.
- To create a template file with the correct column headers, click Export Sales Orders.
- The suggested order of CSV imports for new databases can be found here.
- For a step-by-step tutorial on working with CSV files, check out the CSV video here.
- Below is a list of the CSV columns. All column headers are required. Columns with an asterisk must contain data.
- SalesOrder-Number* - The identifying number of a sales order. It must be different than all other SO numbers in the system.
- SalesOrder-CustomerPONumber - The number of the purchase order a customer generated when their sales order was created.
- SalesOrder-VendorPONumber - The number of the purchase order a vendor generated when their sales order was created.
- SalesOrder-CustomerName* - The name of the customer on a sales order. It must be one of the names found in the Customers module.
- SalesOrder-CarrierName* - The name of the carrier (e.g., UPS, USPS, or FedEx) assigned to a sales order. It must be one found in the Carriers module.
- SalesOrder-CarrierServiceName - The service provided by a carrier to deliver the item(s) in a sales order. It must be one of the services under a carrier in the Carriers module.
- SalesOrder-RepresentativeName - The name of the sales representative on a sales order. This name must be found in the Representatives module.
- SalesOrder-BillToName - The name of the individual or corporation being billed for a sales order.
- SalesOrder-BillToStreet - The street address the bill for a sales order was sent to or will be sent to.
- SalesOrder-BillToCity - The city the bill for a sales order was sent to or will be sent to.
- SalesOrder-BillToState - The state in the U.S. that the bill for a sales order was sent to or will be sent to.
- SalesOrder-BillToCountry - The country the bill for a sales order was sent to or will be sent to. For example, US or United States. Click here to see the list of supported countries and codes.
- SalesOrder-BillToPostalCode - The postal code of the address the bill for a sales order was sent to or will be sent to.
- SalesOrder-BillToEmail - The email address associated with the Bill To information on a sales order.
- SalesOrder-BillToPhone - The phone number associated with the Bill To information on a sales order.
- SalesOrder-BillToResidential - This is either True or False to indicate if a Bill To address is residential or commercial, respectively.
- SalesOrder-ShipToName - The name of the individual or organization the items in a sales order were shipped to or will be shipped to.
- SalesOrder-ShipToStreet - The street address the items in a sales order were shipped to or will be shipped to.
- SalesOrder-ShipToCity - The city the items in a sales order were shipped to or will be shipped to.
- SalesOrder-ShipToState - The state in the U.S. that the items in a sales order were shipped to or will be shipped to.
- SalesOrder-ShipToCountry - The country the items in a sales order were shipped to or will be shipped to. Click here to see the list of supported countries and codes.
- SalesOrder-ShipToPostalCode - The postal code of the address the items in a sales order were shipped to or will be shipped to.
- SalesOrder-ShipToEmail - The email address associated with the Ship To information on a sales order.
- SalesOrder-ShipToPhone - The phone number associated with the Ship To information on a sales order.
- SalesOrder-ShipToResidential - This is either True or False to indicate if a Ship To address is residential or commercial, respectively.
- SalesOrder-Contact - The name of the individual who serves as the contact for a sales order.
- SalesOrder-Phone - The phone number of the contact in a sales order.
- SalesOrder-Notes - Written notes about a sales order. There is no character limit.
- SalesOrder-Url - A URL where a sales order can be found.
- SalesOrder-DateScheduled* - The month, day, and year that a sales order is expected to be fulfilled by. It can include the hour, minute, and second, too.
- SalesOrder-DateExpires - The month, day, and year that a sales order will be voided if it isn't fulfilled by. It can include the hour, minute, and second, too.
- SalesOrder-DateIssued- The month, day, and year that a sales order was issued. It can include the hour, minute, and second, too.
- SalesOrder-DateFulfilled - The month, day, and year that a sales order was fulfilled. It can include the hour, minute, and second, too.
- SalesOrder-DateDue - The month, day, and year that payment for a sales order is due to be received by. It can include the hour, minute, and second, too.
- SalesOrder-SalesOrderStatus* - As noted in the Sales Orders details section above, the status of a sales order can be Estimate, Issued, Picked, Partially Fulfilled, Fulfilled, or Cancelled.
- SalesOrder-PriorityName* - As noted in the Details tab section above, there are five priorities a sales order can have: Lowest, Low, Normal, High, or Highest.
- SalesOrder-TaxRate - The tax percent or dollar amount that applies to the item(s) in a sales order.
- SalesOrder-SalesTaxName - The name of the sales tax associated with a sales order. This must be an existing tax rate found in the Tax Rates module under the Setup group.
- SalesOrder-Subtotal - The total amount of money due for all items in a sales order (not including taxes).
- SalesOrder-MultiCurrencySubtotal - The total amount of money due for all items in a sales order (not including taxes), based on multicurrency conversions.
- SalesOrder-OrderLevelDiscountPercent - The percent discount that applies to all items in a sales order.
- SalesOrder-OrderLevelDiscountTotal - The total amount of money due after a discount is applied to all items in a sales order.
- SalesOrder-MultiCurrencyOrderLevelDiscountTotal - The total amount of money due after multicurrency conversions and discounts are applied to all items in a sales order.
- SalesOrder-DiscountTotal - The total amount of money due after an item's discount is applied.
- SalesOrder-MultiCurrencyDiscountTotal - The total amount of money due after an item's multicurrency conversion and discount are applied to an item in a sales order.
- SalesOrder-TaxTotal - The total amount of taxes due for all items in a sales order.
- SalesOrder-MultiCurrencyTaxTotal - The total amount of taxes due for all items with multicurrency conversions in a sales order.
- SalesOrder-GrandTotal - The total amount of money due for all items in a sales order.
- SalesOrder-MultiCurrencyGrandTotal - The total amount of money due for all items in a sales order after multicurrency conversions are applied.
- SalesOrder-LocationName* - The location that items are shipped from in a sales order.
- SalesOrder-PaymentTermName* - The payment term that applies to a sales order.
- SalesOrder-ShippingTermName* - The shipping term that applies to items in a sales order.
- SalesOrder-FobPointName* - Free On Board, a shipping term referring to the point when international shipping costs are charged.
- SalesOrder-Emails - All email addresses associated with a sales order.
- SalesOrder-AmountsIncludeTax* - This is either True or False to indicate if amounts in a sales order include taxes or not.
- SalesOrder-HomeCurrencyName* - The currency all other currencies are converted into for accounting purposes.
- SalesOrder-ExchangeCurrencyName* - The currency that needs to be converted.
- SalesOrder-ExchangeRate* - The rate at which the exchange currency gets converted into the home currency.
- SalesOrder-BillToVerified - This is either True or False to indicate if the Bill To address has been verified as accurate or not.
- SalesOrder-ShipToVerified - This is either True or False to indicate if the Ship To address has been verified as accurate or not.
- SalesOrder-EmailStatus* - The email status, whether Sent, Need to Send, or Not Set.
- SalesOrder-PrintStatus* - The print status, whether Printed, Need to Print, or Not Set.
- SalesOrderItem-LineNumber* - The number of a line item in a sales order.
- SalesOrderItem-SaleItemName - The name of a sale item in a sales order.
- SalesOrderItem-Description - The description associated with a sale item in a sales order.
- SalesOrderItem-CustomerSaleItemName - The customer-facing name of a sale item in a sales order.
- SalesOrderItem-DateScheduled - The month, day, and year an item in a sales order is scheduled to be fulfilled by. It can include the hour, minute, and second, too.
- SalesOrderItem-DateFulfilled - The month, day, and year an item in a sales order was fulfilled. It can include the hour, minute, and second, too.
- SalesOrderItem-Notes - Notes associated with an item in a sales order. There is no character limit.
- SalesOrderItem-Quantity - The number of units of an item in a sales order.
- SalesOrderItem-QuantityFulfilled - The number of units in a sales order that have been fulfilled.
- SalesOrderItem-QuantityPicked - The number of units in a sales order that have been picked.
- SalesOrderItem-UomName - The unit of measure associated with an item in a sales order.
- SalesOrderItem-Price - The price charged to customers for a single unit in a sales order.
- SalesOrderItem-Cost - The cost paid to obtain a single unit in a sales order.
- SalesOrderItem-MarginPercent - The rate of profit or loss for a single unit in a sales order.
- SalesOrderItem-Markup - The dollar amount above cost the price is set at for a single unit in a sales order.
- SalesOrderItem-DiscountPercent - The discount rate applied to a single unit in a sales order.
- SalesOrderItem-DiscountFlatAmount - The dollar amount discount applied to a single unit in a sales order.
- SalesOrderItem-DiscountTotal - The total dollar amount discount applied to a single unit in a sales order.
- SalesOrderItem-MultiCurrencyDiscountTotal - The total dollar amount discount applied to a single unit in a sales order after a multicurrency conversion is applied.
- SalesOrderItem-Total - The total amount of money charged for all units of an item in a sales order.
- SalesOrderItem-MultiCurrencyTotal - The total amount of money charged for all units of an item in a sales order after multicurrency conversions.
- SalesOrderItem-TaxTotal - The total tax amount applied to all units of an item in a sales order.
- SalesOrderItem-MultiCurrencyTaxTotal - The total tax amount applied to all units of an item in a sales order after multicurrency conversions.
- SalesOrderItem-SalesOrderItemType* - The type of item in a sales order as sale, credit return, drop ship, etc.
- SalesOrderItem-SalesOrderItemStatus* - The status of an item in a sales order as entered, fulfilled, etc.
- SalesOrderItem-TaxName - The name of a tax applied to an item in a sales order.
- SalesOrderItem-TaxRate - The tax rate applied to an item in a sales order.
- SalesOrderItem-Taxable* - This is either True or False to indicate if an item in a sales order is taxable or not.
- SalesOrderItem-ExchangeCurrencyName* - The currency applied to an item in a sales order that needs to be converted.
- SalesOrderItem-ExchangeRate* - The rate at which the exchange currency gets converted into the home currency for an item in a sales order.
If you have created custom fields in this module, they will appear to the right of the columns listed above in the CSV file.
Export sales orders
Clicking the Export Orders button will generate a CSV file you can access from the Downloads section. To see your downloads, click your user profile icon on the top-right of the interface, and then click Downloads in the dropdown menu. The file name of each download will include the type of file it is and the date it was generated.
The Export file mirrors the Import one. Hence, you can download a CSV file by clicking this button, add your own information in it, and reuse it to import that information into your Fishbowl Drive database.
Custom fields
Clicking the Custom Fields option will bring up a wizard that allows you to add, edit, and delete custom fields on the General tab of a sales order. The list will be blank at first, of course.
To add a new custom field, click ADD FIELD on the top-right. Then enter a name and type for it. Your type options are:
- Number - A textbox that only allows numeric characters to be typed into it.
- Text - A textbox that allows alphanumeric characters to be entered.
- Date - A field for adding dates in the following format: MM/DD/YYYY. A calendar option lets users select dates from a calendar if they prefer not to type them by hand.
- Checkbox - A small box that can be checked or unchecked to indicate yes or no.
- Single Choice - A dropdown menu of text options. If selected, this will ask you to enter at least one row to appear in the dropdown menu. Users can only select one of the options available.
- Multiple Choice - A dropdown menu of text options. If selected, this will ask you to enter at least one row to appear in the dropdown menu. Users can select one or all of the options available.
- URL - A textbox that lets you add a website address in relation to a sales order or any of the items in it.
When creating or editing a custom field, click the Required checkbox to make it a required field. Otherwise, it will be optional. Then click ADD to save it, or click CANCEL or the X on the top-right to get rid of it. If you're editing an existing custom field, clicking CANCEL or the X won't delete it but will simply return it to its original state. You can also click the Required toggle switch next to a custom field in the main wizard to turn that function on or off.
To delete a custom field, click the More button to the right of it in the Custom Fields wizard. Then select Delete from the dropdown menu. You can also select Edit or Duplicate from that menu.
To change the order of custom fields, click ORDER FIELDS to the left of ADD FIELD. Then select one of the custom fields and click the up or down arrow on the right to move it. You can do this to each custom field until they're all in the order you want them to be in.
Only the first three custom fields will show up automatically in the General tab of a sales order. Any others can be viewed only after clicking the SHOW MORE button. Bear this in mind when creating and ordering them. Click the SAVE ORDER button to apply your changes to the wizard, and then click the SAVE button to apply those changes to the Sales Orders module.
Change dates
At the top of the Sales Orders module, you will see the following column headers:
- No.
- Status
- Customer
- Sales Rep
- Location
- Date Created
- Order Type
- Total
- Paid Amount
You can click any of them, except Order Type, to reorganize the rows under them. However, they are not all set in stone. For example, if you click Change Dates under the More button, you will find you have three options for the Date column:
- Date Created - A permanent marker that denotes when a sales order was first saved.
- Date Last Modified - A changeable marker that denotes the most recent time a sales order was updated and saved by a user.
- Date Issued - A permanent marker that denotes when a sales order was changed from an Estimate to Issued status.
You can pick whichever one will best help you organize the orders in the Sales Orders module.