Fishbowl Advanced Mobile
Fishbowl Advanced Mobile (previously Fishbowl GO) provides the essential warehouse functions of Fishbowl on Android and iOS devices. Fishbowl Advanced Mobile can also display interactive sales data and custom BI reports on the Dashboard. Fishbowl Advanced Mobile helps reduce human error and increase accuracy. With the ability to scan barcodes, Fishbowl Advanced Mobile also increases efficiency. Fishbowl Advanced Mobile was designed to be simple while still providing the ability to perform complex inventory functions. Fishbowl Advanced Mobile can run on a phone, a tablet, or a variety of hardware devices sold through Fishbowl. Similar to Fishbowl Anywhere, Fishbowl Advanced Mobile can be used on the local network, through a VPN, or configured to connect to a public IP address.

Android
Follow the steps below to start using Fishbowl Advanced Mobile on an Android device.
- Install Fishbowl Advanced Mobile from the Google Play Store. The required version of Fishbowl is listed in the app description on the Google Play Store or at the top of the Android Release Notes.
- If the Google Play Store is not available, follow these steps to manually install Fishbowl Advanced Mobile.
- Open the app drawer on the Android device and click Fishbowl Advanced Mobile. A shortcut can also be placed on the home screen.
- The same data used to log in from a Fishbowl Client can be used in Fishbowl Advanced Mobile. Enter the Server Address or name, Port, Username, and Password, and then click Login. If the device is not on the same local network as the Fishbowl Server, see Advanced login.

- Follow the instructions to approve the application and then click Login again.

iOS
The latest version of Fishbowl Advanced Mobile for iOS, requires iOS 14.0 or later. Follow the steps below to start using Fishbowl Advanced Mobile on an iOS device.
- Download Fishbowl Advanced Mobile from the Apple App Store. The required version of Fishbowl is listed in the app description on the Apple App Store.
- Click the Fishbowl Advanced Mobile icon on the home screen.
- The same data used to log in from a Fishbowl Client can be used in Fishbowl Advanced Mobile. Enter the Server Address or name, Port, Username, and Password, and then click Login. If the device is not on the same local network as the Fishbowl Server, see Advanced login.
- Follow the instructions to approve the application and then click Login again.

- Printing from iOS devices is possible using AirPrint printers.

Most of the documentation below uses screenshots from the Android version of Fishbowl Advanced Mobile. To see the latest examples of the iOS user interface, click here.
Advanced login
- If the Fishbowl Advanced Mobile device is not on the same local network as the Fishbowl Server, the web port (usually 80) can be used to connect remotely through the Fishbowl REST API.

- The web port must match the web port of the Fishbowl Server. If port 80 is already in use, port 2456 is recommended.

- The Secure Web Connection checkbox should be selected in the Fishbowl Server. It is highly recommended to use a Secure Web Connection and select a .JKS certificate file. The certificate can be self-signed or purchased online from a Certificate Authority. This is especially important if you are using Fishbowl Advanced Mobile outside of your local network. Please consult with an IT professional before opening any firewall ports.

Approve app
The first time that an integrated application attempts to connect to Fishbowl, the application will need to be approved. The app only needs to be approved once. Follow the steps below to approve an integrated app.
- Start the Fishbowl Client and open the
 Settings module, located in the Setup group.
- Click the Integrated Apps tab.

- Select the integrated app from the list and then click the
 Approve button.
- The integrated app should now be able to connect successfully.


To activate Fishbowl Advanced Mobile, install and activate the plugin as described below.
Install plugin
In order to access all of the modules and settings of Fishbowl Advanced Mobile, the Fishbowl Advanced Mobile plugin must be installed and activated from a Fishbowl Client. If the plugin hasn't been activated, only the Part module will be accessible from the app. The global settings for Fishbowl Advanced Mobile are also set in the  Fishbowl Advanced Mobile module. Follow the steps below to install and activate the plugin.
The documentation on this page is for the most recent version of the Fishbowl Advanced Mobile plugin. To get the most recent version, Update Fishbowl.
- In any Fishbowl Client, open the
 Plugin module, located in the
 Integrations group.
- Select the
 Fishbowl Advanced Mobile plugin and click Install.
- Completely close all Fishbowl Clients.
- Exit the Fishbowl Server by right-clicking the Fishbowl Server tray icon and selecting Exit.
- After re-opening the Fishbowl Server, the admin user can access the Fishbowl Advanced Mobile module from any Fishbowl Client by opening the Integrations group.
- To grant access to additional users, assign the Fishbowl Advanced Mobile-View access right to the appropriate groups in the
 User Group module.
- Open the Fishbowl Advanced Mobile module and click Yes in the activation dialog, or click the
 Activate button.


Access to the individual modules of the Fishbowl Advanced Mobile app are controlled with the Fishbowl Advanced Mobile access rights. After installing the plugin, the Fishbowl Advanced Mobile modules available to each user can be customized by assigning access rights.
Plugin settings

The global settings for Fishbowl Advanced Mobile are assigned in the Fishbowl Advanced Mobile module. These settings apply to all users and all devices. Some settings may be stored during the login of Fishbowl Advanced Mobile, so global settings may not change on an individual device until the next login. Several more settings are also available in the app settings.
General Settings
- Create "Advanced Mobile" Zebra DataWedge profile - When checked, this generates a Zebra DataWedge profile to put all data obtained via Android barcode scans into the proper format to be shared with Fishbowl.
- Quantity increment presets - These three custom quantities will appear after clicking the
 Quantity button in Fishbowl Advanced Mobile, e.g., to add a specific number of units to an order.
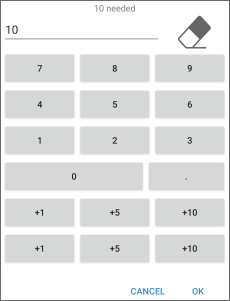
- Quantity increment presets - These three custom quantities will appear after clicking the


Add Inventory Settings
- Scan each individual item - With this option enabled, the quantity field will always be set to 1.
- Allow quantity adjustment - This option allows the quantity to be adjusted even if Scan each individual item is enabled.
Cycle Settings
- Scan each individual item - With this option enabled, the quantity field will always be set to 1.
- Allow quantity adjustment - This option allows the quantity to be adjusted even if Scan each individual item is enabled.
Packing Settings
- Always show edit screen - Always show the edit screen when opening an item in the Pack module.
- Scan each individual item - With this option enabled, the quantity field will always be set to 1.
- Allow quantity adjustment - This option allows the quantity to be adjusted even if Scan each individual item is enabled.
Part Settings
- Update product UPC - Update the UPC for all associated products when modifying the part UPC in Fishbowl Advanced Mobile.
- Update product image - Update the image for all associated products when modifying the part image in Fishbowl Advanced Mobile.
Pick Settings
- Always show edit screen - Always show the edit screen when opening an item in the Pick module.
- Scan each individual item - With this option enabled, the quantity field will always be set to 1.
- Allow quantity adjustment - This option allows the quantity to be adjusted even if Scan each individual item is enabled.
- Only show in progress picks - Only show picks that have a status of Started or Committed.
- Only show user assigned picks - Only show picks that are assigned to the user who is logged into Fishbowl Advanced Mobile.
- Only show entirely fulfillable picks - Only show picks that have all items in stock and fulfillable.
Receive Settings
- Always show edit screen - Always show the edit screen when opening an item in the Receive module.
- Scan each individual item - With this option enabled, the quantity field will always be set to 1.
- Allow quantity adjustment - This option allows the quantity to be adjusted even if Scan each individual item is enabled.
Scrap Settings
- Scan each individual item - With this option enabled, the quantity field will always be set to 1.
- Allow quantity adjustment - This option allows the quantity to be adjusted even if Scan each individual item is enabled.
- Display "Scrap" operation as - With this option, the name of the Scrap module can be changed to Consume.
Shipping Settings
- Include entered shipments - Include shipments that have a status of Entered.
Work Order Settings
- Show all open orders - Show all work orders that have a status of Entered, Issued, or Partial.
App settings
In addition to the plugin settings, several settings are available by clicking the  More button in the app.

General
- Select & Continue - When checked, this enables you to pick products and perform other tasks by simply clicking line items, instead of having to select something and then click another button to perform an action on it.
- Remember my login - When checked, this automatically logs you back in when you close the app without logging out. You can also click this option on the login screen.
- Use fingerprint for login - When checked, this gives you the option to scan your fingerprint to log in, rather than typing your password.
- Print from device - When checked, this allows you to print reports and invoices from your smartphone or other device you’re accessing Fishbowl Advanced Mobile on. This includes AirPrinting to an iOS device and printing on a Bluetooth printer.
- NOTE: When this is turned on, all reports are retrieved from the Fishbowl Server and presented to you on your local device in the local device’s Print system. Thus, any printers that are accessible from the mobile device can be used to print the report (Reports could be one of many different things from the app, e.g., packing list, SO invoice, part barcode, etc.).
- When Print from device is NOT enabled, all print functions are sent to the Fishbowl Server, and it will handle those print requests from the Fishbowl Server. This is essentially the way that all reports are printed when using the Fishbowl Client on a desktop computer.
Orders
- Payment Setup - A means of accepting credit-card and debit-card payments from customers. Clicking this takes you to a CardConnect Setup page where you’ll be asked to enter your Merchant ID.
- Parts to display - The number of parts that can appear on a single page in the Part module.
- Picks to display - The number of picks that can appear on a single page in the Pick module.
- Packing orders to display - The number of orders that can appear on a single page in the Pack module.
- Shipping orders to display - The number of orders that can appear on a single page in the Ship module.
- Receiving orders to display - The number of orders that can appear on a single page in the Receive module.
- Work orders to display - The number of work orders that can appear on a single page in the Work Order module.
- Deliveries to display - The number of deliveries that can appear on a single page in the Delivery module.
- Sales orders to display - The number of sales orders that can appear on a single page in the Sales Order module.
- Purchase orders to display - The number of purchase orders that can appear on a single page in the Purchase Order module.
Other settings
- Show slot number - When checked, this adds a third line in the Pick module next to each item being picked under its quantity and location to show its slot number or order of picking.
- Show notes - When checked, this adds any notes that have been written to each line item in the Pick module.
- Default customer - This opens a new window containing a list of all of your customers so you can select the primary one for new transactions.
- Always Verify Address - When checked, this will verify that the address you’re shipping to is accurate in the Ship module before allowing you to ship an order to it.
- Prompt for initial inventory - When checked, this will make a message appear when you’re creating a new part in the Part module, which lets you know that you need to add an on-hand quantity for it.
Navigation settings
- Picking navigation - This determines where you go after you finish picking an order.
- Search - Return to the main screen of the Pick module to see all orders that remain to be picked.
- Pack - Go to the Pack module to continue working on the picked order.
- Delivery - Go to the Delivery module to continue working on the picked order.
- Packing navigation - This determines where you go after you finish packing an order.
- Search - Return to the main screen of the Pack module to see all orders that remain to be packed.
- Delivery - Go to the Delivery module to continue working on the packed order.
- Pick Search - Go to the Pick module to see all orders that remain to be picked.
Voice announce
- Enable (for Picking) - When checked, this lets the voiceover function work for picks.
- Announcer Voice - This opens a new window containing all of the voice options you can select from.
- Spell out part numbers - When checked, this ensures a part number is spoken one letter and/or digit at a time.
- Detailed Announcements - When checked, this enables the voiceover to include more information about parts and orders than just the basics.
- Include quantity information - When checked, this enables the voiceover to include the quantity of items on hand and in an order.
- Voice Speed - A bar that you can pull a cursor along to increase or decrease the speed at which the announcer will speak. It starts at 100 percent, and you can increase or decrease it in increments of 25 percent.
The modules on the home screen of the app can also be hidden and rearranged by clicking and holding any module icon.

Buttons
The following buttons are found in most modules of Fishbowl Advanced Mobile.
 Back - To go back to the previous screen, click the Back button, or use the Back button on the device.

 Scan - To scan a barcode with the camera, click the Scan button. Devices with built-in scanners can use the hardware button. Most devices with barcode scanners can be configured to send an Enter command after scanning, which will automatically open the item in Fishbowl Advanced Mobile. To send a TAB or ENTER after scanning, follow these instructions.

 More - To change settings or access the Dashboard, click the More button at the top-right corner of any module.

 Refresh - To refresh an item list, click the Refresh button.

 Open - An item can be opened by scanning it, or by selecting it from the list and then clicking the Open button or the Enter key on the keyboard. Alternatively, click the
 Settings button and enable Select & Continue on tap to automatically open the item when it is tapped.


 Edit - To edit an item or change the quantity, click the Edit button.

 Save - To save an order or item, click the Save button.

 Image - To view the part image, click the Image button.

 Print - To print barcode labels, click the Print button.

 Notes - To view the order notes, click the Notes button.

- Quantity - Click the Quantity icon by any quantity field to see a large number pad, or to enter preset quantities.
 Pick


- By default, All Open picks will be displayed. All Open includes picks with a status of Entered, Started, or Committed (everything except Finished).
- To display only In Progress picks, enable the option in the Fishbowl Advanced Mobile plugin. In Progress includes picks with a status of Started or Committed.
- The Pick settings (Picks to display, slot number, notes, etc.) can be set by clicking the Settings button in the top-right corner of the app.
- To open a pick, scan the pick number or select it from the list and then click the Open button at the top.
- To pick an item, scan the item or select it from the list and then click the
 Pick button at the top.
- To view line item notes, press and hold the pick item.
- Items that are short are not displayed. If all items on an order are fulfilled or short (there aren't any fulfillable items left), the order will not be displayed.
- If an item requires tracking, the edit screen will be displayed. Enter or scan the part tracking and then click the Pick button at the bottom of the screen.
- If an item doesn't require tracking, the edit screen can be displayed by clicking the Edit button or by enabling Always show edit screen in the Fishbowl Advanced Mobile plugin. This also allows the quantity to be edited for partial picks.
- Once an item is picked, it will be removed from the list of items.
- When the last item is picked, the pick will be saved and removed from the list of picks.
- To save a partially picked order, click the Save button at any time.
- Voice announcements can be enabled in the app settings.

 Pack


- Packing typically occurs after picking and before shipping. Auto pack can be enabled in the
 Shipping module options.
- The Pack module displays Entered shipments. Packing can also be bypassed in Fishbowl Advanced Mobile by enabling Include entered shipments in the Fishbowl Advanced Mobile plugin, which allows an order to be shipped from Fishbowl Advanced Mobile, even if it hasn't been packed yet.
- The number of orders displayed on the device can be set by clicking the Settings button in the top-right corner of the app.
- To open a shipment, scan the ship number or select it from the list and then click the Open button at the top.
- The list of unpacked items is displayed. The current carton is also listed at the top. To add more cartons, click the
 New Carton button. The current carton can be changed at any time by clicking the carton name or the dropdown arrow.
- To pack an item into the current carton, scan the item or select it from the list and then click the
 Pack button at the top.
- If an item has tracking, the edit screen will be displayed. When modifying the quantity of a serialized part, modify the serial number list to match the items that are being packed and then click the Pack button at the bottom of the screen.
- If an item doesn't require tracking, the edit screen can be displayed by clicking the Edit button or by enabling Always show edit screen in the Fishbowl Advanced Mobile plugin. This also allows the quantity to be edited and split into multiple cartons.
- Once an item is packed, it will be removed from the list of unpacked items.
- The Carrier can be modified at the bottom of the screen.
- When the last item is packed, the shipment will be saved and removed from the list of Entered shipments.
- After a shipment is packed, a dialog will be displayed with the option to print a packing list. This will print the default report for the Shipping module. The default printer of the Fishbowl Server will be used, unless a default printer is specified for the location group of the shipment.


 Ship


- Shipping occurs after picking and packing.
- By default, the Ship module displays Packed orders. Packing can be bypassed in Fishbowl Advanced Mobile by enabling Include entered shipments in the Fishbowl Advanced Mobile plugin, which allows an order to be shipped from Fishbowl Advanced Mobile, even if it hasn't been packed yet.
- The number of orders displayed on the device can be set by clicking the Settings button in the top-right corner of the app.
- To ship an order, scan the ship number or select it from the list and then click the
 Ship button at the top.
- There is no edit screen in the Shipping module. When scanning an order, or clicking the Ship button, the order will be shipped and removed from the list of unshipped orders.
- A shipment can be voided in the Shipping module of the Fishbowl Client if the shipment hasn't been exported to the accounting system yet.

 Shipping Labels


- The Shipping Labels module only appears if you have integrated with Fishbowl ShipExpress and generated quotes or labels.
- To open an order, scan the order number or select it from the list and then click the Open button at the top.
- You can add or edit information about the order in the two reference fields. Plus, you can add the recipient’s phone number and email address in the two other text fields.
- Click a carton to choose a carton type, enter its weight in pounds, and enter its length, width, and height in inches. You can also add insurance, which we’ll discuss in more detail in the next bullet point.
- Click the Shipment Extras button to access the following options:
- Use Retail Rates - A checkbox that allows retail shipping rates to be used.
- Saturday Delivery - A checkbox that enables delivery to the customer on more than just weekdays.
- Use Insurance - A checkbox that lets you assign insurance information to a shipment. You can also access this option by clicking a carton.
- Insured Amount - The value of the shipment contents that will be reimbursed in case of damage, loss, or theft in transit. The currency can be Australian dollars, New Zealand dollars, U.S. dollars, or Canadian dollars.
- Insured Contents - A description of the products contained within the carton(s).
- Insurance Provider - The name of the company responsible for paying out if there is a valid insurance claim. The options are Shipsurance, FedEx, UPS, and OnTrac.
- Contains Dry Ice - A checkbox that enables you to enter a dry ice weight, and select a unit of measure to attach to that number. Your options for UOMs are grams, kilograms, ounces, and pounds.
- Contains Alcohol - A checkbox that enables you to select a recipient type:
- Licensee
- Consumer
- COD - A checkbox that gives you the ability to select a payment method and then enter the amount of money in U.S. dollars, euros, British pounds, or Australian dollars. The payment methods are:
- Secured Funds
- Cash
- Any
- Signature Confirmation - A checkbox that lets you select a type of signature confirmation for the delivery:
- None - No confirmation is required.
- Adult - Only someone 21 years of age or older can sign for the carton(s).
- Carrier Confirmation - The carrier signs off on the fact that they delivered the carton(s).
- Certified - Only a specified person can sign for the carton(s).
- Indirect - The carton(s) can be signed for by someone at a neighboring address if no one is available at the destination.
- Standard - Anyone at the destination can sign for the carton(s).
- Click the button on the bottom-right of the Purchase Labels module to open these two options:
- Get Rates - See a comparison of rates you can pay for various shipping methods.
- Quick Ship - Bypass the Ship module and ship the cartons from this module.
 Purchase Order


- The Purchase Order module provides the ability to view, edit, and create purchase orders.
- The number of purchase orders to display can be set by clicking the Settings button in the top-right corner of the app.
- To open a purchase order, scan the purchase order number or select it from the list and then click the Open button at the top.
- To edit a purchase order, open the order and click the
 Edit button at the top.
- To issue a purchase order, click the
 Issue button at the top of the order.
- To unissue a purchase order, click the
 Unissue button at the top of the order.
- To create a new purchase order, click the
 Add button.
- To add items to the purchase order Items tab, click the
 Add Item button and choose from the following options.


 Add Outsourced Item
 Add Credit Return Item
 Add PO Item


 Receive


- By default, All Receivable orders will be displayed. All Receivable includes orders that haven't been received yet.
- The number of orders displayed on the device can be set by clicking the Settings button in the top-right corner of the app.
- To open an order, scan the barcode or select it from the list and then click the Open button at the top.
- To receive an item, scan the item or select it from the list and then click the
 Receive button at the top.
- If an item requires tracking, the edit screen will be displayed. Enter or scan the part tracking and then click the Receive button at the bottom of the screen.
- If an item doesn't require tracking, the edit screen can be displayed by clicking the Edit button or by enabling Always show edit screen in the Fishbowl Advanced Mobile plugin. This also allows the quantity to be edited for partial receipts.
- Once an item is received, it will be removed from the list of items.
- When the last item is received, the order will be saved and removed from the list of receivable orders.
- To save a partially received order, click the Save button at any time.

 Move


- The Move module is used to move parts between locations and is designed to be used with the Part and Location barcodes that can be printed from the
 Reports module of Fishbowl. In addition, parts and locations can be entered manually.
- To move an item, scan the current location of the part, then scan the part, and then scan the location where the part is going.
- If an item requires tracking, enter or scan the part tracking and then click the
 Move button at the bottom of the screen.
- To save the location or part for the next move, click the
 Lock button.


 Add Inventory


- The Add Inventory module is used to add inventory and is designed to be used with the Part and Location barcodes that can be printed from the Reports module of Fishbowl. In addition, parts and locations can be entered manually.
- To add inventory, scan the location where the part will be stored, then scan the part, and then enter the quantity that is being added.
- If an item requires tracking, enter or scan the new tracking and then click the
 Add Inventory button at the bottom of the screen.
- To save the location or part for the next add, click the Lock button.

 Scrap


- The Scrap module is used to remove inventory and is designed to be used with the Part and Location barcodes that can be printed from the Reports module of Fishbowl. In addition, parts and locations can be entered manually.
- To scrap inventory, scan the location where the part was, then scan the part, and then enter the quantity that is being scrapped.
- If an item requires tracking, enter or scan the tracking and then click the
 Scrap button at the bottom of the screen.
- To save the location, part, or customer for the next scrap, click the Lock button.
- The name of the Scrap module can be changed to Consume in the Plugin settings.

 Cycle


- The Cycle module is used to adjust the quantity of parts and is designed to be used with the Part and Location barcodes that can be printed from the Reports module of Fishbowl. In addition, parts and locations can be entered manually.
- To cycle an item, scan the current location of the part, then scan the part, and then enter the actual quantity in that location.
- If an item requires tracking, enter or scan the actual tracking and then click the
 Cycle button at the bottom of the screen.
- The location will be updated with the entered quantity and tracking. If the quantity was decreased, the items that weren't entered will be removed.
- To save the location or part for the next cycle, click the Lock button.

 Part


- To see part information, scan the part barcode or enter the part number or UPC and then click the
 Search button at the top.
- To see more details, click Details.
- To add or modify the UPC, enter the UPC and then click the Save button.
- To create a new part, click the Add button.
- To update the UPC of all associated products, enable Update product UPC in the Fishbowl Advanced Mobile plugin.
- Click the part image to capture a new image from the camera.
- To update the image of all associated products, enable Update product image in the Fishbowl Advanced Mobile plugin.
- To see inventory details for other locations, swipe the gray bar to the left or right, or click the arrow button.
- To print the part barcode, click the Print button. This will print the default Part Label report as specified in Fishbowl's Reports module options.


 Location


- The Location module allows locations to be viewed and added.
- To view the inventory stored in the location, click the location name.
 Work Order


- The Work Order module provides the ability to finish work orders.
- If the Show all open orders setting is unchecked, only Started work orders will be displayed. If the option is checked, Entered work orders will be shown as well. Note that a work order has a status that is separate from the manufacture order status.
- After opening an order, the instruction steps are displayed. Click the checkmark to complete the instructions.
- Raw goods will also be displayed. Click the Add button to add raw goods.
- If the work order hasn't been picked, Fishbowl Advanced Mobile will give the option to open the pick.
- The final step shows the finished goods that will be produced by the work order. The quantity of the finished good can be adjusted, or click the Add button to add finished goods.
- Enter any necessary tracking information and then click the
 Finish button to fulfill the work order.

 Sales Order


- The Sales Order module provides the ability to view, edit, and create sales orders.
- The Sales Order settings (sales orders to display, default customer, etc.) can be set by clicking the Settings button in the top-right corner of the app.
- To open a sales order, scan the sales order number or select it from the list and then click the Open button at the top.
- To edit a sales order, open the order and click the Edit button at the top.
- To issue a sales order, click the Issue button at the top of the order.
- To unissue a sales order, click the Unissue button at the top of the order.
- To Quick Fulfill a sales order, click the
 Quick Fulfill button at the top of the order.
- To create a new sales order, click the Add button.
- To add items to the sales order Items tab, click the Add Item button and choose from the following options.

 Add Note Item
 Add Tax Item
 Add Drop Ship Item
 Add Discount Item
- Add Credit Return Item
 Add Sale Item


- To take a payment, click the
 Payment button on the sales order.

- Credit card processing is supported by opening the app settings and clicking Payment Setup.
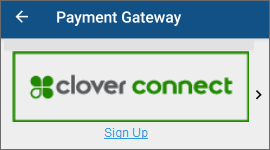
- Card numbers can be typed manually or entered automatically with a credit card scanner (such as the VP3300).
- When you issue a sales order, you will receive a prompt asking if you want to print a corresponding invoice. You can turn that feature on or off under the Orders section of the app settings. In addition, you can print an invoice for an issued sales order by clicking the Print Invoice option under the More button at the top-right of the sales order.


 Delivery


- The Delivery module is the same as the Ship module for Fishbowl Advanced Mobile, except it allows a signature to be added.
- The dimensions of the signature image can be customized on the Details tab of the Shipping module by clicking the
 Change image options button.

 Dashboard


- The Dashboard displays interactive BI reports from Fishbowl.
- Custom BI reports can be created in the
 BI Editor module.
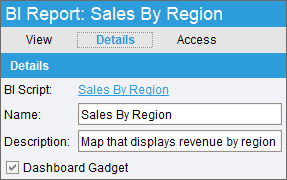
- A BI report must be marked as a Dashboard Gadget in the
 BI Report module before it can be viewed in Fishbowl Advanced Mobile.
- To view the Dashboard, click the
 More button at the top-right corner of any Fishbowl Advanced Mobile module and choose Dashboard.
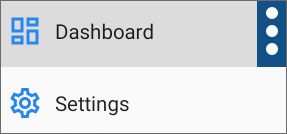
- To automatically display the Dashboard after logging into Fishbowl Advanced Mobile, open the Dashboard, click the More button, and select Display on login.
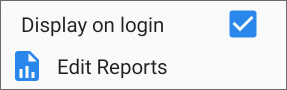
- Selecting Edit Reports allows dashboard gadgets to be hidden or rearranged by holding and dragging the
 Move icon.

- To enlarge a report, click the
 Fullscreen button
 .


Troubleshooting
- Assistance from a network specialist is highly recommended throughout the setup process.
- Approve the app first, then open the Fishbowl Advanced Mobile module and activate the plugin.
- If a user doesn't have access to a module in the app, assign the Fishbowl Advanced Mobile access rights as described here.
- Have a network specialist assist in opening Fishbowl's ports through the firewall/network. Turn off any antivirus software and try connecting to see if it is blocking access to Fishbowl Advanced Mobile. DISCLAIMER: We do not recommend doing this without assistance from a trained professional.
- More than one API user logged in: The simplest solution is to open the Fishbowl Server Tools > Options > Server tab > Users can only be logged in once checkbox. Another solution is to click the Options button on the device and log out of the app. Then tap the device's Open apps button and completely exit the app. This will log out that user on the server. This must be done every time to correctly log out. Increasing the device's sleep time can also help with this.
- Incorrect location scan (i.e. Scan location barcode for tag 12, and location tag 8 appears): Uninstall and reinstall Fishbowl Advanced Mobile on the device.
- Pick errors: Go to Pick settings on the device and increase the number of lines shown (default is 99).
- Network connectivity throughout your warehouse must be consistent. Pinging the server's IP address (through the command prompt) can identify packet loss issues. Packet sniffers can be used in identifying speed issues on the network. Seek assistance from a network specialist.
System Requirements
- iOS 14.0 or later on iPhone or iPad
- Android 5.0 or newer
- Screen resolution of 1280 x 720 or higher
- At least a 1.7 GHz multi-core CPU
- At least 2 GB RAM and 8GB of storage
Manual install
If the Google Play Store is not available on your device, you can manually install the APK file. You can open this page on the Android device and download the APK file directly, or you can download the file on your computer and transfer it to the Android device.
- Download the version of Fishbowl Advanced Mobile that you would like to install by clicking one of the following links.
- 6.9.0 - 2023-10-18
- 6.8.0 - 2023-05-22
- 6.7.0 - 2023-04-06
- 6.6.3 - 2023-01-24
- 6.6.2 - 2022-12-08
- 6.6.1 - 2022-12-07
- 6.6.0 - 2022-12-05
- 6.5.0 - 2022-09-19
- 6.4.2 - 2022-07-27
- 6.4.1 - 2022-06-30
- 6.4.0 - 2022-06-29
- 6.3.0 - 2022-06-13
- 6.2.2 - 2022-03-07
- 6.2.1 - 2022-03-02
- 6.2 - 2022-03-02
- 6.1.5 - 2022-02-15
- 6.1.4 - 2022-02-07
- 6.1.3 - 2022-01-28
- 6.1.2 - 2022-01-27
- 6.1.1 - 2022-01-25
- 6.1 - 2022-01-24
- Open the file on the Android device.
- A security warning may be displayed about installing apps.
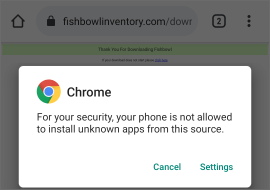
If so, open the security settings on the device and allow the installation.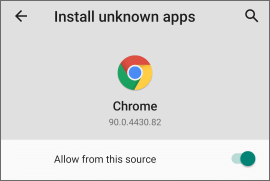
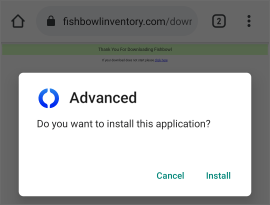
- Click Install to install Fishbowl Advanced Mobile


Release Notes
Note: Fishbowl Advanced Mobile now uses the REST API to connect to the Fishbowl Server. For more information, see Advanced login.
To read the release notes for the iOS version of Fishbowl Advanced Mobile, visit Fishbowl Advanced Mobile on the App Store, scroll down to What's New and then click Version History on the right side.

To read the release notes for the Android version of Fishbowl Advanced Mobile, click the menu icon in the mobile app, select About, and then click Release Notes.


The latest version of Fishbowl Advanced Mobile for Android can be downloaded from the Google Play Store.
- Fishbowl Advanced Mobile 6 for Android requires Fishbowl 21.11 (2021-11-11) or higher
- Fishbowl Advanced Mobile 5 for Android requires Fishbowl 21.4 (2021-04-15) or higher
- Fishbowl Advanced Mobile 4 for Android requires Fishbowl 20.10 (2020-10-08) or higher
- Fishbowl Advanced Mobile 3 for Android requires Fishbowl 20.2 (2020-02-20) or higher
- Fishbowl Advanced Mobile 2 for Android requires Fishbowl 17.5 (2017-07-13) or higher
- Fishbowl Advanced Mobile 1 for Android requires Fishbowl 16.5 (2016-07-14) or higher