Items: Difference between revisions
(→Tracking tab: I explained how to add more tracking criteria.) |
No edit summary |
||
| (38 intermediate revisions by one other user not shown) | |||
| Line 2: | Line 2: | ||
* The '''Items''' module stores the parts and products that you purchase, manufacture, and sell. | * The '''Items''' module stores the parts and products that you purchase, manufacture, and sell. | ||
* {{New|item}} | * {{New|item}} | ||
* The following tabs are available for each item: '''General''', '''Sale Items''', '''Substitute Items''', '''Reorder Points''', '''Tracking''', '''Locations''', '''Vendor Items''', and ''' | * The following tabs are available for each item: [[Items#Optional item details|'''General''']], [[Items#Sale Items tab|'''Sale Items''']], [[Items#Substitute Items tab|'''Substitute Items''']], [[Items#Reorder Points|'''Reorder Points''']], [[Items#Tracking tab|'''Tracking''']], [[Items#Locations tab|'''Locations''']], [[Items#Vendor Items tab|'''Vendor Items''']], and [[Items#Documents tab|'''Documents''']]. | ||
* To sell an item, add the product details to the '''Sale Items''' tab. | * To sell an item, add the product details to the [[Items#Sale Items tab|'''Sale Items''' tab]]. | ||
* For a step-by-step tutorial on creating items, click the video | * For a step-by-step tutorial on creating items, click the video below. | ||
{{Wistia|tyk4lpnz84|Create a new item}} | {{Wistia|tyk4lpnz84|Create a new item}} | ||
# '''Click the ADD NEW''' button on the top-right. Or click | Follow these steps to create a new item. You will need to fill out four required fields before you will be able to save it. | ||
# '''Click the ADD NEW''' button on the top-right. Or click an item, and then click the plus sign that appears above it in the Items section on the left. | |||
# '''Add a name''' between 1 and 255 characters in length. | # '''Add a name''' between 1 and 255 characters in length. | ||
# '''Select a UOM''', or unit of measure. The default UOM will already be selected, but you can change it to any other you've created if you wish. Any conversions that apply to the UOM you choose will automatically appear on the left side of the interface. You can make adjustments to them or reset them to their original values. | # '''Select a UOM''', or unit of measure. The default UOM will already be selected, but you can change it to any other you've created if you wish. Any conversions that apply to the UOM you choose will automatically appear on the left side of the interface. You can make adjustments to them or reset them to their original values. | ||
# '''Add the average cost''', also known as the Average Cost of Goods Sold. This is the amount of money it costs you to obtain this item, not the price you will charge customers for it. It is in U.S. dollars and cents. You can change that price under the Sale Items tab. If you use a different UOM than Each, which means one item, be sure to adjust the average cost to match that change in quantity. The average cost starts at $0.00. | # '''Add the average cost''', also known as the Average Cost of Goods Sold. This is the amount of money it costs you to obtain a single unit of this item, not the price you will charge customers for it. It is in U.S. dollars and cents. You can change that price under the [[Items#Sale Items tab|'''Sale Items''' tab]]. If you use a different UOM than Each, which means one item, be sure to adjust the average cost to match that change in quantity. The average cost starts at $0.00. | ||
# '''Select a type'''. This can be Inventory, Shipping, Service, Non Inventory, Bundle, Labor, or Overhead. The type you choose for the item will change many things, including tabs and certain fields, such as dimensions. The item's type can't be changed after you save the item, so make sure it's exactly what you want it to be before clicking '''SAVE''' or '''SAVE AND CLOSE'''. | # '''Select a type'''. This can be Inventory, Shipping, Service, Non Inventory, Bundle, Labor, or Overhead. The type you choose for the item will change many things, including tabs and certain fields, such as dimensions. The item's type can't be changed after you save the item, so make sure it's exactly what you want it to be before clicking '''SAVE''' or '''SAVE AND CLOSE'''. | ||
#* Inventory is a physical object | #* Inventory is a physical object | ||
| Line 24: | Line 25: | ||
=== Optional item details === | === Optional item details === | ||
In addition to the above required fields, there are many other optional parameters you can add to an item. These can be added or changed at any time when or after you create an item. | [[File:Items module - New Item - General tab.png|border|800x800px]] | ||
In addition to the above required fields, there are many other optional parameters you can add to an item. These can be added or changed at any time when, or after, you create an item. | |||
* '''Image''' - One or more images of the item. Click the '''MANAGE IMAGES''' button and then '''BROWSE''' to select at least one image and click '''Open'''. You can also drag and drop images or click the square on the right to add images over there. Select one image to be the default one users will see, and then click the '''ADD''' button to close the dialog. | * '''Image''' - One or more images of the item. Click the '''MANAGE IMAGES''' button and then '''BROWSE''' to select at least one image and click '''Open'''. You can also drag and drop images or click the square on the right to add images over there. Select one image to be the default one users will see, and then click the '''ADD''' button to close the dialog. | ||
| Line 32: | Line 35: | ||
* '''Dimensions''' - The length, width, and height of an item. Obviously, this only applies to physical items. These will only be visible if the item type you selected is Inventory, Non Inventory, or Bundle. You can use any of the following UOMs to measure an item's dimensions: inches, feet, yards, millimeters, centimeters, or meters. Inches is the default UOM. | * '''Dimensions''' - The length, width, and height of an item. Obviously, this only applies to physical items. These will only be visible if the item type you selected is Inventory, Non Inventory, or Bundle. You can use any of the following UOMs to measure an item's dimensions: inches, feet, yards, millimeters, centimeters, or meters. Inches is the default UOM. | ||
* '''Weight''' - The overall mass of an item. It can be measured in pounds, ounces, tons, kilograms, or grams. Pounds is the default UOM. | * '''Weight''' - The overall mass of an item. It can be measured in pounds, ounces, tons, kilograms, or grams. Pounds is the default UOM. | ||
* '''Custom Fields''' - If you have created a custom field, it will appear here. Up to three custom fields will appear automatically. If you have more than that, you can click the '''SHOW MORE''' button to display all of them. The order they appear in will depend on what you set in the '''Custom Fields''' wizard of the Items module. To hide the extra custom fields, click '''HIDE FIELDS''', and then only the first three will be visible again. | * '''Purchase Tax''' - A dropdown menu to select a tax from the [[Tax Rates|'''Tax Rates''' module]]. You can also create a new tax by entering text into this field and clicking the '''+ Add''' option. Fill out the '''New Tax Rate''' wizard, and click the blue '''SAVE''' button on the bottom-right of the popup. | ||
* '''Taxable''' - A checkbox you can click to indicate if an item is taxable or not. Its default status is to be unchecked. So make sure to check it if you need to pay a purchase tax on the item. | |||
* '''Custom Fields''' - If you have created a custom field, it will appear here. Up to three custom fields will appear automatically. If you have more than that, you can click the '''SHOW MORE''' button to display all of them. The order they appear in will depend on what you set in the '''Custom Fields''' wizard of the '''Items''' module. To hide the extra custom fields, click '''HIDE FIELDS''', and then only the first three will be visible again. | |||
* '''Alert Notes''' - An important warning employees should know about an item when ordering, selling, or handling it. Alert notes can be up to 255 characters in length. | * '''Alert Notes''' - An important warning employees should know about an item when ordering, selling, or handling it. Alert notes can be up to 255 characters in length. | ||
* '''Notes''' - A general message to record about an item. | * '''Notes''' - A general message to record about an item. There is no character limit. | ||
* '''Tags''' - Markers that allow you to categorize items. For example, some items can be tagged as related to Plastic, Metal, or both. You can select from existing tags or click the '''MANAGE''' button to create a new tag. Add as many as you like. | * '''Tags''' - Markers that allow you to categorize items. For example, some items can be tagged as related to Plastic, Metal, or both. You can select from existing tags or click the '''MANAGE''' button to create a new tag. Add as many as you like. | ||
* '''COGS Account''' - This tells the accounting software you integrate with which account to record the item under when you make a sale. You can find the full list of accounts in the '''Chart of Accounts''' module. Your options are: | * '''COGS Account''' - This tells the accounting software you integrate with which account to record the item under when you make a sale. You can find the full list of accounts in the [[Chart of Accounts|'''Chart of Accounts''' module]]. Your options are: | ||
** Use Default Account | ** Use Default Account | ||
** Cost of Goods Sold - Cost of Goods Sold | ** Cost of Goods Sold - Cost of Goods Sold | ||
** Inventory Adjustment - Cost of Goods Sold | ** Inventory Adjustment - Cost of Goods Sold | ||
* '''Expense Account''' - This tells the accounting software you integrate with which account to record the item under when you need to expense it. You can find the full list of accounts in the '''Chart of Accounts''' module. Your options are: | * '''Expense Account''' - This tells the accounting software you integrate with which account to record the item under when you need to expense it. You can find the full list of accounts in the [[Chart of Accounts|'''Chart of Accounts''' module]]. Your options are: | ||
** Use Default Account | ** Use Default Account | ||
** Non-Inventory - Expense | ** Non-Inventory - Expense | ||
| Line 48: | Line 53: | ||
** Shipping Expense - Expense | ** Shipping Expense - Expense | ||
** Scrap Inventory - Expense | ** Scrap Inventory - Expense | ||
* '''Accounting Class''' - A means of categorizing transactions. You can select a class to categorize an item's sale or purchase by its location, size, use, or a variety of other criteria. You can only select one from the list you've created in the '''Classes''' module. | * '''Accounting Class''' - A means of categorizing transactions in both Fishbowl Drive and your accounting solution. You can select a class to categorize an item's sale or purchase by its location, size, use, or a variety of other criteria. You can only select one from the list you've created in the [[Classes|'''Classes''' module]]. | ||
You will need to click the '''SAVE''' or '''SAVE AND CLOSE''' button to apply these changes. | You will need to click the '''SAVE''' or '''SAVE AND CLOSE''' button to apply these changes. | ||
=== Conversions === | |||
[[File:Items module - Conversions.png|border]] | |||
Fishbowl Drive is unique from Fishbowl Advanced in that it allows users to modify UOM conversions on a per-item basis. | |||
UOM conversion can only be created in the [[UOMs|'''UOMs''' module]]. However, once a conversion is created there and the UOM it is attached to is selected for an item in the '''Items''' module, the conversion can be modified in the '''Conversions''' section on the bottom-left of the [[Items#Optional item details|'''General''' tab]]. Any modification you make to the UOM conversion won’t affect the conversion in the '''UOMs''' module or in any other item. | |||
Thus, you can have hundreds of items with the same UOM, and each one can have a different conversion value into other UOMs. This customizability enables you to make all kinds of changes without worrying about changing another item or conversion. | |||
As soon as you change the value of a conversion, a '''Reset''' icon will appear to the right its textbox. If you want to revert a conversion back to its original value, click the '''Reset''' icon. | |||
== Tab options by item type == | == Tab options by item type == | ||
The other tabs available, besides the '''General''' tab, will change depending on the type you select for an item. For a list of item types, see #5 of the required fields in the ''' | The other tabs available, besides the '''General''' tab, will change depending on the type you select for an item. For a list of item types, see #5 of the required fields in the [[Items#Create a new item|'''Create a new item''']] section above. The following are the tabs contained in each type of item: | ||
'''Inventory''' | '''Inventory''' | ||
* Sale Items | * [[Items#Sale Items tab|Sale Items]] | ||
* Substitute Items | * [[Items#Substitute Items tab|Substitute Items]] | ||
* Reorder Points | * [[Items#Reorder Points|Reorder Points]] | ||
* Tracking | * [[Items#Tracking tab|Tracking]] | ||
* Locations | * [[Items#Locations tab|Locations]] | ||
* Vendor Items | * [[Items#Vendor Items tab|Vendor Items]] | ||
* Documents | * [[Items#Documents tab|Documents]] | ||
'''Shipping''' | '''Shipping''' | ||
* Sale Items | * [[Items#Sale Items tab|Sale Items]] | ||
* Vendor Items | * [[Items#Vendor Items tab|Vendor Items]] | ||
* Documents | * [[Items#Documents tab|Documents]] | ||
'''Service''' | '''Service''' | ||
* Sale Items | * [[Items#Sale Items tab|Sale Items]] | ||
* Vendor Items | * [[Items#Vendor Items tab|Vendor Items]] | ||
* Documents | * [[Items#Documents tab|Documents]] | ||
'''Non Inventory''' | '''Non Inventory''' | ||
* Sale Items | * [[Items#Sale Items tab|Sale Items]] | ||
* Reorder Points | * [[Items#Reorder Points|Reorder Points]] | ||
* Locations | * [[Items#Locations tab|Locations]] | ||
* Vendor Items | * [[Items#Vendor Items tab|Vendor Items]] | ||
* Documents | * [[Items#Documents tab|Documents]] | ||
'''Bundle''' | '''Bundle''' | ||
* Bundle Items | * [[Items#Bundles|Bundle Items]] | ||
* Documents | * [[Items#Documents tab|Documents]] | ||
'''Labor''' | '''Labor''' | ||
* Vendor Items | * [[Items#Vendor Items tab|Vendor Items]] | ||
* Documents | * [[Items#Documents tab|Documents]] | ||
'''Overhead''' | '''Overhead''' | ||
* Vendor Items | * [[Items#Vendor Items tab|Vendor Items]] | ||
* Documents | * [[Items#Documents tab|Documents]] | ||
{{Wistia|asg2n9ynf5|Bundles}} | {{Wistia|asg2n9ynf5|Bundles}} | ||
| Line 105: | Line 121: | ||
{{Image|1|Bundle}} | {{Image|1|Bundle}} | ||
* For a step-by-step tutorial on creating bundles, click the video to the right. | * For a step-by-step tutorial on creating bundles, click the video to the right. | ||
The Bundle item type is the only one that | The Bundle item type is the only one that has a '''Bundle Items''' tab. You will need to add at least two sale items to be able to create a bundle. That can be two of the same sale item or two different sale items. Thus, you can only create a bundle after you've created other types of items. | ||
To create a bundle, start by clicking the '''ADD NEW''' button on the top-right of the '''Bundle''' '''Items''' tab. A popup window will open, enabling you to add a bundle item. It will ask for the following information. Required fields are marked with an asterisk. | To create a bundle, start by clicking the '''ADD NEW''' button on the top-right of the '''Bundle''' '''Items''' tab. A popup window will open, enabling you to add a bundle item. It will ask for the following information. Required fields are marked with an asterisk. | ||
* '''Sale Item*''' - A dropdown menu of all of your sale items. Note that these may be different than the names of the items because these are sale items. | * '''Sale Item*''' - A dropdown menu of all of your sale items. Note that these may be different than the names of the items because these are sale items. | ||
* '''Quantity*''' - A textbox that enables you to add one or more of a certain sale item to the bundle. The UOM can't be changed from here. It can only be changed by clicking the sale item in the Items module. | * '''Quantity*''' - A textbox that enables you to add one or more of a certain sale item to the bundle. The UOM can't be changed from here. It can only be changed by clicking the sale item in the '''Items''' module. | ||
* '''Discount''' - A textbox that lets you choose to apply a percent or dollar discount to the bundle item. This will affect the total price. | * '''Discount''' - A textbox that lets you choose to apply a percent or dollar discount to the bundle item. This will affect the total price. | ||
* '''Price''' - The amount of money you are charging for each bundle, according to its UOM. This can only be changed by clicking the sale item in the Items module. | * '''Price''' - The amount of money you are charging for each bundle, according to its UOM. This can only be changed by clicking the sale item in the '''Items''' module. | ||
* '''Total''' - The sum of the price multiplied by the quantity, minus any discount. It changes automatically | * '''Total''' - The sum of the price multiplied by the quantity, minus any discount. It changes automatically when you update one of those three numbers. | ||
The '''RESET''' button acts as an undo button on the '''Discount''' textbox. For example, if you add a 1% discount and then click '''RESET''', it will erase that 1% discount and return to the full price in the total. But if you add a 1% discount, click '''DONE''', and then go back in and change the 1% discount to $1 and click '''RESET''', it will go back to the 1% discount. It won't get rid of the discount but will return it to the state it was in when you opened the window. To delete the discount, you'll have to return the number to 0 in the '''Discount''' textbox. | The '''RESET''' button acts as an undo button on the '''Discount''' textbox. For example, if you add a 1% discount and then click '''RESET''', it will erase that 1% discount and return to the full price in the total. But if you add a 1% discount, click '''DONE''', and then go back in and change the 1% discount to $1 and click '''RESET''', it will go back to the 1% discount. It won't get rid of the discount but will return it to the state it was in when you opened the window. To delete the discount, you'll have to return the number to 0 in the '''Discount''' textbox. | ||
== Sale Items tab == | == Sale Items tab == | ||
[[File:Items module - New Item - Create Sale Item.png|border]] | |||
If you click YES, the information in the '''Sale Items''' tab will reflect many of the things you initially added to the '''General''' tab of the new item. It will rarely include information added after the first save of the item. The UOM is a notable exception. That field's options change based on each edit you make to the UOM in the '''General''' tab. Plus, there are a variety of fields that aren't populated with information from the '''General''' tab. We will go through them below. | When you first save an item with an Inventory, Shipping, Service, or Non Inventory type, a message will pop up asking if you want to create a default sale item for it. If you click YES, you will find the new sale item under the '''Sale Items''' tab. If you click NO, you won't have an opportunity to automatically generate a sale item again. You'll have to do it manually if you want one in the future. | ||
If you click YES, the information in the '''Sale Items''' tab will reflect many of the things you initially added to the [[Items#Optional item details|'''General''' tab]] of the new item. It will rarely include information added after the first save of the item. The UOM is a notable exception. That field's options change based on each edit you make to the UOM in the [[Items#Optional item details|'''General''' tab]]. Plus, there are a variety of fields that aren't populated with information from the [[Items#Optional item details|'''General''' tab]]. We will go through them below. | |||
=== Fields populated with data from the General tab === | === Fields populated with data from the General tab === | ||
[[File:Items module - New Item - Add Sale Item.png|border|800x800px]] | |||
The following fields include information that the '''Sale Items''' tab automatically brings over from the [[Items#Optional item details|'''General''' tab]]. Keep in mind that it only has the information you initially added when you created the item. Any additional images or text you add after you first save the item won't be included here. The required fields are marked with an asterisk. | |||
=== | * '''Image''' - All of the images you added in the [[Items#Optional item details|'''General''' tab]] will be found here when you click the '''MANAGE IMAGES''' button. And the default one you chose before will also be selected as the default in the '''Sale Items''' tab. You can choose a different default image here, and it won't affect the one in the [[Items#Optional item details|'''General''' tab]]. In fact, you can even delete images here, and they'll still be in the [[Items#Optional item details|'''General''' tab]]. | ||
* '''Name*''' - This name can be changed to something different for selling purposes without affecting the name in the [[Items#Optional item details|'''General''' tab]]. | |||
* '''Description''' - This description will be what customers read, so you may want to change it from the internal description in the [[Items#Optional item details|'''General''' tab]]. | |||
* '''SKU''' - You'll probably want to leave the stock-keeping unit the same as the one in the [[Items#Optional item details|'''General''' tab]]. But you can change it here if you like. | |||
* '''Barcode / UPC''' - An identifying code for a sale item. | |||
* '''UOM*''' - The unit of measure you can select here depends on the one you already selected in the [[Items#Optional item details|'''General''' tab]]. If you change that one, it will affect the UOM options in the '''Sale''' '''Items''' tab. For example, if you selected Each, which has conversions to Inches, Pairs, and Dozens, you will be able to select one of those from a dropdown menu. But any UOMs it doesn't have conversions to won't be listed here. | |||
* '''Taxable''' - A checkbox you can click to indicate if an item is taxable or not. Check it if you need to charge a sales tax or service tax for the item. | |||
* '''Dimensions and Weight*''' - This will show the same dimensions, weight, and UOMs that you entered in the [[Items#Optional item details|'''General''' tab]]. However, the dimensions are in a different order. Instead of length, width, and height, they are in this order: width, height, and length. Also, if you delete the Dimension UOM and click '''DONE''' without selecting a new one, it will default to Inches. If you do that with the Weight UOM, it will default to Pounds. | |||
* '''Alert Notes''' - An important warning employees should know about a sale item when selling it. Alert notes can be up to 255 characters in length. | |||
* '''Notes''' - This has all of the text you initially typed into the '''Notes''' field from the [[Items#Optional item details|'''General''' tab]]. | |||
* '''Tags''' - These tags can be the same or different than the ones in the [[Items#Optional item details|'''General''' tab]]. | |||
=== Field not populated with data from the General tab === | |||
This field is found in both the '''General''' and '''Sale Items''' tabs, but it doesn't carry over the information contained in it from one to the other. It is optional, not a required field. | |||
* '''Accounting Class''' - Because sale items are treated differently than order items, they may not necessarily have the same accounting class. In any case, you can select the same class as the one you selected in the '''General''' tab or a different one in this field. | * '''Accounting Class''' - Because sale items are treated differently than order items, they may not necessarily have the same accounting class. In any case, you can select the same class as the one you selected in the '''General''' tab or a different one in this field. | ||
=== New fields to fill in the Sale Items tab === | === New fields to fill in the Sale Items tab === | ||
These '''Sale Items''' fields are not found in the '''General''' tab, so they will be wholly new and distinct. The required fields are marked with an asterisk. | These '''Sale Items''' fields are not found in the [[Items#Optional item details|'''General''' tab]], so they will be wholly new and distinct. The required fields are marked with an asterisk. | ||
* '''URL''' - If you have an e-commerce store or some other website where you keep information on an item, you can link to it here. | * '''URL''' - If you have an e-commerce store or some other website where you keep information on an item, you can link to it here. | ||
* '''Price*''' - At first, this will be the same amount as the cost in the '''General''' tab. However, price is different than cost. Price is the amount of money (in U.S. dollars and cents) you will charge customers for an item, while cost is the amount of money you spend to obtain that same item. Thus, the price should always exceed the cost, except for in extraordinary circumstances like a closeout sale. | * '''Price*''' - At first, this will be the same amount as the cost in the [[Items#Optional item details|'''General''' tab]]. However, price is different than cost. Price is the amount of money (in U.S. dollars and cents) you will charge customers for an item, while cost is the amount of money you spend to obtain that same item. Thus, the price should always exceed the cost, except for in extraordinary circumstances like a closeout sale. | ||
* ''' | * '''Sales tax''' - This enables you to select a tax rate (from the [[Tax Rates|'''Tax Rates''' module]]) that applies to an item. It has no default, so you can leave it blank if you like. | ||
* '''Default Type*''' - There are three transaction types you can choose from. You can only choose one. If you delete the Default Type, click '''DONE''', and then save the item, this field will default to Sale. Here are the three types: | * '''Default Type*''' - There are three transaction types you can choose from. You can only choose one. If you delete the Default Type, click '''DONE''', and then save the item, this field will default to Sale. Here are the three types: | ||
** Sale | ** Sale | ||
** Credit Return | ** Credit Return | ||
** Drop Ship | ** Drop Ship | ||
* '''Default''' - A checkbox that marks a particular sale item as the default one you'll use when selling that item. | * '''Default''' - A checkbox that marks a particular sale item as the default one you'll use when selling that item. | ||
* '''Income Account''' - Since a sale is, by definition, income, it differs from the ordering process because that only accounts for expenses and assets. That is why, under the '''Sale Items''' tab, you have the option to link to an income account in your accounting software. That way, it automatically adds income to the appropriate account when you make a sale. Your options are: | * '''Income Account''' - Since a sale is, by definition, income, it differs from the ordering process because that only accounts for expenses and assets. That is why, under the '''Sale Items''' tab, you have the option to link to an income account in your accounting software. That way, it automatically adds income to the appropriate account when you make a sale. Your options are: | ||
| Line 162: | Line 182: | ||
=== Multiple sale items === | === Multiple sale items === | ||
You can create multiple sale items for the same item under the Sale Items tab. There are a number of reasons why you might want to do this. For example, you could create one for regular sales, a second for credit returns, and a third for drop shipping. Or you could create ones with different prices for different categories of customers. Perhaps you have multiple e-commerce profiles, and you need to add more than one URL. | [[File:Items module - Sale Items tab.png|border|800x800px]] | ||
You can create multiple sale items for the same item under the '''Sale Items''' tab. There are a number of reasons why you might want to do this. For example, you could create one for regular sales, a second for credit returns, and a third for drop shipping. Or you could create ones with different prices for different categories of customers. Perhaps you have multiple e-commerce profiles, and you need to add more than one URL. | |||
When you create a new sale item, you will find that only the | When you create a new sale item, you will find that only the '''Description''' field will be populated with the description from the '''General''' tab. Other than that, everything will be blank. Unfortunately, there is no way to duplicate a sale item from the '''Sale Items''' tab. So you'll have to fill all of the required fields once more, as well as any of the optional fields that you wish to fill. The Default Type will be Sale, and the Income Account will be set as Use Default Account. | ||
In order to change which sale item is the default one, click the Default checkbox in it, and it will automatically switch it to the primary position among your sale items once you click '''DONE'''. Or you can click the | In order to change which sale item is the default one, click the Default checkbox in it, and it will automatically switch it to the primary position among your sale items once you click '''DONE'''. Or you can click the {{Icon Button|More}} to the right of a sale item in the '''Sale Items''' list and select Set as Default before saving your work. Additionally, you have the option to delete a sale item from that dropdown menu. | ||
All of the images from the '''General''' tab will be included as options to pick. But you'll have to click '''MANAGE IMAGES''' and then select one and click '''ADD''' in order to have one show up once you click '''DONE'''. | All of the images from the [[Items#Optional item details|'''General''' tab]] will be included as options to pick. But you'll have to click '''MANAGE IMAGES''' and then select one and click '''ADD''' in order to have one show up once you click '''DONE'''. | ||
Be sure to click '''SAVE''' or '''SAVE AND CLOSE''' in order to keep the sale item(s) you've created. | Be sure to click '''SAVE''' or '''SAVE AND CLOSE''' in order to keep the sale item(s) you've created. | ||
== Substitute Items tab == | == Substitute Items tab == | ||
If the item you have clicked | [[File:Items module - Substitute Items tab.png|border|800x800px]] | ||
If the item you have clicked is an Inventory type, you will see a '''Substitute Items''' tab in the '''Items''' module. Click it, and it will open the '''Substitute Items''' section. It's easy to add substitute items. Simply click the '''ADD NEW''' button, and a popup window will appear. Select an item from the dropdown menu. Then click the '''ADD''' button to add the item to the list. | |||
On the list, you will see each substitute item's name, UOM, dimensions, and price. You can't edit those from here. To update them, you'll need to click | On the list, you will see each substitute item's name, UOM, dimensions, and price. You can't edit those from here. To update them, you'll need to click the item in the '''Items''' module. | ||
You can add as many substitute items as you like. To delete an item, click its checkbox on the left, and then click the '''DELETE''' button. To delete all items, click the checkbox in the header to select all, and then click the '''DELETE''' button. Or you can click the | You can add as many substitute items as you like. To delete an item, click its checkbox on the left, and then click the '''DELETE''' button. To delete all items, click the checkbox in the header to select all, and then click the '''DELETE''' button. Or you can click the {{Icon Button|More}} on the right of an item and select '''DELETE ITEM'''. Be sure to click '''SAVE''' or '''SAVE AND CLOSE''' to save your changes. | ||
Substitute items can be used in the '''Sales Orders''' module when the item you added them to has a zero quantity. When you add this item to a sales order, a message will pop up giving you the option to use the substitute items you have previously assigned to it in this tab. If the item has one or more units in stock, that message will not pop up when you add it to a sales order, even if the quantity on the sales order is greater than the quantity of the item you have in stock. | [[File:Substitute Items.png|border]] | ||
Substitute items can be used in the [[Sales Orders|'''Sales Orders''' module]] when the item you added them to has a zero quantity. When you add this item to a sales order, a message will pop up (as shown above) giving you the option to use the substitute items you have previously assigned to it in this tab. If the item has one or more units in stock, that message will not pop up when you add it to a sales order, even if the quantity on the sales order is greater than the quantity of the item you have in stock. | |||
{{Wistia|nocfxxedpg|Reorder Points}} | {{Wistia|nocfxxedpg|Reorder Points}} | ||
| Line 186: | Line 212: | ||
{{Import|Reorder Points}} | {{Import|Reorder Points}} | ||
** '''ReorderPoint-ID''' - The identifying number of an item. | ** '''ReorderPoint-ID''' - The identifying number of an item. | ||
** '''ReorderPoint-ItemName*''' - The name of | ** '''ReorderPoint-ItemName*''' - The name of an item. | ||
** '''ReorderPoint-ParentLocationName*''' - The Parent location the reorder point for | ** '''ReorderPoint-ParentLocationName*''' - The Parent location that the reorder point for an item will apply to. | ||
** '''ReorderPoint-DailyConsumptionRate''' - The average number of units of | ** '''ReorderPoint-DailyConsumptionRate''' - The average number of units of an item that are sold or otherwise removed from inventory each day. | ||
** '''ReorderPoint-Minimum''' - The lowest number of units of | ** '''ReorderPoint-Minimum''' - The lowest number of units of an item that can be in stock. The number of units shouldn’t fall below this number while you wait for a restock. | ||
** '''ReorderPoint-Maximum''' - The highest number of units of | ** '''ReorderPoint-Maximum''' - The highest number of units of an item that can be in stock. The reorder amount shouldn’t put the total quantity over this number. | ||
** '''ReorderPoint-AlertAt''' - The quantity of units of | ** '''ReorderPoint-AlertAt''' - The quantity of units of an item that will trigger a message informing the responsible party or parties that they need to purchase more units. | ||
** '''ReorderAlert-ContactName*''' - The name of the contact who will be alerted. Only applies if adding alert. | ** '''ReorderAlert-ContactName*''' - The name of the contact who will be alerted. Only applies if adding alert. | ||
** '''ReorderAlert-Phone''' - The phone number that the person will be contacted at. | ** '''ReorderAlert-Phone''' - The phone number that the person will be contacted at. | ||
** '''ReorderAlert-Email''' - The email address that the person will be contacted at. | ** '''ReorderAlert-Email''' - The email address that the person will be contacted at. | ||
** '''ReorderAlert-ReceiveSmsNotifications''' - True/False if Fishbowl Drive will send text messages when an item reaches its reorder point. | |||
** '''ReorderAlert-ReceiveEmailNotifications''' - True/False if Fishbowl Drive will send emails when an item reaches its reorder point. | |||
** '''ReorderAlert-ReceiveInStockNotifications''' -True/False if Fishbowl Drive will send notifications when an item's shipment is received into inventory. | |||
Reorder points on items allow you to automate the reordering process. Instead of you having to manually look at each item's quantity to spot low quantities, the system alerts you via text and/or email when an item reaches its minimum quantity. | Reorder points on items allow you to automate the reordering process. Instead of you having to manually look at each item's quantity to spot low quantities, the system alerts you via text and/or email when an item reaches its minimum quantity. | ||
| Line 216: | Line 245: | ||
== Tracking tab == | == Tracking tab == | ||
[[File:Items module - Tracking tab.png|border|800x800px]] | |||
To add a tracking type to an Inventory item, first click the '''Tracking''' tab. Second, click the toggle switch next to the tracking type. Third, enter the appropriate information into the now-active textbox. There are three tracking types you can add to an item. | To add a tracking type to an Inventory item, first click the '''Tracking''' tab. Second, click the toggle switch next to the tracking type. Third, enter the appropriate information into the now-active textbox. There are three tracking types you can add to an item. | ||
| Line 224: | Line 255: | ||
Be sure to click '''SAVE''' or '''SAVE AND CLOSE''' once you are finished making changes in this tab. | Be sure to click '''SAVE''' or '''SAVE AND CLOSE''' once you are finished making changes in this tab. | ||
To create additional tracking criteria that you can use in this tab, go to the '''Settings''' module and scroll down to the '''Tracking''' section. | To create additional tracking criteria that you can use in this tab, go to the '''Settings''' module and scroll down to the [[Settings#Tracking|'''Tracking''' section]]. | ||
== Locations tab == | == Locations tab == | ||
[[File:Items module - Locations tab.png|border|800x800px]] | |||
* '''Parent Location*''' - The primary location | To add locations to an item, click the '''Locations''' tab of that item. Then click the '''ADD NEW''' button on the top-right. The '''Add Locations Item''' wizard will appear with four dropdown menus. There is only one required field, which is marked with an asterisk. | ||
* '''Pick | |||
* '''Parent Location*''' - The primary location that child locations are housed under. | |||
* '''Pick Origin Location''' - The area within the [[Locations#Parent and child locations|Parent Location]] where you store this item and will go to in order to pick it for a sales order. | |||
* '''Receive Location''' - The area within the Parent Location where you receive the item, such as a loading bay or receiving area. | * '''Receive Location''' - The area within the Parent Location where you receive the item, such as a loading bay or receiving area. | ||
* '''Pick | * '''Pick Destination Location''' - The area within the Parent Location where you move the item to once you pick it to prepare it for shipping. | ||
You have to select the Parent Location first before you can choose the other three locations. That's because the Pick | You have to select the Parent Location first before you can choose the other three locations. That's because the Pick Origin, Receive, and Pick Destination locations change depending on the Parent Location. For example, if you select Parent Location 1 and then select three sublocations within it for the other three options, and then you select Parent Location 2, all of the other locations you selected will reset. You'll have to select new ones because the previous ones were all related to Parent Location 1, and they don't apply to Parent Location 2. | ||
In order to save a location, you'll need to select a Parent Location and at least one of the other three options. If you try to only add a Parent Location without a Pick | In order to save a location, you'll need to select a Parent Location and at least one of the other three options. If you try to only add a Parent Location without a Pick Origin, Receive, or Pick Destination location, you will receive an error message. Once you make two or more selections, you can click the '''ADD''' button. Be sure to click '''SAVE''' or '''SAVE AND CLOSE''' to keep your changes to the item. | ||
You can only use each Parent Location you have once per item. If you try to use the same Parent Location a second time with different Pick | You can only use each Parent Location you have once per item. If you try to use the same Parent Location a second time with different Pick Origin, Receive, and Pick Destination locations, you will receive an error message, and you won't be able to save it. | ||
To edit a location, click anywhere along its line. The '''Edit Locations Item''' wizard will appear. You won't be able to change the Parent Location, but you can select a new Pick | To edit a location, click anywhere along its line. The '''Edit Locations Item''' wizard will appear. You won't be able to change the Parent Location, but you can select a new Pick Origin, Receive, and Pick Destination location. Then click the '''EDIT''' button to make the change. | ||
To delete a location, you have two options. Click the checkbox on the left of its line and click '''DELETE''', or click the | To delete a location, you have two options. Click the checkbox on the left of its line and click '''DELETE''', or click the {{Icon Button|More}} on the right of its line and select '''Delete location'''. | ||
== Vendor Items tab == | == Vendor Items tab == | ||
[[File:Items module - Vendor Items tab.png|border|800x800px]] | |||
Every item type except for Bundle has a '''Vendor Items''' tab. Adding a vendor item enables you to reorder an item when its quantity gets low. | Every item type except for Bundle has a '''Vendor Items''' tab. Adding a vendor item enables you to reorder an item when its quantity gets low. | ||
To add a vendor item, click the '''Vendor Items''' tab, and then click the '''ADD''' button on the top-right. The '''Add Vendor Item''' wizard will appear with the following fields for you to fill out. Required fields are marked with an asterisk | To add a vendor item, click the '''Vendor Items''' tab, and then click the '''ADD''' button on the top-right. The '''Add Vendor Item''' wizard will appear with the following fields for you to fill out. Required fields are marked with an asterisk. | ||
* '''Vendor*''' - A dropdown menu of all the vendors you currently have in the system. You can select just one. | * '''Vendor*''' - A dropdown menu of all the vendors you currently have in the system. You can select just one. | ||
* '''Vendor Item Name*''' - A textbox containing the name of the item. You can change it to something else if the vendor refers to it by a different name than you do. | * '''Vendor Item Name*''' - A textbox containing the name of the item. You can change it to something else if the vendor refers to it by a different name than you do. | ||
* '''Cost*''' - A textbox for you to enter the amount of money (in U.S. dollars and cents) the vendor charges for the item. | * '''Cost*''' - A textbox for you to enter the amount of money (in U.S. dollars and cents) the vendor charges for each unit of the item. | ||
* '''UOM*''' - A dropdown menu containing all of the units of measure you have available for the item. By default, it will contain the UOM you previously selected for the item in the '''General''' tab. But you can change it to any UOM you like. | * '''UOM*''' - A dropdown menu containing all of the units of measure you have available for the item. By default, it will contain the UOM you previously selected for the item in the [[Items#Optional item details|'''General''' tab]]. But you can change it to any UOM you like. | ||
* '''Lead Time''' - A textbox for you to enter the number of days it takes to receive new | * '''Lead Time''' - A textbox for you to enter the number of days it takes to receive new units from the vendor after you place an order with them. | ||
* '''Minimum Quantity''' - A textbox for you to enter the lowest number of | * '''Minimum Quantity''' - A textbox for you to enter the lowest number of units of the item that the vendor will allow you to order from them in a single transaction. | ||
* '''Default''' - A checkbox you can click if you want to make a certain vendor the default one you will order the item from. If this is the first vendor you're adding, you will need to check the box. For each additional vendor item you add, you can either check the box to make it the default vendor item or you can leave it unchecked, and it will not be the default. | * '''Default''' - A checkbox you can click if you want to make a certain vendor the default one you will order the item from. If this is the first vendor you're adding, you will need to check the box. For each additional vendor item you add, you can either check the box to make it the default vendor item or you can leave it unchecked, and it will not be the default. | ||
Click the blue '''ADD''' button, and you'll see the vendor item show up on the list. To make this change permanent, be sure to click '''SAVE''' or '''SAVE AND CLOSE'''. | Click the blue '''ADD''' button, and you'll see the vendor item show up on the list. To make this change permanent, be sure to click '''SAVE''' or '''SAVE AND CLOSE'''. | ||
Once you add a vendor item, you will notice that in the '''Vendor Items''' tab | Once you add a vendor item, you will notice that in the '''Vendor Items''' tab there are columns for all of the fields you saw in the wizard above (Cost and UOM are combined), plus one more. The additional one is Last Date. It is the month, day, and year (MM/DD/YYYY) that you most recently made a change to the vendor item. At first it will be blank. But once you click the '''SAVE''' button, it will automatically be populated with the current date. | ||
You can't add an item containing the same Vendor and Vendor Item Name as a previous entry you've made. If you try, you will be able to add it to the list, but when you attempt to save it, you will receive an error message. You can't save duplicate items from the same vendor, even if they have different costs, UOMs, lead times, and minimum quantities. However, you can have multiple vendor items from the same vendor, as long as they have different names. Inversely, you can have multiple vendor items with the same name, as long as they are from different vendors. | You can't add an item containing the same Vendor and Vendor Item Name as a previous entry you've made. If you try, you will be able to add it to the list, but when you attempt to save it, you will receive an error message. You can't save duplicate items from the same vendor, even if they have different costs, UOMs, lead times, and minimum quantities. However, you can have multiple vendor items from the same vendor, as long as they have different names. Inversely, you can have multiple vendor items with the same name, as long as they are from different vendors. | ||
To edit an item, click | To edit an item, click its line and update any or all of the fields in the wizard that appears. Then click the blue '''UPDATE''' button. | ||
To delete a vendor item, click the checkbox on the left of it, and then click the '''DELETE''' button. | To delete a vendor item, click the checkbox on the left of it, and then click the '''DELETE''' button that appears in the action bar of the tab. | ||
== Documents tab == | == Documents tab == | ||
[[File:Items module - Documents tab.png|border|800x800px]] | |||
To add files to an item, click the '''Documents''' tab, and then click the '''UPLOAD''' button on the top-right. The '''Upload Documents''' wizard will appear. You can either drag and drop files into the window, or you can click the '''BROWSE''' button on the bottom-left to select files to add and then click the '''ADD''' button. | To add files to an item, click the '''Documents''' tab, and then click the '''UPLOAD''' button on the top-right. The '''Upload Documents''' wizard will appear. You can either drag and drop files into the window, or you can click the '''BROWSE''' button on the bottom-left to select files to add and then click the '''ADD''' button. | ||
Given the name of this tab, everything seems to be pointing toward only being able to add Word files But the fact is that you can add virtually any file type in here, not just documents. In addition to DOC and DOCX files, you'll find that JPG, GIF, PDF, XLSX, PPTX, and many other file types are permissible. | [[File:Items module - Documents tab - Upload Documents.png|border|800x800px]] | ||
Given the name of this tab, everything seems to be pointing toward only being able to add Word files. But the fact is that you can add virtually any file type in here, not just documents. In addition to DOC and DOCX files, you'll find that JPG, GIF, PDF, XLSX, PPTX, and many other file types are permissible. | |||
Once you add a file, you won't be able to edit it. All you can do is download a copy of it. If you want to edit a file, you'll need to download it, edit it, and upload the revised version. | Once you add a file, you won't be able to edit it. All you can do is download a copy of it. If you want to edit a file, you'll need to download it, edit it, and upload the revised version. | ||
| Line 279: | Line 318: | ||
== How to return to the main Items page == | == How to return to the main Items page == | ||
[[File:Items module - Save buttons.png|border]] | |||
When you're done working on an item, there are three ways you can return to the main Items page, which lists all of your items: | When you're done working on an item, there are three ways you can return to the main Items page, which lists all of your items: | ||
# Click the '''X''' on the top-right of the window. Not the one that closes the browser, of course, but the one at the top of the item window. This won't delete the item, but it will simply close it and return you to the main Items page. If you have any unsaved changes, you will receive a prompt asking if you want to save before leaving. | # Click the '''X''' on the top-right of the window. Not the one that closes the browser, of course, but the one at the top of the item window. This won't delete the item, but it will simply close it and return you to the main Items page. If you have any unsaved changes, you will receive a prompt asking if you want to save before leaving. | ||
# Click the '''SAVE''' '''AND CLOSE''' button. This will save your changes and return you to the main Items page. | # Click the '''SAVE''' '''AND CLOSE''' button. This will save your changes and return you to the main Items page. | ||
# Click the Items module button on the left of the browser. If you have any unsaved changes, you will receive a prompt asking if you want to save before leaving. | # Click the '''Items''' module button in the side nav on the left side of the browser. If you have any unsaved changes, you will receive a prompt asking if you want to save before leaving. | ||
== How to go to an item in the Inventory module == | == How to go to an item in the Inventory module == | ||
Let's say you're working on an item in the '''Items''' module, and you want to go check its quantities in stock in the '''Inventory''' module. You might think you have to go to the '''Inventory''' module and search for it. However, there's a much quicker way. | Let's say you're working on an item in the '''Items''' module, and you want to go check its quantities in stock in the [[Inventory#How to go to an item in the Items module|'''Inventory''' module]]. You might think you have to go to the [[Inventory#How to go to an item in the Items module|'''Inventory''' module]] and search for it. However, there's a much quicker way. | ||
In the '''Items''' module, you'll see a | [[File:Items module - Flow bar.png|border]] | ||
In the '''Items''' module, you'll see a [[Getting Started#Layout|Flow bar]] on the top-left of the window that says '''Items''' and '''Inventory'''. If the item you've clicked is an Inventory type, both Items and Inventory will light up, indicating that you can click them. Clicking '''Inventory''' will take you directly to that item's entry in the [[Inventory#How to go to an item in the Items module|'''Inventory''' module]]. If you have any unsaved changes, you will receive a prompt asking if you want to save before leaving. | |||
You can return to the item's entry in the '''Items''' module via the same method. Simply click Items in that tool, and it will return you to where you were. | You can return to the item's entry in the '''Items''' module via the same method. Simply click Items in that tool, and it will return you to where you were. | ||
| Line 295: | Line 338: | ||
== How to duplicate and delete items == | == How to duplicate and delete items == | ||
To duplicate or delete an item, go to the '''Items''' module and click the | [[File:Items module - More button.png|border|800x800px]] | ||
To duplicate or delete an item, go to the '''Items''' module and click the {{Icon Button|More}} to the right of the item. A dropdown menu will appear, giving you two options: | |||
* Duplicate Item | * Duplicate Item | ||
* Delete Item | * Delete Item | ||
[[File:Items module - Item - More button.png|border]] | |||
* Inventory On Hand | In addition, you can click the item and click the {{Icon Button|More}} that is on the top-right of the interface just to the left of the '''X'''. That dropdown will have those same two options, as well as the ability to generate the following three reports: | ||
* Item Price List | |||
* Total Item Sales | * [[Items#Inventory On Hand report|Inventory On Hand]] | ||
* [[Items#Item Price List report|Item Price List]] | |||
* [[Items#Total Item Sales report|Total Item Sales]] | |||
Clicking '''Duplicate Item''' will generate an identical copy of the item with “Copy” in parentheses after the names in the '''General''' tab and '''Sale Items''' tab. Clicking '''Delete Item''' will delete the item and all associated sale items. | Clicking '''Duplicate Item''' will generate an identical copy of the item with “Copy” in parentheses after the names in the '''General''' tab and '''Sale Items''' tab. Clicking '''Delete Item''' will delete the item and all associated sale items. | ||
==More button== | ==More button== | ||
When you click | When you click an item, you will see an action bar above the tabs. On the right side of the action bar, there is a {{Icon Button|More}}. Click it to see a '''Show Report''' dropdown menu. When you click that, the following three reports will be listed: | ||
*Inventory On Hand | *Inventory On Hand | ||
* Item Price List | * Item Price List | ||
| Line 316: | Line 363: | ||
===Inventory On Hand report=== | ===Inventory On Hand report=== | ||
The '''Inventory On Hand''' report shows how much inventory you have on hand at a variety of locations. | The [[Inventory On Hand Report|'''Inventory On Hand''' report]] shows how much inventory you have on hand at a variety of locations. The report will only include information about the item you clicked. You can adjust it by changing the '''Item''' dropdown menu in the '''Optional''' section below. That lets you switch to any item, but only one can be used at a time. | ||
This report initially has the following columns: | This report initially has the following columns: | ||
* '''Item | * '''Item''' - The identifying designation for the item. | ||
* '''Description''' - An explanation of what the item is. | * '''Description''' - An explanation of what the item is. | ||
*'''Qty''' - The number | *'''Qty''' - The total number of units of the item that are in stock. | ||
*'''Location''' - The place within your inventory where the item is located. | *'''Location''' - The place within your inventory where the item is located. | ||
====Optional==== | ====Optional==== | ||
| Line 327: | Line 374: | ||
Under '''Select All Optional''', there are three options for you to filter results in the report: | Under '''Select All Optional''', there are three options for you to filter results in the report: | ||
* '''Location''' - A dropdown menu to only list items at one location or | |||
*'''Item''' - A dropdown menu to only list a single item. | * '''Location''' - A dropdown menu to only list items at one '''Parent Location''' or '''Child Location'''. By default, all locations will be included on the report. But you can narrow down the results to a single location by selecting one in this field. You can create a new location by entering a name for the location in the textbox and hitting Enter or clicking the '''+ Add''' option. Then fill out the '''New Location''' wizard that pops up. | ||
* '''Item''' - A dropdown menu to only list a single item. You can create a new item by entering a name for the item in the textbox and hitting Enter or clicking the '''+ Add''' option. Then fill out the '''New Item''' wizard that pops up. | |||
* '''Group By''' - A dropdown menu that enables you to reorganize the items in this report by one of two criteria: | |||
** '''Item''' - This organizes all locations where an item is stored under that item’s name. This is the default option for this report. | |||
** '''Location''' - This organizes all items under each location where they are stored. | |||
* '''Tracking Value''' - A textbox where you can enter a lot number, serial number, or other tracking value to narrow down your search to a specific item or a group of items. | * '''Tracking Value''' - A textbox where you can enter a lot number, serial number, or other tracking value to narrow down your search to a specific item or a group of items. | ||
* '''Show Tracking''' - A checkbox to add a '''Tracking''' column header on the right of the '''Location''' column. | |||
If you only choose a location, the report will include all items at that location. If you only choose an item, the report will include all locations where that item is found. But if you choose both a location and an item, the report will only include information about that item at that specific location. | If you only choose a location, the report will include all items at that location. If you only choose an item, the report will include all locations where that item is found. But if you choose both a location and an item, the report will only include information about that item at that specific location. | ||
====Create a new preset ==== | ====Create a new preset ==== | ||
To apply your changes and see what they will look like in the report, click the '''GENERATE REPORT''' button on the bottom-right. This | To apply your changes and see what they will look like in the report, click the '''GENERATE REPORT''' button on the bottom-right. This also applies to every other report we will talk about in this section. | ||
To save a report for later use, click the '''CREATE NEW PRESET''' button on the top-right of the wizard. A popup will appear asking for just one thing: '''Preset Name'''. Add any name you like. For example, it can be the name of the item and/or location the report includes. Then click the '''SAVE''' button. You can either do this before you begin making changes to the report | To save a report for later use, click the '''CREATE NEW PRESET''' button on the top-right of the wizard. A popup will appear asking for just one thing: '''Preset Name'''. Add any name you like. For example, it can be the name of the item and/or location the report includes. Then click the '''SAVE''' button. You can either do this before you begin making changes to the report or you can do it at the end. If you want to make additional changes to the report, click the '''UPDATE''' button. The '''CREATE NEW PRESET''' button changes to '''UPDATE''' when you're in a preset report. | ||
====Additional presets==== | ====Additional presets==== | ||
To create another preset report, first click the '''X''' in the dropdown menu that displays the name of the current preset. Then you can go through the same steps above to create a new one. | To create another preset report, first click the '''X''' in the dropdown menu that displays the name of the current preset. Then you can go through the same steps above to create a new one. | ||
| Line 342: | Line 395: | ||
If this isn't the first time you've opened this wizard, and you've created at least one preset in the past, you will see the default preset report first thing. And you will be able to see all of the preset reports in the dropdown menu on the top-right. | If this isn't the first time you've opened this wizard, and you've created at least one preset in the past, you will see the default preset report first thing. And you will be able to see all of the preset reports in the dropdown menu on the top-right. | ||
To set a new default preset report, click the '''Default''' checkbox in it and click the '''UPDATE''' button. If you uncheck the '''Default''' checkbox on the default preset report and click the '''UPDATE''' button, you'll receive an error message. That's because there usually has to be a default. However, if you delete the default preset report, there won't be a default report, and it will show all items and locations when you click the '''REPORT''' button. That is, until you pick a preset report as the default or create a new one. | To set a new default preset report, click the '''Default''' checkbox in it, and click the '''UPDATE''' button. If you uncheck the '''Default''' checkbox on the default preset report and click the '''UPDATE''' button, you'll receive an error message. That's because there usually has to be a default. However, if you delete the default preset report, there won't be a default report, and it will show all items and locations when you click the '''REPORT''' button. That is, until you pick a preset report as the default or create a new one. | ||
To delete a preset report, first click the trashcan icon next to the '''UPDATE''' button. Then click the red '''DELETE''' button in the message that pops up. | To delete a preset report, first click the trashcan icon next to the '''UPDATE''' button. Then click the red '''DELETE''' button in the message that pops up. | ||
====Report options==== | ====Report options==== | ||
The following buttons are at the top of the '''Inventory On Hand''' report (and every other report discussed below) to allow you to make adjustments and send it to other people | The following buttons are at the top of the '''Inventory On Hand''' report (and every other report discussed below) to allow you to make adjustments and send it to other people. Tooltips appear when you mouse over these buttons for a couple seconds. They succinctly explain what each one does. | ||
* '''Zoom Out''' - This makes the text in the report appear smaller. After 10 clicks, the text is basically invisible on a computer screen. | * '''Zoom Out''' - This makes the text in the report appear smaller. After 10 clicks, the text is basically invisible on a computer screen. | ||
* '''Reset''' - This restores the report to its original size. So even if you forget how many times you | * '''Reset''' - This restores the report to its original size. So even if you forget how many times you clicked '''Zoom In''' or '''Zoom Out''', you can quickly return to normalcy by clicking this button. | ||
*'''Zoom In''' - This makes the text in the report appear larger. You can keep zooming in virtually forever, but you'll probably want to stop after 200 clicks because things start to get weird at that point. | *'''Zoom In''' - This makes the text in the report appear larger. You can keep zooming in virtually forever, but you'll probably want to stop after 200 clicks because things start to get weird at that point. | ||
*'''Page Down''' - If a report has multiple pages, this button enables you to move down through the pages from a higher number to a lower one. | *'''Page Down''' - If a report has multiple pages, this button enables you to move down through the pages from a higher number to a lower one. | ||
*'''Page Up''' - If a report has multiple pages, this button enables you to move up through the pages from a lower number to a higher one. | *'''Page Up''' - If a report has multiple pages, this button enables you to move up through the pages from a lower number to a higher one. | ||
*'''Download | *'''Download XLSX File''' - This enables you to download the report into an XLSX file, which you can open in Excel. | ||
*'''Download PDF''' - This enables you to download a report into a PDF, which you can open with Adobe Acrobat. | *'''Download PDF''' - This enables you to download a report into a PDF, which you can open with Adobe Acrobat. | ||
*'''Print Report''' - This enables you to print a hard copy of a report. | *'''Print Report''' - This enables you to print a hard copy of a report. | ||
*'''E-mail Report''' - This enables you to email a report to as many recipients as you like. It opens a popup where you can add email addresses in the '''To''', '''Cc''', and '''Bcc''' textboxes. Then you can add a subject and message. Click the '''SEND''' button to send the email with the report as a PDF attachment. The sender will be '''Fishbowl <fishbowl@fishbowlonline.com>''', and it may go to recipients' junk mail folder, depending on their | *'''E-mail Report''' - This enables you to email a report to as many recipients as you like. It opens a popup where you can add email addresses in the '''To''', '''Cc''', and '''Bcc''' textboxes. Then you can add a subject and message. Click the '''SEND''' button to send the email with the report as a PDF attachment. The sender will be '''Fishbowl <fishbowl@fishbowlonline.com>''', and it may go to recipients' junk mail folder, depending on their email settings. | ||
* '''Expand''' - This expands the report to the full size of your browser window. When you click this button, it changes to a '''Contract''' button, which you can click to return the report to its previous smaller size. | * '''Expand''' - This expands the report to the full size of your browser window. When you click this button, it changes to a '''Contract''' button, which you can click to return the report to its previous smaller size. | ||
=== Item Price List report === | === Item Price List report === | ||
The '''Item Price List''' report displays information about each sale item and its price. | The [[Item Price List Report|'''Item Price List''' report]] displays information about each sale item and its price. | ||
This report initially has the following column headers: | This report initially has the following column headers: | ||
*'''Sale Item''' - The name of each sale item in the '''Items''' module. | *'''Sale Item''' - The name of each sale item in the '''Items''' module. | ||
*'''Description''' - | *'''Description''' - An explanation of a sale item from the '''Items''' module. | ||
*'''Price''' - The | *'''Price''' - The amount of money charged to customers for each unit of a sale item. | ||
By default, you will see all sale items on the report. But you can narrow down the results to a single item by using the '''Optional''' features on the right of the report. | By default, you will see all sale items on the report. But you can narrow down the results to a single item by using the '''Optional''' features on the right of the report. | ||
| Line 371: | Line 424: | ||
*'''Group By''' - An option that enables you to group the information in this report by the following criterion: | *'''Group By''' - An option that enables you to group the information in this report by the following criterion: | ||
**'''Tags''' - Click this checkbox to organize all sale items under the tag(s) they have attached to them. Sale items that don’t have any tags will be included under the '''No Tag''' header. | **'''Tags''' - Click this checkbox to organize all sale items under the tag(s) they have attached to them. Sale items that don’t have any tags will be included under the '''No Tag''' header. | ||
*'''Tag''' - A dropdown menu to select tags to include on the report. You can select as many tags as you like. Unfortunately, this field doesn’t appear to affect this report right now. But this will likely be fixed in the future. After you click | *'''Tag''' - A dropdown menu to select tags to include on the report. You can select as many tags as you like. Unfortunately, this field doesn’t appear to affect this report right now. But this will likely be fixed in the future. After you click an existing tag, you can create a new tag by entering its name in the textbox and hitting Enter or clicking the '''+ Add''' option. No wizard will pop up. The new tag will simply appear on the list. | ||
*'''Sale Item''' - A dropdown menu to select a sale item from the list of ones you created in the '''Items''' module under the '''Materials''' module group. You can’t create a new sale item from here, nor can you select more than one. | *'''Sale Item''' - A dropdown menu to select a sale item from the list of ones you created in the '''Items''' module under the '''Materials''' module group. You can’t create a new sale item from here, nor can you select more than one. | ||
*'''Show SKU''' - A checkbox that adds a column in between '''Description''' and '''Price'''. This column displays each sale item’s stock-keeping unit number if available. | *'''Show SKU''' - A checkbox that adds a column in between '''Description''' and '''Price'''. This column displays each sale item’s stock-keeping unit number if available. | ||
| Line 382: | Line 435: | ||
Fishbowl Drive has its very own T.P.S Report. This report generates a list of gross sales for the date range specified, ordered from greatest to least. An empty date range will report on gross sales to date. T.P.S normally stands for Total Product Sales, and the lack of a third period is deliberate. Since there are no products in Fishbowl Drive, only items, the report’s name was changed to '''Total Item Sales'''. But we kept the abbreviation the same. | Fishbowl Drive has its very own T.P.S Report. This report generates a list of gross sales for the date range specified, ordered from greatest to least. An empty date range will report on gross sales to date. T.P.S normally stands for Total Product Sales, and the lack of a third period is deliberate. Since there are no products in Fishbowl Drive, only items, the report’s name was changed to '''Total Item Sales'''. But we kept the abbreviation the same. | ||
The '''Total Item Sales''' report includes the following column headers by default: | The [[Total Item Sales Report|'''Total Item Sales''' report]] includes the following column headers by default: | ||
*'''Sale Item''' - The name of a sale item from the '''Items''' module. | *'''Sale Item''' - The name of a sale item from the '''Items''' module. | ||
*'''Description''' - An explanation of what the sale item is from the '''Items''' module. | *'''Description''' - An explanation of what the sale item is from the '''Items''' module. | ||
| Line 405: | Line 458: | ||
== Export, import, custom fields, and change dates == | == Export, import, custom fields, and change dates == | ||
On the top-right of the '''Items''' module, just to the left of the '''ADD NEW''' button, you will see | [[File:Items module - Action bar - More button.png|border]] | ||
On the top-right of the '''Items''' module, just to the left of the '''ADD NEW''' button, you will see a {{Icon Button|More}}. Click it to open a dropdown menu containing the following options: | |||
* Export | * Export | ||
| Line 419: | Line 474: | ||
The Export files mirror the Import ones. Hence, you can download a CSV file from this section, add your own information in it, and reuse it to import that information into your Fishbowl Drive account. | The Export files mirror the Import ones. Hence, you can download a CSV file from this section, add your own information in it, and reuse it to import that information into your Fishbowl Drive account. | ||
* '''Export Items''' - This CSV file includes all of the required, optional, and custom fields for each item in the '''Items''' module. If an item has multiple sale items associated with it, | * '''Export Items''' - This CSV file includes all of the required, optional, and custom fields for each item in the '''Items''' module. If an item has multiple sale items associated with it, each sale item will appear in a separate row of the spreadsheet. | ||
* '''Export Item Locations''' - This CSV file contains all items with physical locations for storing, picking, and receiving them. It will only contain Inventory and Bundle item types. Shipping, Service, Non Inventory, Labor, and Overhead item types won't be in this report. | * '''Export Item Locations''' - This CSV file contains all items with physical locations for storing, picking, and receiving them. It will only contain Inventory and Bundle item types. Shipping, Service, Non Inventory, Labor, and Overhead item types won't be in this report. | ||
* '''Export Reorder Point''' - This CSV file contains each item's reorder point values that users have added. These include consumption rates, quantities, contact information, and preferred contact methods by item and location. | * '''Export Reorder Point''' - This CSV file contains each item's reorder point values that users have added. These include consumption rates, quantities, contact information, and preferred contact methods by item and location. | ||
| Line 426: | Line 481: | ||
=== Import items === | === Import items === | ||
{{Import|Items}} | {{Import|Items}} | ||
** '''Item-Name*''' - Name of | ** '''Item-Name*''' - Name of an item (e.g., B201). | ||
** '''Item-Description''' - Description of | ** '''Item-Description''' - Description of an item (e.g., Premium Brake Cables). | ||
** '''Item- | ** '''Item-Notes''' - This allows you to leave additional details about specific items. | ||
** '''Item-Cost*''' - The amount the company pays for | ** '''Item-AlertNotes''' - Messages that appear when items are added to a sales order. | ||
** '''Item-Upc''' - This allows you to associate the UPC (Universal Product Code) | ** '''Item-Cost*''' - The amount the company pays for each unit of an item (e.g., 17.50). | ||
** '''Item-Sku''' - This allows you to associate the SKU (Stock Keeping Unit) | ** '''Item-Upc''' - This allows you to associate the UPC (Universal Product Code) with an item during the import. | ||
** '''Item-Url''' - This allows you to associate the URL (Uniform Resource Locator) | ** '''Item-Sku''' - This allows you to associate the SKU (Stock Keeping Unit) with an item during the import. | ||
** '''Item-Url''' - This allows you to associate the URL (Uniform Resource Locator) with an item during the import. | |||
** '''Item-ItemType*''' - Inventory, Shipping, Service, Non Inventory, Labor, or Overhead. | ** '''Item-ItemType*''' - Inventory, Shipping, Service, Non Inventory, Labor, or Overhead. | ||
** '''Item-DefaultUomName*''' - The UOM (Unit of Measure) | ** '''Item-DefaultUomName*''' - The UOM (Unit of Measure) assigned to an item (e.g., Each, Pair). | ||
** '''Item- | ** '''Item-PurchaseTaxName''' – Tax rate associated with an item when you purchase it. | ||
** '''Item-Length''' - The length of | ** '''Item-Length''' - The length of an item. You can enter in 0 if you do not need/use this information. | ||
** '''Item-Width''' - The width of | ** '''Item-Width''' - The width of an item. You can enter in 0 if you do not need/use this information. | ||
** '''Item-Height''' - The height of | ** '''Item-Height''' - The height of an item. You can enter in 0 if you do not need/use this information. | ||
** '''Item-DimensionUnit''' - The | ** '''Item-DimensionUnit''' - The UOM assigned to an item’s dimensions (e.g., Inches, Feet). | ||
** '''Item-Weight''' - The weight of | ** '''Item-Weight''' - The weight of an item. You can enter in 0 if you do not need/use this information. | ||
** '''Item-WeightUnit''' - The | ** '''Item-WeightUnit''' - The UOM assigned to an item’s weight (e.g., Ounces, Pounds, Kilograms). | ||
** '''Item-Taxable*''' - If | ** '''Item-Taxable*''' - If an item is taxable (e.g., True or False). | ||
** '''Item-AssetAccountName''' - The Asset account name attached to | ** '''Item-AssetAccountName''' - The Asset account name attached to an item for accounting purposes. | ||
** '''Item-ScrapAccountName''' - The Scrap account name attached to | ** '''Item-ScrapAccountName''' - The Scrap account name attached to an item for accounting purposes. | ||
** '''Item-CostOfGoodsSoldAccountName''' - The Cost of Goods Sold account name attached to | ** '''Item-CostOfGoodsSoldAccountName''' - The Cost of Goods Sold account name attached to an item for accounting purposes. | ||
** '''Item-AdjustmentAccountName''' - The Adjustment account name attached to | ** '''Item-AdjustmentAccountName''' - The Adjustment account name attached to an item for accounting purposes. | ||
** '''Item-DefaultImageLink''' - A link to the default image of | ** '''Item-DefaultImageLink''' - A link to the default image of an item. | ||
** '''Item-AccountingClassName''' - The | ** '''Item-AccountingClassName''' - The Class name attached to an item for accounting purposes. | ||
** '''Item-Tags''' - Tags assigned to | ** '''Item-Tags''' - Tags assigned to an item, separated by commas. | ||
** '''SaleItem-Name*''' - This can be the same name used for Item-Name (e.g., B201). | ** '''SaleItem-Name*''' - This can be the same name used for Item-Name or something different (e.g., B201). | ||
** '''SaleItem-Description''' - This can be the same | ** '''SaleItem-Description''' - This can be the same as what’s used for Item-Description or something different (e.g., Premium Brake Cables). | ||
** '''SaleItem- | ** '''SaleItem-Notes''' - You can include additional item details for your sale items. | ||
** '''SaleItem-Price*''' - The amount the company sells | ** '''SaleItem-AlertNotes''' - A message that appears when a sale item is added to a sales order. | ||
** '''SaleItem-Sku''' - This allows you to associate the SKU | ** '''SaleItem-Price*''' - The amount of money the company sells an item for (e.g., 35). | ||
** '''SaleItem-Url''' - This allows you to associate the URL | ** '''Item-Upc''' - This allows you to associate the UPC with a sale item during the import. | ||
** '''SaleItem-DefaultUomName*''' - The UOM | ** '''SaleItem-Sku''' - This allows you to associate the SKU with a sale item during the import. | ||
** '''SaleItem-SalesTaxName''' - Tax associated with | ** '''SaleItem-Url''' - This allows you to associate the URL with a sale item during the import. | ||
** '''SaleItem-Length''' - The length of | ** '''SaleItem-DefaultUomName*''' - The UOM assigned to a sale item (e.g., Each, Pair). | ||
** '''SaleItem-Width''' - The width of | ** '''SaleItem-SalesTaxName''' - Tax rate associated with a sale item when you sell it. | ||
** '''SaleItem-Height''' - The height of | ** '''SaleItem-Length''' - The length of a sale item. You can enter in 0 if you do not need/use this information. | ||
** '''SaleItem-DimensionUnit''' - The | ** '''SaleItem-Width''' - The width of a sale item. You can enter in 0 if you do not need/use this information. | ||
** '''SaleItem-Weight''' - | ** '''SaleItem-Height''' - The height of a sale item. You can enter in 0 if you do not need/use this information. | ||
** '''SaleItem-WeightUnit''' - The | ** '''SaleItem-DimensionUnit''' - The UOM assigned to a sale item’s dimensions. (e.g., Inches, Feet). | ||
** '''SaleItem-DefaultSalesOrderItemType*''' - This determines if | ** '''SaleItem-Weight''' - The weight of a sale item. You can enter in 0 if you do not need/use this information. | ||
** '''SaleItem-Taxable*''' - If | ** '''SaleItem-WeightUnit''' - The UOM assigned to a sale item’s weight (e.g., Ounces, Pounds, Kilograms). | ||
** '''SaleItem-DefaultFlag*''' - If you have multiple | ** '''SaleItem-DefaultSalesOrderItemType*''' - This determines if a sale item defaults to Sale or Credit Return. | ||
** '''SaleItem-IncomeAccountName''' - The Income account name attached to | ** '''SaleItem-Taxable*''' - If a sale item is taxable (e.g., True or False). | ||
** '''SaleItem-DefaultImageLink''' - A link to the default image of | ** '''SaleItem-DefaultFlag*''' - If you have multiple sale items associated with a general item, you can specify if this is the default sale item (e.g., True or False). | ||
** '''SaleItem-AccountingClassName''' - The | ** '''SaleItem-IncomeAccountName''' - The Income account name attached to a sale item for accounting purposes. | ||
** '''SaleItem-Tags''' - Tags assigned to | ** '''SaleItem-DefaultImageLink''' - A link to the default image of a sale item. | ||
** '''Tracking-Lot Number''' - If | ** '''SaleItem-AccountingClassName''' - The Class name attached to a sale item for accounting purposes. | ||
** '''Tracking-Expiration Date''' - If | ** '''SaleItem-Tags''' - Tags assigned to a sale item, separated by commas. | ||
** '''TrackingSerial-Serial Number''' - If | ** '''Tracking-Lot Number''' - If an item has lot number tracking enabled (e.g., True or False). | ||
** '''Tracking-Expiration Date''' - If an item has expiration date tracking enabled (e.g., True or False). | |||
** '''TrackingSerial-Serial Number''' - If an item has serial number tracking enabled (e.g., True or False). | |||
The options under this header allow you to import items and their associated data into Fishbowl Drive. When you click Import, you will see a question-mark icon at the top of the dropdown menu. You can click it to go to the Import items section of this same article. It will walk you through the steps to create a properly formatted CSV file. Or you can simply click Export and select one of the four options that appear to generate a template for you to populate with your own information. | If you have custom tracking and/or custom fields, they will appear in columns after the ones on this list. You can also fill those fields if you like. | ||
The options under this header allow you to import items and their associated data into Fishbowl Drive. When you click '''Import''', you will see a question-mark icon at the top of the dropdown menu. You can click it to go to the '''Import items''' section of this same article. It will walk you through the steps to create a properly formatted CSV file. Or you can simply click '''Export''' and select one of the four options that appear to generate a template for you to populate with your own information. | |||
If the import of at least one item fails, you will receive an error message. Then you can go to the '''Downloads''' page and download a CSV file containing the item(s) that failed to be imported. In the first column of the spreadsheet, it will tell you where the error occurred. That way, you can fix it and try to import it again. | If the import of at least one item fails, you will receive an error message. Then you can go to the '''Downloads''' page and download a CSV file containing the item(s) that failed to be imported. In the first column of the spreadsheet, it will tell you where the error occurred. That way, you can fix it and try to import it again. | ||
| Line 481: | Line 541: | ||
All of your imported and exported files will be listed by date in the History column on the right of the '''Downloads''' page. You can download your exported files from the column on the left marked '''Downloads'''. Imports that are successful will be marked as Completed in the History column, and they won't be able to be downloaded. But imports that fail (in full or in part) will be marked as Failed, and they can be downloaded. | All of your imported and exported files will be listed by date in the History column on the right of the '''Downloads''' page. You can download your exported files from the column on the left marked '''Downloads'''. Imports that are successful will be marked as Completed in the History column, and they won't be able to be downloaded. But imports that fail (in full or in part) will be marked as Failed, and they can be downloaded. | ||
* '''Import Items''' - This allows you to import items via CSV file. You can use this function to fill | * '''Import Items''' - This allows you to import items via CSV file. You can use this function to fill every field in the [[Items#Optional item details|'''General''' tab]]. The same is also true of the [[Items#Sale Items tab|'''Sale Items''' tab]]. If you run into errors attempting to add information, you can attempt to fix them in the spreadsheet, or you can add what information you can and then go in manually and add any missing information once your items are in Fishbowl Drive. | ||
* '''Import Item Locations''' - This enables you to import item locations via CSV file. You can add picking and receiving locations to all items, even ones that aren't marked as Inventory or Bundle item types. However, Shipping, Service, Non Inventory, Labor, and Overhead item types still won't show up if you try to export them, although that information will be associated with them under the '''Locations''' tab of each item. | * '''Import Item Locations''' - This enables you to import item locations via CSV file. You can add picking and receiving locations to all items, even ones that aren't marked as Inventory or Bundle item types. However, Shipping, Service, Non Inventory, Labor, and Overhead item types still won't show up if you try to export them, although that information will be associated with them under the [[Items#Locations tab|'''Locations''' tab]] of each item. | ||
* '''Import Reorder Point''' - This lets you import items' reorder points via CSV file. You can include minimum and maximum levels, daily consumption rates, alert levels, contact information, and how to send alert messages. | * '''Import Reorder Point''' - This lets you import items' reorder points via CSV file. You can include minimum and maximum levels, daily consumption rates, alert levels, contact information, and how to send alert messages. | ||
* '''Import Vendor Items''' - This gives you the ability to import vendor items via CSV file. You can add vendor names, costs, UOMs, lead times (in days), minimum quantities, and default statuses for all items in the system. And you're not limited to just one vendor per item. Add as many as you like as long as you designate which one is the default. | * '''Import Vendor Items''' - This gives you the ability to import vendor items via CSV file. You can add vendor names, costs, UOMs, lead times (in days), minimum quantities, and default statuses for all items in the system. And you're not limited to just one vendor per item. Add as many as you like as long as you designate which one is the default. | ||
=== Custom fields === | === Custom fields === | ||
Clicking this option will bring up a wizard that allows you to add, edit, and delete custom fields on the '''General''' tab of your items. The list will be blank at first, of course. | Clicking this option will bring up a wizard that allows you to add, edit, and delete custom fields on the [[Items#Optional item details|'''General''' tab]] of your items. The list will be blank at first, of course. | ||
[[File:Items module - Add custom field.png|border|800x800px]] | |||
To add a new custom field, click '''ADD FIELD''' on the top-right. Then enter a name and type for it. Your type options are: | To add a new custom field, click '''ADD FIELD''' on the top-right. Then enter a name and type for it. Your type options are: | ||
| Line 499: | Line 561: | ||
* '''URL''' - A textbox that lets you add a website in relation to an item. | * '''URL''' - A textbox that lets you add a website in relation to an item. | ||
When creating or editing a custom field, | When creating or editing a custom field, click the '''Required''' checkbox to make it a required field. Otherwise, it will be optional. Then click '''ADD''' to save it, or click '''CANCEL''' or the '''X''' on the top-right to get rid of it. If you're editing an existing custom field, clicking '''CANCEL''' or the '''X''' won't delete it but will simply return it to its original state. You can also click the '''Required''' toggle switch next to a custom field in the main wizard to turn that function on or off. | ||
To delete a custom field, click the | To delete a custom field, click the {{Icon Button|More}} to the right of it in the '''Custom Fields''' wizard. Then select '''Delete''' from the dropdown menu. You can also select '''Edit''' or '''Duplicate''' from that menu. | ||
To change the order of custom fields, click '''ORDER FIELDS''' to the left of '''ADD FIELD'''. Then select one of the custom fields and click the up or down arrow on the right to move it. You can do this to each custom field until they're all in the order you want them to be in. | To change the order of custom fields, click '''ORDER FIELDS''' to the left of '''ADD FIELD'''. Then select one of the custom fields and click the up or down arrow on the right to move it. You can do this to each custom field until they're all in the order you want them to be in. | ||
| Line 510: | Line 572: | ||
At the top of the '''Items''' module, you will see the following column headers: | At the top of the '''Items''' module, you will see the following column headers: | ||
* | * Name | ||
* | * Barcode / UPC | ||
* | * SKU | ||
* | * Type | ||
* | * Quantity | ||
* | * Sale Item | ||
* | * Date Created | ||
* | * Price | ||
* | * Cost | ||
You can click any of them, except Quantity, to reorganize the rows under them. However, they are not all set in stone. For example, if you click '''Change Dates''', you will find you have two options for the '''Date''' column: | You can click any of them, except Quantity, to reorganize the rows under them. However, they are not all set in stone. For example, if you click '''Change Dates''', you will find you have two options for the '''Date''' column: | ||
| Line 526: | Line 588: | ||
You can pick whichever one will best help you organize the items in the '''Items''' module. | You can pick whichever one will best help you organize the items in the '''Items''' module. | ||
=== Import item locations === | === Import item locations === | ||
{{Import|Item Locations}} | {{Import|Item Locations}} | ||
** '''ItemLocation-ItemName*''' - The name of the item | ** '''ItemLocation-ItemName*''' - The name of the item that a location is being set for. | ||
** '''Location-ParentName*''' - The Parent location of where | ** '''Location-ParentName*''' - The Parent location of where an item is found. | ||
** '''Location-PickFrom''' - The location where | ** '''Location-PickFrom''' - The location where an item is picked. | ||
** '''Location-Receive''' - The location where | ** '''Location-Receive''' - The location where an item is received into a warehouse. | ||
** '''Location-PickTo''' - The location where | ** '''Location-PickTo''' - The location where an item is placed after picking it. | ||
=== Import vendor items === | === Import vendor items === | ||
| Line 544: | Line 602: | ||
** '''VendorItem-ItemName*''' - The name of an item in Fishbowl Drive. | ** '''VendorItem-ItemName*''' - The name of an item in Fishbowl Drive. | ||
** '''VendorItem-VendorItemName''' - The name of a vendor item, which can be different than what the item is called in Fishbowl Drive. | ** '''VendorItem-VendorItemName''' - The name of a vendor item, which can be different than what the item is called in Fishbowl Drive. | ||
** '''VendorItem-VendorName*''' - The name of the vendor assigned to | ** '''VendorItem-VendorName*''' - The name of the vendor assigned to a vendor item. | ||
** '''VendorItem-Cost*''' - The amount of money it costs to obtain a single unit of | ** '''VendorItem-Cost*''' - The amount of money it costs to obtain a single unit of a vendor item. | ||
** '''VendorItem-UomName*''' - The unit of measure assigned to | ** '''VendorItem-UomName*''' - The unit of measure assigned to a vendor item. | ||
** '''VendorItem-LeadTime''' - The amount of time (in days) it takes to obtain more vendor items after issuing a purchase order. | ** '''VendorItem-LeadTime''' - The amount of time (in days) it takes to obtain more vendor items after issuing a purchase order. | ||
** '''VendorItem-MinQuantity''' - The lowest quantity the vendor requires to be put in a purchase order before they will accept it. | ** '''VendorItem-MinQuantity''' - The lowest quantity of an item's units the vendor requires to be put in a purchase order before they will accept it. | ||
** '''VendorItem-Default*''' - True/False if | ** '''VendorItem-Default*''' - True/False if it is the default vendor item. | ||
Latest revision as of 11:52, 12 March 2025

- The Items module stores the parts and products that you purchase, manufacture, and sell.
- To create a new item, click the
 New button. Each existing item is displayed in the search area on the left.
- The following tabs are available for each item: General, Sale Items, Substitute Items, Reorder Points, Tracking, Locations, Vendor Items, and Documents.
- To sell an item, add the product details to the Sale Items tab.
- For a step-by-step tutorial on creating items, click the video below.

Create a new item
Follow these steps to create a new item. You will need to fill out four required fields before you will be able to save it.
- Click the ADD NEW button on the top-right. Or click an item, and then click the plus sign that appears above it in the Items section on the left.
- Add a name between 1 and 255 characters in length.
- Select a UOM, or unit of measure. The default UOM will already be selected, but you can change it to any other you've created if you wish. Any conversions that apply to the UOM you choose will automatically appear on the left side of the interface. You can make adjustments to them or reset them to their original values.
- Add the average cost, also known as the Average Cost of Goods Sold. This is the amount of money it costs you to obtain a single unit of this item, not the price you will charge customers for it. It is in U.S. dollars and cents. You can change that price under the Sale Items tab. If you use a different UOM than Each, which means one item, be sure to adjust the average cost to match that change in quantity. The average cost starts at $0.00.
- Select a type. This can be Inventory, Shipping, Service, Non Inventory, Bundle, Labor, or Overhead. The type you choose for the item will change many things, including tabs and certain fields, such as dimensions. The item's type can't be changed after you save the item, so make sure it's exactly what you want it to be before clicking SAVE or SAVE AND CLOSE.
- Inventory is a physical object
- Shipping is a charge for a carrier service
- Service is a job like plumbing or IT work
- Non Inventory can be software or some other intangible asset
- Bundle is a combination of at least two items
- Labor is the cost of an employee's time to perform a task
- Overhead is a fixed cost or utility like rent, electricity, etc.
- Click the SAVE or SAVE AND CLOSE button on the top-right.
Optional item details

In addition to the above required fields, there are many other optional parameters you can add to an item. These can be added or changed at any time when, or after, you create an item.
- Image - One or more images of the item. Click the MANAGE IMAGES button and then BROWSE to select at least one image and click Open. You can also drag and drop images or click the square on the right to add images over there. Select one image to be the default one users will see, and then click the ADD button to close the dialog.
- Description - A detailed explanation of the item, up to 4,000 characters.
- Barcode / UPC - An identifying code to help you bring up detailed information about the item on a mobile device. It can be up to 255 characters in length.
- SKU - The stock-keeping unit for an item to help you track it and differentiate it from other items. It can be up to 255 characters in length.
- Dimensions - The length, width, and height of an item. Obviously, this only applies to physical items. These will only be visible if the item type you selected is Inventory, Non Inventory, or Bundle. You can use any of the following UOMs to measure an item's dimensions: inches, feet, yards, millimeters, centimeters, or meters. Inches is the default UOM.
- Weight - The overall mass of an item. It can be measured in pounds, ounces, tons, kilograms, or grams. Pounds is the default UOM.
- Purchase Tax - A dropdown menu to select a tax from the Tax Rates module. You can also create a new tax by entering text into this field and clicking the + Add option. Fill out the New Tax Rate wizard, and click the blue SAVE button on the bottom-right of the popup.
- Taxable - A checkbox you can click to indicate if an item is taxable or not. Its default status is to be unchecked. So make sure to check it if you need to pay a purchase tax on the item.
- Custom Fields - If you have created a custom field, it will appear here. Up to three custom fields will appear automatically. If you have more than that, you can click the SHOW MORE button to display all of them. The order they appear in will depend on what you set in the Custom Fields wizard of the Items module. To hide the extra custom fields, click HIDE FIELDS, and then only the first three will be visible again.
- Alert Notes - An important warning employees should know about an item when ordering, selling, or handling it. Alert notes can be up to 255 characters in length.
- Notes - A general message to record about an item. There is no character limit.
- Tags - Markers that allow you to categorize items. For example, some items can be tagged as related to Plastic, Metal, or both. You can select from existing tags or click the MANAGE button to create a new tag. Add as many as you like.
- COGS Account - This tells the accounting software you integrate with which account to record the item under when you make a sale. You can find the full list of accounts in the Chart of Accounts module. Your options are:
- Use Default Account
- Cost of Goods Sold - Cost of Goods Sold
- Inventory Adjustment - Cost of Goods Sold
- Expense Account - This tells the accounting software you integrate with which account to record the item under when you need to expense it. You can find the full list of accounts in the Chart of Accounts module. Your options are:
- Use Default Account
- Non-Inventory - Expense
- Service - Expense
- Discount Expense - Expense
- Miscellaneous Expense - Expense
- Shipping Expense - Expense
- Scrap Inventory - Expense
- Accounting Class - A means of categorizing transactions in both Fishbowl Drive and your accounting solution. You can select a class to categorize an item's sale or purchase by its location, size, use, or a variety of other criteria. You can only select one from the list you've created in the Classes module.
You will need to click the SAVE or SAVE AND CLOSE button to apply these changes.
Conversions

Fishbowl Drive is unique from Fishbowl Advanced in that it allows users to modify UOM conversions on a per-item basis.
UOM conversion can only be created in the UOMs module. However, once a conversion is created there and the UOM it is attached to is selected for an item in the Items module, the conversion can be modified in the Conversions section on the bottom-left of the General tab. Any modification you make to the UOM conversion won’t affect the conversion in the UOMs module or in any other item.
Thus, you can have hundreds of items with the same UOM, and each one can have a different conversion value into other UOMs. This customizability enables you to make all kinds of changes without worrying about changing another item or conversion.
As soon as you change the value of a conversion, a Reset icon will appear to the right its textbox. If you want to revert a conversion back to its original value, click the Reset icon.
Tab options by item type
The other tabs available, besides the General tab, will change depending on the type you select for an item. For a list of item types, see #5 of the required fields in the Create a new item section above. The following are the tabs contained in each type of item:
Inventory
Shipping
Service
Non Inventory
Bundle
Labor
Overhead
Bundles
- A bundle is a group of multiple items that can be sold together.
- To create a new bundle, change the item type to Bundle and add items to the Bundle Items tab.

- For a step-by-step tutorial on creating bundles, click the video to the right.
The Bundle item type is the only one that has a Bundle Items tab. You will need to add at least two sale items to be able to create a bundle. That can be two of the same sale item or two different sale items. Thus, you can only create a bundle after you've created other types of items.
To create a bundle, start by clicking the ADD NEW button on the top-right of the Bundle Items tab. A popup window will open, enabling you to add a bundle item. It will ask for the following information. Required fields are marked with an asterisk.
- Sale Item* - A dropdown menu of all of your sale items. Note that these may be different than the names of the items because these are sale items.
- Quantity* - A textbox that enables you to add one or more of a certain sale item to the bundle. The UOM can't be changed from here. It can only be changed by clicking the sale item in the Items module.
- Discount - A textbox that lets you choose to apply a percent or dollar discount to the bundle item. This will affect the total price.
- Price - The amount of money you are charging for each bundle, according to its UOM. This can only be changed by clicking the sale item in the Items module.
- Total - The sum of the price multiplied by the quantity, minus any discount. It changes automatically when you update one of those three numbers.
The RESET button acts as an undo button on the Discount textbox. For example, if you add a 1% discount and then click RESET, it will erase that 1% discount and return to the full price in the total. But if you add a 1% discount, click DONE, and then go back in and change the 1% discount to $1 and click RESET, it will go back to the 1% discount. It won't get rid of the discount but will return it to the state it was in when you opened the window. To delete the discount, you'll have to return the number to 0 in the Discount textbox.
Sale Items tab

When you first save an item with an Inventory, Shipping, Service, or Non Inventory type, a message will pop up asking if you want to create a default sale item for it. If you click YES, you will find the new sale item under the Sale Items tab. If you click NO, you won't have an opportunity to automatically generate a sale item again. You'll have to do it manually if you want one in the future.
If you click YES, the information in the Sale Items tab will reflect many of the things you initially added to the General tab of the new item. It will rarely include information added after the first save of the item. The UOM is a notable exception. That field's options change based on each edit you make to the UOM in the General tab. Plus, there are a variety of fields that aren't populated with information from the General tab. We will go through them below.
Fields populated with data from the General tab

The following fields include information that the Sale Items tab automatically brings over from the General tab. Keep in mind that it only has the information you initially added when you created the item. Any additional images or text you add after you first save the item won't be included here. The required fields are marked with an asterisk.
- Image - All of the images you added in the General tab will be found here when you click the MANAGE IMAGES button. And the default one you chose before will also be selected as the default in the Sale Items tab. You can choose a different default image here, and it won't affect the one in the General tab. In fact, you can even delete images here, and they'll still be in the General tab.
- Name* - This name can be changed to something different for selling purposes without affecting the name in the General tab.
- Description - This description will be what customers read, so you may want to change it from the internal description in the General tab.
- SKU - You'll probably want to leave the stock-keeping unit the same as the one in the General tab. But you can change it here if you like.
- Barcode / UPC - An identifying code for a sale item.
- UOM* - The unit of measure you can select here depends on the one you already selected in the General tab. If you change that one, it will affect the UOM options in the Sale Items tab. For example, if you selected Each, which has conversions to Inches, Pairs, and Dozens, you will be able to select one of those from a dropdown menu. But any UOMs it doesn't have conversions to won't be listed here.
- Taxable - A checkbox you can click to indicate if an item is taxable or not. Check it if you need to charge a sales tax or service tax for the item.
- Dimensions and Weight* - This will show the same dimensions, weight, and UOMs that you entered in the General tab. However, the dimensions are in a different order. Instead of length, width, and height, they are in this order: width, height, and length. Also, if you delete the Dimension UOM and click DONE without selecting a new one, it will default to Inches. If you do that with the Weight UOM, it will default to Pounds.
- Alert Notes - An important warning employees should know about a sale item when selling it. Alert notes can be up to 255 characters in length.
- Notes - This has all of the text you initially typed into the Notes field from the General tab.
- Tags - These tags can be the same or different than the ones in the General tab.
Field not populated with data from the General tab
This field is found in both the General and Sale Items tabs, but it doesn't carry over the information contained in it from one to the other. It is optional, not a required field.
- Accounting Class - Because sale items are treated differently than order items, they may not necessarily have the same accounting class. In any case, you can select the same class as the one you selected in the General tab or a different one in this field.
New fields to fill in the Sale Items tab
These Sale Items fields are not found in the General tab, so they will be wholly new and distinct. The required fields are marked with an asterisk.
- URL - If you have an e-commerce store or some other website where you keep information on an item, you can link to it here.
- Price* - At first, this will be the same amount as the cost in the General tab. However, price is different than cost. Price is the amount of money (in U.S. dollars and cents) you will charge customers for an item, while cost is the amount of money you spend to obtain that same item. Thus, the price should always exceed the cost, except for in extraordinary circumstances like a closeout sale.
- Sales tax - This enables you to select a tax rate (from the Tax Rates module) that applies to an item. It has no default, so you can leave it blank if you like.
- Default Type* - There are three transaction types you can choose from. You can only choose one. If you delete the Default Type, click DONE, and then save the item, this field will default to Sale. Here are the three types:
- Sale
- Credit Return
- Drop Ship
- Default - A checkbox that marks a particular sale item as the default one you'll use when selling that item.
- Income Account - Since a sale is, by definition, income, it differs from the ordering process because that only accounts for expenses and assets. That is why, under the Sale Items tab, you have the option to link to an income account in your accounting software. That way, it automatically adds income to the appropriate account when you make a sale. Your options are:
- Use Default Account
- Sales Retail - Income
- Discount Income - Income
- Shipping Income - Income
When you are done, click SAVE. If you don't want to save your changes, click CANCEL or the X on the top-right.
Multiple sale items

You can create multiple sale items for the same item under the Sale Items tab. There are a number of reasons why you might want to do this. For example, you could create one for regular sales, a second for credit returns, and a third for drop shipping. Or you could create ones with different prices for different categories of customers. Perhaps you have multiple e-commerce profiles, and you need to add more than one URL.
When you create a new sale item, you will find that only the Description field will be populated with the description from the General tab. Other than that, everything will be blank. Unfortunately, there is no way to duplicate a sale item from the Sale Items tab. So you'll have to fill all of the required fields once more, as well as any of the optional fields that you wish to fill. The Default Type will be Sale, and the Income Account will be set as Use Default Account.
In order to change which sale item is the default one, click the Default checkbox in it, and it will automatically switch it to the primary position among your sale items once you click DONE. Or you can click the  More button to the right of a sale item in the Sale Items list and select Set as Default before saving your work. Additionally, you have the option to delete a sale item from that dropdown menu.
All of the images from the General tab will be included as options to pick. But you'll have to click MANAGE IMAGES and then select one and click ADD in order to have one show up once you click DONE.
Be sure to click SAVE or SAVE AND CLOSE in order to keep the sale item(s) you've created.
Substitute Items tab

If the item you have clicked is an Inventory type, you will see a Substitute Items tab in the Items module. Click it, and it will open the Substitute Items section. It's easy to add substitute items. Simply click the ADD NEW button, and a popup window will appear. Select an item from the dropdown menu. Then click the ADD button to add the item to the list.
On the list, you will see each substitute item's name, UOM, dimensions, and price. You can't edit those from here. To update them, you'll need to click the item in the Items module.
You can add as many substitute items as you like. To delete an item, click its checkbox on the left, and then click the DELETE button. To delete all items, click the checkbox in the header to select all, and then click the DELETE button. Or you can click the More button on the right of an item and select DELETE ITEM. Be sure to click SAVE or SAVE AND CLOSE to save your changes.

Substitute items can be used in the Sales Orders module when the item you added them to has a zero quantity. When you add this item to a sales order, a message will pop up (as shown above) giving you the option to use the substitute items you have previously assigned to it in this tab. If the item has one or more units in stock, that message will not pop up when you add it to a sales order, even if the quantity on the sales order is greater than the quantity of the item you have in stock.
Reorder Points
- Click the Reorder Points tab in the Items module to set the reorder points for each location and/or company wide.
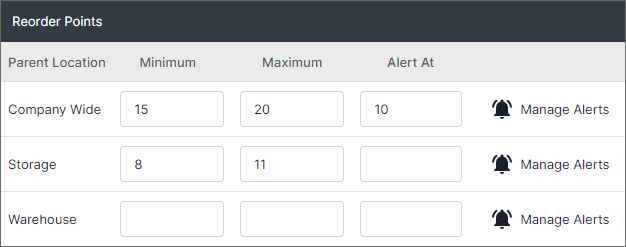
- To receive stock alerts via email (SMS coming soon), click Manage Alerts.
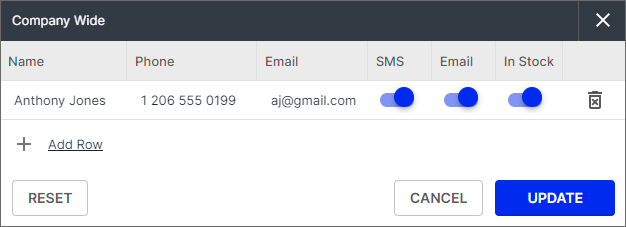
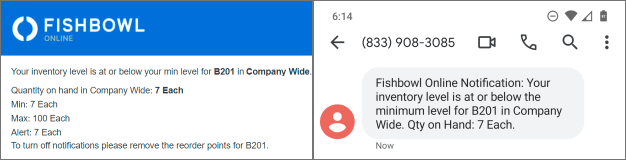
- To import reorder points from a spreadsheet or CSV file, click the
 More button at the top of the item list and choose Import Reorder Points.
- To create a template file with the correct column headers, click Export Reorder Points.
- The suggested order of CSV imports for new databases can be found here.
- For a step-by-step tutorial on working with CSV files, check out the CSV video here.
- Below is a list of the CSV columns. All column headers are required. Columns with an asterisk must contain data.
- ReorderPoint-ID - The identifying number of an item.
- ReorderPoint-ItemName* - The name of an item.
- ReorderPoint-ParentLocationName* - The Parent location that the reorder point for an item will apply to.
- ReorderPoint-DailyConsumptionRate - The average number of units of an item that are sold or otherwise removed from inventory each day.
- ReorderPoint-Minimum - The lowest number of units of an item that can be in stock. The number of units shouldn’t fall below this number while you wait for a restock.
- ReorderPoint-Maximum - The highest number of units of an item that can be in stock. The reorder amount shouldn’t put the total quantity over this number.
- ReorderPoint-AlertAt - The quantity of units of an item that will trigger a message informing the responsible party or parties that they need to purchase more units.
- ReorderAlert-ContactName* - The name of the contact who will be alerted. Only applies if adding alert.
- ReorderAlert-Phone - The phone number that the person will be contacted at.
- ReorderAlert-Email - The email address that the person will be contacted at.
- ReorderAlert-ReceiveSmsNotifications - True/False if Fishbowl Drive will send text messages when an item reaches its reorder point.
- ReorderAlert-ReceiveEmailNotifications - True/False if Fishbowl Drive will send emails when an item reaches its reorder point.
- ReorderAlert-ReceiveInStockNotifications -True/False if Fishbowl Drive will send notifications when an item's shipment is received into inventory.


Reorder points on items allow you to automate the reordering process. Instead of you having to manually look at each item's quantity to spot low quantities, the system alerts you via text and/or email when an item reaches its minimum quantity.
To add a reorder point, click the Reorder Points tab of an item, and then click the ADD NEW button on the top-right. A wizard will pop up, asking you to enter the following information:
- Parent Location - The location that the reorder point will apply at. There will be at least two options: your Primary Warehouse and Company Wide. The former is where you store inventory and otherwise do business. The latter applies to every location in the system. Whether you have one warehouse or 100 warehouses, they will all fit under the Company Wide category.
- Daily Consumption Rate - The average number of items you sell, use, or otherwise consume in a day. You can manually add a number to the textbox, or you can click the calendar icon on the right of the textbox and select a date range to calculate the rate from. That will analyze your sales data and overall usage data over the period of time you select, and it will automatically generate the Daily Consumption Rate for the item.
- Minimum - The lowest quantity you are willing to have in stock of an item. You probably don't want this number to reach zero. You can calculate this by taking the Alert At quantity and subtracting the Daily Consumption Rate multiplied by the number of days it takes to receive a new shipment from the vendor for that item, also known as lead time.
- Maximum - The highest quantity you are willing to have at a location. This includes the Minimum quantity above and the reordered quantity. It will help with automatically adding the right quantity to a purchase order when the time comes to reorder.
- Alert At - The quantity of an item in stock at which point users will receive an alert message of the need to reorder. This quantity depends on the item's lead time. You'll want to keep enough on hand to avoid a stockout as you wait for a vendor to send a fresh shipment.
- Manage Alerts - A bell icon that, once clicked, enables you to choose who and how to receive alerts when an item reaches its reorder point. Be sure to fill out the rest of the information listed above for the reorder point before attempting to add this contact information. If you try to do this part on an empty reorder point, it won't save the contact information you enter. You can add the following information in this popup:
- Name - A required field that identifies the person or department being contacted. They don't have to be a Fishbowl Drive user. If you don't add a name, you will receive an error message when you try to save.
- Phone - The phone number of the individual or department. It should have the area code and number, and you can use dashes or just digits, e.g., XXX-XXX-XXXX or XXXXXXXXXX.
- Email - The email address of the individual or department. Neither this nor the Phone is required. You can leave them blank, and it will still save the Name in the row. Then you can come back later and add or revise their contact information if you like.
- Email - A toggle switch that, when flipped on, allows the person or department to receive an email when the item reaches its Alert At quantity.
- In Stock - A toggle switch that, when flipped on, allows the person or department to receive a text and/or email when an item they were alerted to reorder gets received at the appropriate location.
Click the plus sign or Add Row button to create additional recipients of texts or emails. You can add a virtually unlimited number of rows. To delete a row, click the trashcan icon with an X in it on the right. If you want to erase every row, click RESET on the bottom-left.
Once you're done adding recipients, click ADD or UPDATE on the bottom-right. Then click SAVE or SAVE AND CLOSE. If you don't want to save your changes, click CANCEL or the X before closing the popup.
Tracking tab

To add a tracking type to an Inventory item, first click the Tracking tab. Second, click the toggle switch next to the tracking type. Third, enter the appropriate information into the now-active textbox. There are three tracking types you can add to an item.
- Lot Number - Fill in the textbox to assign the item to a specific batch. The number you enter will be assigned to the first items. Each subsequent batch of items you receive will get a unique lot number to differentiate them from all that came before and will come after.
- Expiration Date - Fill in the textbox to assign a shelf life (in days) to the item.
- Serial Number - Fill in the textbox to assign a unique number to the item to differentiate it from all other items in your inventory. You can only use serial number tracking if the item has Each as its UOM. If you try to use this with any other UOM, you will receive an error message when you try to save.
Be sure to click SAVE or SAVE AND CLOSE once you are finished making changes in this tab.
To create additional tracking criteria that you can use in this tab, go to the Settings module and scroll down to the Tracking section.
Locations tab

To add locations to an item, click the Locations tab of that item. Then click the ADD NEW button on the top-right. The Add Locations Item wizard will appear with four dropdown menus. There is only one required field, which is marked with an asterisk.
- Parent Location* - The primary location that child locations are housed under.
- Pick Origin Location - The area within the Parent Location where you store this item and will go to in order to pick it for a sales order.
- Receive Location - The area within the Parent Location where you receive the item, such as a loading bay or receiving area.
- Pick Destination Location - The area within the Parent Location where you move the item to once you pick it to prepare it for shipping.
You have to select the Parent Location first before you can choose the other three locations. That's because the Pick Origin, Receive, and Pick Destination locations change depending on the Parent Location. For example, if you select Parent Location 1 and then select three sublocations within it for the other three options, and then you select Parent Location 2, all of the other locations you selected will reset. You'll have to select new ones because the previous ones were all related to Parent Location 1, and they don't apply to Parent Location 2.
In order to save a location, you'll need to select a Parent Location and at least one of the other three options. If you try to only add a Parent Location without a Pick Origin, Receive, or Pick Destination location, you will receive an error message. Once you make two or more selections, you can click the ADD button. Be sure to click SAVE or SAVE AND CLOSE to keep your changes to the item.
You can only use each Parent Location you have once per item. If you try to use the same Parent Location a second time with different Pick Origin, Receive, and Pick Destination locations, you will receive an error message, and you won't be able to save it.
To edit a location, click anywhere along its line. The Edit Locations Item wizard will appear. You won't be able to change the Parent Location, but you can select a new Pick Origin, Receive, and Pick Destination location. Then click the EDIT button to make the change.
To delete a location, you have two options. Click the checkbox on the left of its line and click DELETE, or click the More button on the right of its line and select Delete location.
Vendor Items tab

Every item type except for Bundle has a Vendor Items tab. Adding a vendor item enables you to reorder an item when its quantity gets low.
To add a vendor item, click the Vendor Items tab, and then click the ADD button on the top-right. The Add Vendor Item wizard will appear with the following fields for you to fill out. Required fields are marked with an asterisk.
- Vendor* - A dropdown menu of all the vendors you currently have in the system. You can select just one.
- Vendor Item Name* - A textbox containing the name of the item. You can change it to something else if the vendor refers to it by a different name than you do.
- Cost* - A textbox for you to enter the amount of money (in U.S. dollars and cents) the vendor charges for each unit of the item.
- UOM* - A dropdown menu containing all of the units of measure you have available for the item. By default, it will contain the UOM you previously selected for the item in the General tab. But you can change it to any UOM you like.
- Lead Time - A textbox for you to enter the number of days it takes to receive new units from the vendor after you place an order with them.
- Minimum Quantity - A textbox for you to enter the lowest number of units of the item that the vendor will allow you to order from them in a single transaction.
- Default - A checkbox you can click if you want to make a certain vendor the default one you will order the item from. If this is the first vendor you're adding, you will need to check the box. For each additional vendor item you add, you can either check the box to make it the default vendor item or you can leave it unchecked, and it will not be the default.
Click the blue ADD button, and you'll see the vendor item show up on the list. To make this change permanent, be sure to click SAVE or SAVE AND CLOSE.
Once you add a vendor item, you will notice that in the Vendor Items tab there are columns for all of the fields you saw in the wizard above (Cost and UOM are combined), plus one more. The additional one is Last Date. It is the month, day, and year (MM/DD/YYYY) that you most recently made a change to the vendor item. At first it will be blank. But once you click the SAVE button, it will automatically be populated with the current date.
You can't add an item containing the same Vendor and Vendor Item Name as a previous entry you've made. If you try, you will be able to add it to the list, but when you attempt to save it, you will receive an error message. You can't save duplicate items from the same vendor, even if they have different costs, UOMs, lead times, and minimum quantities. However, you can have multiple vendor items from the same vendor, as long as they have different names. Inversely, you can have multiple vendor items with the same name, as long as they are from different vendors.
To edit an item, click its line and update any or all of the fields in the wizard that appears. Then click the blue UPDATE button.
To delete a vendor item, click the checkbox on the left of it, and then click the DELETE button that appears in the action bar of the tab.
Documents tab

To add files to an item, click the Documents tab, and then click the UPLOAD button on the top-right. The Upload Documents wizard will appear. You can either drag and drop files into the window, or you can click the BROWSE button on the bottom-left to select files to add and then click the ADD button.

Given the name of this tab, everything seems to be pointing toward only being able to add Word files. But the fact is that you can add virtually any file type in here, not just documents. In addition to DOC and DOCX files, you'll find that JPG, GIF, PDF, XLSX, PPTX, and many other file types are permissible.
Once you add a file, you won't be able to edit it. All you can do is download a copy of it. If you want to edit a file, you'll need to download it, edit it, and upload the revised version.
To delete a file, click the trashcan icon with an X in it to the right of the file, and then click DELETE in the popup window.
Once you've made a change, whether adding or deleting a file, be sure to click SAVE or SAVE AND CLOSE to preserve your work.
How to return to the main Items page

When you're done working on an item, there are three ways you can return to the main Items page, which lists all of your items:
- Click the X on the top-right of the window. Not the one that closes the browser, of course, but the one at the top of the item window. This won't delete the item, but it will simply close it and return you to the main Items page. If you have any unsaved changes, you will receive a prompt asking if you want to save before leaving.
- Click the SAVE AND CLOSE button. This will save your changes and return you to the main Items page.
- Click the Items module button in the side nav on the left side of the browser. If you have any unsaved changes, you will receive a prompt asking if you want to save before leaving.
How to go to an item in the Inventory module
Let's say you're working on an item in the Items module, and you want to go check its quantities in stock in the Inventory module. You might think you have to go to the Inventory module and search for it. However, there's a much quicker way.

In the Items module, you'll see a Flow bar on the top-left of the window that says Items and Inventory. If the item you've clicked is an Inventory type, both Items and Inventory will light up, indicating that you can click them. Clicking Inventory will take you directly to that item's entry in the Inventory module. If you have any unsaved changes, you will receive a prompt asking if you want to save before leaving.
You can return to the item's entry in the Items module via the same method. Simply click Items in that tool, and it will return you to where you were.
One thing to keep in mind is that when you return to the Items module, you will technically be in a search. So if you close the item, you will only see that item listed on the main Items module page. To get out of the search and list all of your items, click the Show All button on the top-left under the Search bar.
How to duplicate and delete items

To duplicate or delete an item, go to the Items module and click the More button to the right of the item. A dropdown menu will appear, giving you two options:
- Duplicate Item
- Delete Item

In addition, you can click the item and click the More button that is on the top-right of the interface just to the left of the X. That dropdown will have those same two options, as well as the ability to generate the following three reports:
Clicking Duplicate Item will generate an identical copy of the item with “Copy” in parentheses after the names in the General tab and Sale Items tab. Clicking Delete Item will delete the item and all associated sale items.
More button
When you click an item, you will see an action bar above the tabs. On the right side of the action bar, there is a More button. Click it to see a Show Report dropdown menu. When you click that, the following three reports will be listed:
- Inventory On Hand
- Item Price List
- Total Item Sales
We will explain how each of these reports works below.
Inventory On Hand report
The Inventory On Hand report shows how much inventory you have on hand at a variety of locations. The report will only include information about the item you clicked. You can adjust it by changing the Item dropdown menu in the Optional section below. That lets you switch to any item, but only one can be used at a time.
This report initially has the following columns:
- Item - The identifying designation for the item.
- Description - An explanation of what the item is.
- Qty - The total number of units of the item that are in stock.
- Location - The place within your inventory where the item is located.
Optional
In addition, you can add a Tracking column, which contains the tracking information for each item. Click the checkbox next to Show Tracking on the right. You can also click the checkbox next to Select All Optional, and it will have the same effect. Then serial numbers will be added to the Part Number column, and a new Tracking column will appear with other tracking criteria, such as lot numbers and expiration dates.
Under Select All Optional, there are three options for you to filter results in the report:
- Location - A dropdown menu to only list items at one Parent Location or Child Location. By default, all locations will be included on the report. But you can narrow down the results to a single location by selecting one in this field. You can create a new location by entering a name for the location in the textbox and hitting Enter or clicking the + Add option. Then fill out the New Location wizard that pops up.
- Item - A dropdown menu to only list a single item. You can create a new item by entering a name for the item in the textbox and hitting Enter or clicking the + Add option. Then fill out the New Item wizard that pops up.
- Group By - A dropdown menu that enables you to reorganize the items in this report by one of two criteria:
- Item - This organizes all locations where an item is stored under that item’s name. This is the default option for this report.
- Location - This organizes all items under each location where they are stored.
- Tracking Value - A textbox where you can enter a lot number, serial number, or other tracking value to narrow down your search to a specific item or a group of items.
- Show Tracking - A checkbox to add a Tracking column header on the right of the Location column.
If you only choose a location, the report will include all items at that location. If you only choose an item, the report will include all locations where that item is found. But if you choose both a location and an item, the report will only include information about that item at that specific location.
Create a new preset
To apply your changes and see what they will look like in the report, click the GENERATE REPORT button on the bottom-right. This also applies to every other report we will talk about in this section.
To save a report for later use, click the CREATE NEW PRESET button on the top-right of the wizard. A popup will appear asking for just one thing: Preset Name. Add any name you like. For example, it can be the name of the item and/or location the report includes. Then click the SAVE button. You can either do this before you begin making changes to the report or you can do it at the end. If you want to make additional changes to the report, click the UPDATE button. The CREATE NEW PRESET button changes to UPDATE when you're in a preset report.
Additional presets
To create another preset report, first click the X in the dropdown menu that displays the name of the current preset. Then you can go through the same steps above to create a new one.
The first preset report you create will automatically be the default. There will be a Default checkbox option above the UPDATE button.
If this isn't the first time you've opened this wizard, and you've created at least one preset in the past, you will see the default preset report first thing. And you will be able to see all of the preset reports in the dropdown menu on the top-right.
To set a new default preset report, click the Default checkbox in it, and click the UPDATE button. If you uncheck the Default checkbox on the default preset report and click the UPDATE button, you'll receive an error message. That's because there usually has to be a default. However, if you delete the default preset report, there won't be a default report, and it will show all items and locations when you click the REPORT button. That is, until you pick a preset report as the default or create a new one.
To delete a preset report, first click the trashcan icon next to the UPDATE button. Then click the red DELETE button in the message that pops up.
Report options
The following buttons are at the top of the Inventory On Hand report (and every other report discussed below) to allow you to make adjustments and send it to other people. Tooltips appear when you mouse over these buttons for a couple seconds. They succinctly explain what each one does.
- Zoom Out - This makes the text in the report appear smaller. After 10 clicks, the text is basically invisible on a computer screen.
- Reset - This restores the report to its original size. So even if you forget how many times you clicked Zoom In or Zoom Out, you can quickly return to normalcy by clicking this button.
- Zoom In - This makes the text in the report appear larger. You can keep zooming in virtually forever, but you'll probably want to stop after 200 clicks because things start to get weird at that point.
- Page Down - If a report has multiple pages, this button enables you to move down through the pages from a higher number to a lower one.
- Page Up - If a report has multiple pages, this button enables you to move up through the pages from a lower number to a higher one.
- Download XLSX File - This enables you to download the report into an XLSX file, which you can open in Excel.
- Download PDF - This enables you to download a report into a PDF, which you can open with Adobe Acrobat.
- Print Report - This enables you to print a hard copy of a report.
- E-mail Report - This enables you to email a report to as many recipients as you like. It opens a popup where you can add email addresses in the To, Cc, and Bcc textboxes. Then you can add a subject and message. Click the SEND button to send the email with the report as a PDF attachment. The sender will be Fishbowl <fishbowl@fishbowlonline.com>, and it may go to recipients' junk mail folder, depending on their email settings.
- Expand - This expands the report to the full size of your browser window. When you click this button, it changes to a Contract button, which you can click to return the report to its previous smaller size.
Item Price List report
The Item Price List report displays information about each sale item and its price.
This report initially has the following column headers:
- Sale Item - The name of each sale item in the Items module.
- Description - An explanation of a sale item from the Items module.
- Price - The amount of money charged to customers for each unit of a sale item.
By default, you will see all sale items on the report. But you can narrow down the results to a single item by using the Optional features on the right of the report.
Optional
These are the Optional fields that you can use to modify the report:
- Group By - An option that enables you to group the information in this report by the following criterion:
- Tags - Click this checkbox to organize all sale items under the tag(s) they have attached to them. Sale items that don’t have any tags will be included under the No Tag header.
- Tag - A dropdown menu to select tags to include on the report. You can select as many tags as you like. Unfortunately, this field doesn’t appear to affect this report right now. But this will likely be fixed in the future. After you click an existing tag, you can create a new tag by entering its name in the textbox and hitting Enter or clicking the + Add option. No wizard will pop up. The new tag will simply appear on the list.
- Sale Item - A dropdown menu to select a sale item from the list of ones you created in the Items module under the Materials module group. You can’t create a new sale item from here, nor can you select more than one.
- Show SKU - A checkbox that adds a column in between Description and Price. This column displays each sale item’s stock-keeping unit number if available.
- Show UPC - A checkbox that adds a column in between SKU and Price. This column displays each sale item’s universal product code if available.
To select all of the status fields at once, click the Select All Optional checkbox. The Select All Optional checkbox won’t affect either of the dropdown menus you see under the Optional header. Those will have to be updated manually. To search for an option in a dropdown menu, click in that field and begin entering text. It will show all options that have that text in them.
To apply your changes and see what they look like in the report, click the GENERATE REPORT button on the bottom-right. And follow the directions above to save your changes to a Preset.
Total Item Sales report
Fishbowl Drive has its very own T.P.S Report. This report generates a list of gross sales for the date range specified, ordered from greatest to least. An empty date range will report on gross sales to date. T.P.S normally stands for Total Product Sales, and the lack of a third period is deliberate. Since there are no products in Fishbowl Drive, only items, the report’s name was changed to Total Item Sales. But we kept the abbreviation the same.
The Total Item Sales report includes the following column headers by default:
- Sale Item - The name of a sale item from the Items module.
- Description - An explanation of what the sale item is from the Items module.
- Sales - The gross dollar amount of sales for an item over a certain time period. If no Date Range is selected, this will include all sales.
Optional
These are the Optional fields that you can use to modify the report:
- Date Range - A textbox that brings up a calendar to select a start and end date for the report. In addition, you can select one of these options on the right of the calendar:
- Today
- Yesterday
- This Week
- Last Week
- Last 7 Days
- This Month
- Last Month
- Include Cover Sheet - A checkbox that adds a cover sheet to the report that makes it look incredibly professional and confidential.
- Show UOM - A checkbox that adds a UOM column header in between the Description and Sales columns. It displays the unit of measure for each item in the report.
- Show Quantity - A checkbox that adds a Quantity column header in between the Description and UOM columns. It displays the number of units of each item that have been sold.
To select all of the status fields at once, click the Select All Optional checkbox. The Select All Optional checkbox won’t affect the Date Range. That will have to be updated manually.
To apply your changes and see what they look like in the report, click the GENERATE REPORT button on the bottom-right. And follow the directions above to save your changes to a Preset.
Export, import, custom fields, and change dates

On the top-right of the Items module, just to the left of the ADD NEW button, you will see a More button. Click it to open a dropdown menu containing the following options:
- Export
- Import
- Custom Fields
- Change Dates
Three of these are dropdown menus themselves, while Custom Fields is not. You will find explanations of everything contained in these options below.
Export items
Clicking any of the four buttons under Export will generate a CSV file you can access from the Downloads section. To see your downloads, click your user profile icon on the top-right of the interface, and then click Downloads in the dropdown menu. The file name of each download will include the type of file it is and the date it was generated.
The Export files mirror the Import ones. Hence, you can download a CSV file from this section, add your own information in it, and reuse it to import that information into your Fishbowl Drive account.
- Export Items - This CSV file includes all of the required, optional, and custom fields for each item in the Items module. If an item has multiple sale items associated with it, each sale item will appear in a separate row of the spreadsheet.
- Export Item Locations - This CSV file contains all items with physical locations for storing, picking, and receiving them. It will only contain Inventory and Bundle item types. Shipping, Service, Non Inventory, Labor, and Overhead item types won't be in this report.
- Export Reorder Point - This CSV file contains each item's reorder point values that users have added. These include consumption rates, quantities, contact information, and preferred contact methods by item and location.
- Export Vendor Items - This CSV file includes vendor information for every item that it has been added to, even if the item type is something other than Inventory or Bundle. It includes both default vendors and alternative vendors, as well as minimum quantities, lead time (in days), UOMs, and costs.
Import items
- To import items from a spreadsheet or CSV file, click the More button at the top of the item list and choose Import Items.
- To create a template file with the correct column headers, click Export Items.
- The suggested order of CSV imports for new databases can be found here.
- For a step-by-step tutorial on working with CSV files, check out the CSV video here.
- Below is a list of the CSV columns. All column headers are required. Columns with an asterisk must contain data.
- Item-Name* - Name of an item (e.g., B201).
- Item-Description - Description of an item (e.g., Premium Brake Cables).
- Item-Notes - This allows you to leave additional details about specific items.
- Item-AlertNotes - Messages that appear when items are added to a sales order.
- Item-Cost* - The amount the company pays for each unit of an item (e.g., 17.50).
- Item-Upc - This allows you to associate the UPC (Universal Product Code) with an item during the import.
- Item-Sku - This allows you to associate the SKU (Stock Keeping Unit) with an item during the import.
- Item-Url - This allows you to associate the URL (Uniform Resource Locator) with an item during the import.
- Item-ItemType* - Inventory, Shipping, Service, Non Inventory, Labor, or Overhead.
- Item-DefaultUomName* - The UOM (Unit of Measure) assigned to an item (e.g., Each, Pair).
- Item-PurchaseTaxName – Tax rate associated with an item when you purchase it.
- Item-Length - The length of an item. You can enter in 0 if you do not need/use this information.
- Item-Width - The width of an item. You can enter in 0 if you do not need/use this information.
- Item-Height - The height of an item. You can enter in 0 if you do not need/use this information.
- Item-DimensionUnit - The UOM assigned to an item’s dimensions (e.g., Inches, Feet).
- Item-Weight - The weight of an item. You can enter in 0 if you do not need/use this information.
- Item-WeightUnit - The UOM assigned to an item’s weight (e.g., Ounces, Pounds, Kilograms).
- Item-Taxable* - If an item is taxable (e.g., True or False).
- Item-AssetAccountName - The Asset account name attached to an item for accounting purposes.
- Item-ScrapAccountName - The Scrap account name attached to an item for accounting purposes.
- Item-CostOfGoodsSoldAccountName - The Cost of Goods Sold account name attached to an item for accounting purposes.
- Item-AdjustmentAccountName - The Adjustment account name attached to an item for accounting purposes.
- Item-DefaultImageLink - A link to the default image of an item.
- Item-AccountingClassName - The Class name attached to an item for accounting purposes.
- Item-Tags - Tags assigned to an item, separated by commas.
- SaleItem-Name* - This can be the same name used for Item-Name or something different (e.g., B201).
- SaleItem-Description - This can be the same as what’s used for Item-Description or something different (e.g., Premium Brake Cables).
- SaleItem-Notes - You can include additional item details for your sale items.
- SaleItem-AlertNotes - A message that appears when a sale item is added to a sales order.
- SaleItem-Price* - The amount of money the company sells an item for (e.g., 35).
- Item-Upc - This allows you to associate the UPC with a sale item during the import.
- SaleItem-Sku - This allows you to associate the SKU with a sale item during the import.
- SaleItem-Url - This allows you to associate the URL with a sale item during the import.
- SaleItem-DefaultUomName* - The UOM assigned to a sale item (e.g., Each, Pair).
- SaleItem-SalesTaxName - Tax rate associated with a sale item when you sell it.
- SaleItem-Length - The length of a sale item. You can enter in 0 if you do not need/use this information.
- SaleItem-Width - The width of a sale item. You can enter in 0 if you do not need/use this information.
- SaleItem-Height - The height of a sale item. You can enter in 0 if you do not need/use this information.
- SaleItem-DimensionUnit - The UOM assigned to a sale item’s dimensions. (e.g., Inches, Feet).
- SaleItem-Weight - The weight of a sale item. You can enter in 0 if you do not need/use this information.
- SaleItem-WeightUnit - The UOM assigned to a sale item’s weight (e.g., Ounces, Pounds, Kilograms).
- SaleItem-DefaultSalesOrderItemType* - This determines if a sale item defaults to Sale or Credit Return.
- SaleItem-Taxable* - If a sale item is taxable (e.g., True or False).
- SaleItem-DefaultFlag* - If you have multiple sale items associated with a general item, you can specify if this is the default sale item (e.g., True or False).
- SaleItem-IncomeAccountName - The Income account name attached to a sale item for accounting purposes.
- SaleItem-DefaultImageLink - A link to the default image of a sale item.
- SaleItem-AccountingClassName - The Class name attached to a sale item for accounting purposes.
- SaleItem-Tags - Tags assigned to a sale item, separated by commas.
- Tracking-Lot Number - If an item has lot number tracking enabled (e.g., True or False).
- Tracking-Expiration Date - If an item has expiration date tracking enabled (e.g., True or False).
- TrackingSerial-Serial Number - If an item has serial number tracking enabled (e.g., True or False).
If you have custom tracking and/or custom fields, they will appear in columns after the ones on this list. You can also fill those fields if you like.
The options under this header allow you to import items and their associated data into Fishbowl Drive. When you click Import, you will see a question-mark icon at the top of the dropdown menu. You can click it to go to the Import items section of this same article. It will walk you through the steps to create a properly formatted CSV file. Or you can simply click Export and select one of the four options that appear to generate a template for you to populate with your own information.
If the import of at least one item fails, you will receive an error message. Then you can go to the Downloads page and download a CSV file containing the item(s) that failed to be imported. In the first column of the spreadsheet, it will tell you where the error occurred. That way, you can fix it and try to import it again.
All of your imported and exported files will be listed by date in the History column on the right of the Downloads page. You can download your exported files from the column on the left marked Downloads. Imports that are successful will be marked as Completed in the History column, and they won't be able to be downloaded. But imports that fail (in full or in part) will be marked as Failed, and they can be downloaded.
- Import Items - This allows you to import items via CSV file. You can use this function to fill every field in the General tab. The same is also true of the Sale Items tab. If you run into errors attempting to add information, you can attempt to fix them in the spreadsheet, or you can add what information you can and then go in manually and add any missing information once your items are in Fishbowl Drive.
- Import Item Locations - This enables you to import item locations via CSV file. You can add picking and receiving locations to all items, even ones that aren't marked as Inventory or Bundle item types. However, Shipping, Service, Non Inventory, Labor, and Overhead item types still won't show up if you try to export them, although that information will be associated with them under the Locations tab of each item.
- Import Reorder Point - This lets you import items' reorder points via CSV file. You can include minimum and maximum levels, daily consumption rates, alert levels, contact information, and how to send alert messages.
- Import Vendor Items - This gives you the ability to import vendor items via CSV file. You can add vendor names, costs, UOMs, lead times (in days), minimum quantities, and default statuses for all items in the system. And you're not limited to just one vendor per item. Add as many as you like as long as you designate which one is the default.
Custom fields
Clicking this option will bring up a wizard that allows you to add, edit, and delete custom fields on the General tab of your items. The list will be blank at first, of course.

To add a new custom field, click ADD FIELD on the top-right. Then enter a name and type for it. Your type options are:
- Number - A textbox that only allows numeric characters to be typed into it.
- Text - A textbox that allows alphanumeric characters to be entered.
- Date - A field for adding dates in the following format: MM/DD/YYYY. A calendar option lets users select dates if they prefer not to type them.
- Checkbox - A small box that can be checked or unchecked to indicate yes or no.
- Single Choice - A dropdown menu of text options. If selected, this will ask you to enter at least one row to appear in the dropdown menu. Users can only select one of the options available.
- Multiple Choice - A dropdown menu of text options. If selected, this will ask you to enter at least one row to appear in the dropdown menu. Users can select one or all of the options available.
- URL - A textbox that lets you add a website in relation to an item.
When creating or editing a custom field, click the Required checkbox to make it a required field. Otherwise, it will be optional. Then click ADD to save it, or click CANCEL or the X on the top-right to get rid of it. If you're editing an existing custom field, clicking CANCEL or the X won't delete it but will simply return it to its original state. You can also click the Required toggle switch next to a custom field in the main wizard to turn that function on or off.
To delete a custom field, click the More button to the right of it in the Custom Fields wizard. Then select Delete from the dropdown menu. You can also select Edit or Duplicate from that menu.
To change the order of custom fields, click ORDER FIELDS to the left of ADD FIELD. Then select one of the custom fields and click the up or down arrow on the right to move it. You can do this to each custom field until they're all in the order you want them to be in.
Only the first three custom fields will show up automatically in the General tab of an item. Any others can be viewed only after clicking the SHOW MORE button. Bear this in mind when creating and ordering them. Click the SAVE ORDER button to apply your changes to the wizard, and then click the SAVE button to apply those changes to the Items module.
Change dates
At the top of the Items module, you will see the following column headers:
- Name
- Barcode / UPC
- SKU
- Type
- Quantity
- Sale Item
- Date Created
- Price
- Cost
You can click any of them, except Quantity, to reorganize the rows under them. However, they are not all set in stone. For example, if you click Change Dates, you will find you have two options for the Date column:
- Date Created - A permanent marker that denotes when an item was first added to the system.
- Last Modified - A changeable marker that denotes the most recent time an item was edited by a user.
You can pick whichever one will best help you organize the items in the Items module.
Import item locations
- To import item locations from a spreadsheet or CSV file, click the More button at the top of the item list and choose Import Item Locations.
- To create a template file with the correct column headers, click Export Item Locations.
- The suggested order of CSV imports for new databases can be found here.
- For a step-by-step tutorial on working with CSV files, check out the CSV video here.
- Below is a list of the CSV columns. All column headers are required. Columns with an asterisk must contain data.
- ItemLocation-ItemName* - The name of the item that a location is being set for.
- Location-ParentName* - The Parent location of where an item is found.
- Location-PickFrom - The location where an item is picked.
- Location-Receive - The location where an item is received into a warehouse.
- Location-PickTo - The location where an item is placed after picking it.
Import vendor items
- To import vendor items from a spreadsheet or CSV file, click the More button at the top of the item list and choose Import Vendor Items.
- To create a template file with the correct column headers, click Export Vendor Items.
- The suggested order of CSV imports for new databases can be found here.
- For a step-by-step tutorial on working with CSV files, check out the CSV video here.
- Below is a list of the CSV columns. All column headers are required. Columns with an asterisk must contain data.
- VendorItem-ID - The identifying number of a vendor item.
- VendorItem-ItemName* - The name of an item in Fishbowl Drive.
- VendorItem-VendorItemName - The name of a vendor item, which can be different than what the item is called in Fishbowl Drive.
- VendorItem-VendorName* - The name of the vendor assigned to a vendor item.
- VendorItem-Cost* - The amount of money it costs to obtain a single unit of a vendor item.
- VendorItem-UomName* - The unit of measure assigned to a vendor item.
- VendorItem-LeadTime - The amount of time (in days) it takes to obtain more vendor items after issuing a purchase order.
- VendorItem-MinQuantity - The lowest quantity of an item's units the vendor requires to be put in a purchase order before they will accept it.
- VendorItem-Default* - True/False if it is the default vendor item.