Getting Started: Difference between revisions
m (→1. Install Fishbowl: I changed a period to a colon.) |
No edit summary |
||
| (39 intermediate revisions by 2 users not shown) | |||
| Line 1: | Line 1: | ||
Welcome to Fishbowl! This article will guide you through the process of installing, starting, and setting up Fishbowl. Click a number below to jump to a section, or scroll down to read through the article. | Welcome to Fishbowl! This article will guide you through the process of installing, starting, and setting up Fishbowl. Click a number below to jump to a section, or scroll down to read through the article. | ||
{{Getting Started}} | {{Getting Started}}__NOTOC__ | ||
__NOTOC__ | |||
Fishbowl Advanced has two main components. The '''Fishbowl Client''' is the visible program that users interact with. The '''Fishbowl Server''' runs behind the scenes, processing and storing all of the data. Both the server and the client can be run on a single computer, or the Fishbowl Client can be installed on workstations that communicate with the Fishbowl Server over a network. | |||
The Fishbowl | :[[File:Server and Client.png]] | ||
The [[System_Requirements#Hardware_recommendations|hardware recommendations]] for the Fishbowl Server are higher than the Fishbowl Client. You should install the Fishbowl Server on the most powerful computer that you can as that computer will most likely be running your [[#1. Install MySQL|MySQL database]] and [[#4._Integrate_an_accounting_system|Accounting system]] as well. | |||
==1. Install MySQL== | |||
This step is no longer required for new installations of the Fishbowl Server Application on Windows. '''[[Release_Notes#2024.6_-_06/18/24|Fishbowl 2024.6 and later versions will automatically install MySQL 8]].''' If you still wish to install your own installation of MySQL the manual installation instructions are listed below otherwise proceed to step 2: | |||
Fishbowl Advanced utilizes a popular database platform called MySQL that is free to install. '''MySQL only needs to be installed on the Fishbowl Server computer.''' | |||
:[[File:Server and | '''[[Release_Notes#2024.6_-_06/18/24|Fishbowl 2024.6 and newer will automatically install MySQL 8]].''' Manual instructions are listed below: | ||
# Download the MySQL 8 installer for Windows by clicking [https://dev.mysql.com/get/Downloads/MySQLInstaller/mysql-installer-web-community-8.0.37.0.msi here].<br>If you will be running the Fishbowl '''Server''' on macOS, click [[Fishbowl_for_Mac#Install_MySQL|here]]. | |||
# Select the '''Server only''' installation and then click '''Next'''.<br>[[File:MySQL server only.png]] | |||
# On the next step, select '''Execute''' to download the required components and then click '''Next'''. | |||
# Click the '''Execute''' button again to install MySQL and then click '''Next'''. | |||
# Click '''Next''' again, select '''Server Computer''' in the '''Config Type''' field, and then click '''Next'''.<br>[[File:MySQL config type.png]] | |||
# {{anchor|Password}}Select '''Use Strong Password Encryption for Authentication''' and then click '''Next'''. | |||
# Create a strong password. You will need to enter this password when creating your Fishbowl database, so make sure that it is securely stored and then click '''Next'''.<br>[[File:MySQL password.png]] | |||
# Leave the default settings on the '''Windows Service''' step, and then click '''Next'''. | |||
# Leave the default settings on the '''Server File Permissions''' step, and then click '''Next'''. | |||
# Click '''Execute''' to apply all of the listed configurations.<br>[[File:MySQL apply configuration.png]] | |||
# Click '''Finish''' and complete the installation wizard. | |||
Congratulations! You have installed MySQL 8 on your server computer. Next you will install the Fishbowl Server application on the same computer. If you were previously connected to a MySQL 5.7 database, the Fishbowl Server will be prompt you to migrate your database to MySQL 8.0 using the [[#Password|password you chose]]. If you use an ODBC connection for shipping integrations, it will need to be [[Shipping_Integration#ODBC_setup_for_MySQL_8.0|reconfigured after migrating to MySQL 8.0]]. | |||
==2. Install Fishbowl== | |||
After you've completed the [[#1._Install_MySQL|MySQL installation]], you're ready to install Fishbowl Advanced. You will need to install the Fishbowl Advanced Server on one computer, and the Fishbowl Advanced Client on any additional computers that you want to use to access your Fishbowl database. The same installer is used for the server and the client. After the initial install, all of the clients will automatically update whenever the server is updated to a new version. | |||
'''Follow the steps below to install Fishbowl.''' | '''Follow the steps below to install Fishbowl.''' | ||
| Line 23: | Line 41: | ||
#*'''CLIENT INSTALL''' - If you are installing the Fishbowl Client on a workstation, select '''Current Fishbowl User''' and then choose '''Client Only'''. | #*'''CLIENT INSTALL''' - If you are installing the Fishbowl Client on a workstation, select '''Current Fishbowl User''' and then choose '''Client Only'''. | ||
#*'''SERVER INSTALL''' - The Fishbowl Server only needs to be installed on one computer (the same computer as QuickBooks if you plan on integrating). To install the Fishbowl Server, select '''Current Fishbowl User''' and then choose '''Server with Client'''. Click '''Next''' to advance to the '''License Key''' step. Select a trial license key or enter the permanent license key you received when you purchased Fishbowl.<br>[[File:Enter License Key.png]] | #*'''SERVER INSTALL''' - The Fishbowl Server only needs to be installed on one computer (the same computer as QuickBooks if you plan on integrating). To install the Fishbowl Server, select '''Current Fishbowl User''' and then choose '''Server with Client'''. Click '''Next''' to advance to the '''License Key''' step. Select a trial license key or enter the permanent license key you received when you purchased Fishbowl.<br>[[File:Enter License Key.png]] | ||
#Click '''Next''' to proceed through the wizard. On the final step, select '''Run Fishbowl'''.<br>[[File:Run Fishbowl.png]] | # If you are installing the Fishbowl Server, the installer will try to find your MySQL 8.0 installation.<br>[[File:MySQL install location.png]] | ||
# If the install location is empty, [[#1._Install_MySQL|install MySQL on your server computer]]. If you close and then relaunch the Fishbowl installer, it will attempt to find the MySQL 8.0 installation, or you can click the '''Browse''' button to manually find the installation (typically in '''C:\Program Files\MySQL\MySQL Server 8.0'''). | |||
# Click '''Next''' to proceed through the wizard. On the final step, select '''Run Fishbowl'''.<br>[[File:Run Fishbowl.png]] | |||
# If you were previously connected to a MySQL 5.7 database, the Fishbowl Server will be prompt you to migrate your database to MySQL 8.0 using the [[#Password|password you chose]]. If you use an ODBC connection for shipping integrations, it will need to be [[Shipping_Integration#ODBC_setup_for_MySQL_8.0|reconfigured after migrating to MySQL 8.0]].<br>[[File:MySQL Migration.png]] | |||
'''The following links contain more information about installing Fishbowl:''' | '''The following links contain more information about installing Fishbowl:''' | ||
*[[Install Fishbowl#Install Fishbowl|Advanced installation instructions]] | * [[Install Fishbowl#Install Fishbowl|Advanced installation instructions]] | ||
* [[System Requirements]] | * [[System Requirements]] | ||
* [[System_Requirements#Supported | * [[System_Requirements#Supported operating systems|Supported operating systems]] | ||
*[[Fishbowl_for_Linux#Install_Fishbowl|Install Fishbowl on Linux]] | * [[Fishbowl_for_Linux#Install_Fishbowl|Install Fishbowl on Linux]] | ||
*[[Fishbowl_for_Mac#Install_Fishbowl|Install Fishbowl on a Mac]] | * [[Fishbowl_for_Mac#Install_Fishbowl|Install Fishbowl on a Mac]] | ||
*[[Fishbowl Canada|Install Fishbowl Canada]] | * [[Fishbowl Canada|Install Fishbowl Canada]] | ||
*[[Start Fishbowl#Change license key after Fishbowl is installed|Change license key after install | * [[Start Fishbowl#Change license key after Fishbowl is installed|Change license key after install]] | ||
* [[Install_Fishbowl#Fishbowl_fundamentals|Access Fishbowl over the internet]] | |||
*[[Install_Fishbowl#Fishbowl_fundamentals|Access Fishbowl over the internet]] | |||
* [[Install_Fishbowl#Move_an_existing_installation|Move an existing installation]] | * [[Install_Fishbowl#Move_an_existing_installation|Move an existing installation]] | ||
* [[Install_Fishbowl#Running_multiple_Fishbowl_Servers|Running multiple Fishbowl Servers]] | * [[Install_Fishbowl#Running_multiple_Fishbowl_Servers|Running multiple Fishbowl Servers]] | ||
*[[Install Fishbowl#Uninstall Fishbowl|Uninstall Fishbowl]] | * [[Install Fishbowl#Uninstall Fishbowl|Uninstall Fishbowl]] | ||
<br><br> | <br><br> | ||
==3. Start Fishbowl== | |||
== | |||
Once the Fishbowl install has been completed, it's time to start Fishbowl. Because a Fishbowl Client only works when there is a Fishbowl Server to connect to, it is important to make sure the server is running first. | Once the Fishbowl install has been completed, it's time to start Fishbowl. Because a Fishbowl Client only works when there is a Fishbowl Server to connect to, it is important to make sure the server is running first. | ||
| Line 55: | Line 74: | ||
#Once the Fishbowl Server is running, start the Fishbowl Client using the desktop icon or the Windows Program menu. The Fishbowl Client can be run on the same computer as the Fishbowl Server, or on any workstations that the Fishbowl Client was installed on. | #Once the Fishbowl Server is running, start the Fishbowl Client using the desktop icon or the Windows Program menu. The Fishbowl Client can be run on the same computer as the Fishbowl Server, or on any workstations that the Fishbowl Client was installed on. | ||
If you are a new customer, the Fishbowl Server will be running an example database. It is recommended that you | If you are a new customer, the Fishbowl Server will be running an example database. It is recommended that you log into this database to experiment and learn before [[Start_Fishbowl#Changing_your_Default_Database|creating your own database]]. If the server is running the example database, the client will automatically log in. Otherwise, follow the steps below. | ||
{{anchor|Login}}'''Follow the steps below to log into Fishbowl.''' | {{anchor|Login}}'''Follow the steps below to log into Fishbowl.''' | ||
| Line 64: | Line 83: | ||
#If you are connecting to the example database, enter '''admin''' as the username and '''admin''' for the password, and then click '''Login'''. | #If you are connecting to the example database, enter '''admin''' as the username and '''admin''' for the password, and then click '''Login'''. | ||
Once you are logged in, you may want to take a moment to become familiar with the [[Start_Fishbowl# | Once you are logged in, you may want to take a moment to become familiar with the [[Start_Fishbowl#Parts_of_the_screen|layout]] and organization of the Fishbowl Client. | ||
{{PartsOfTheScreen}} | {{PartsOfTheScreen}} | ||
| Line 73: | Line 92: | ||
* [[Start_Fishbowl#Launching_the_Fishbowl_Server_and_Client|Launching the Fishbowl Server and Client]] | * [[Start_Fishbowl#Launching_the_Fishbowl_Server_and_Client|Launching the Fishbowl Server and Client]] | ||
*[[Start_Fishbowl#Running_Fishbowl_for_the_First_Time|Running Fishbowl for the First Time]] | * [[Start_Fishbowl#Running_Fishbowl_for_the_First_Time|Running Fishbowl for the First Time]] | ||
* [[Start_Fishbowl# | * [[Start_Fishbowl#Parts_of_the_screen|Parts of the screen]] | ||
*[[Start_Fishbowl#Changing_your_Default_Database|Create your own database]] | * [[Start_Fishbowl#Changing_your_Default_Database|Create your own database]] | ||
*[[User#Change a user password|Change your password]] | * [[User#Change a user password|Change your password]] | ||
*[[Start_Fishbowl#Change_license_key_after_Fishbowl_is_installed|Change your license key]] | * [[Start_Fishbowl#Change_license_key_after_Fishbowl_is_installed|Change your license key]] | ||
* [[FAQs#How_do_I_update_my_license_key.3F|Update license key online]] | * [[FAQs#How_do_I_update_my_license_key.3F|Update license key online]] | ||
*[[Fishbowl_for_Linux#Start_Fishbowl|Start Fishbowl on Linux]] | * [[Fishbowl_for_Linux#Start_Fishbowl|Start Fishbowl on Linux]] | ||
*[[Fishbowl_for_Mac#Install_Fishbowl|Start Fishbowl on a Mac]] | * [[Fishbowl_for_Mac#Install_Fishbowl|Start Fishbowl on a Mac]] | ||
<br><br> | <br><br> | ||
== | ==4. Integrate an accounting system== | ||
In addition to functioning as a standalone application, Fishbowl has the ability to integrate with [[QuickBooks]], [[QuickBooks Online]], or [[Xero]]. Data can be imported into Fishbowl from the accounting system, and when actions are performed in Fishbowl, the corresponding entries can be exported to the accounting system. | In addition to functioning as a standalone application, Fishbowl has the ability to integrate with [[QuickBooks]], [[QuickBooks Online]], or [[Xero]]. Data can be imported into Fishbowl from the accounting system, and when actions are performed in Fishbowl, the corresponding entries can be exported to the accounting system. | ||
| Line 92: | Line 111: | ||
#Before integrating with QuickBooks, you may want to create a copy of your QuickBooks file while you experiment and learn about the QuickBooks integration. | #Before integrating with QuickBooks, you may want to create a copy of your QuickBooks file while you experiment and learn about the QuickBooks integration. | ||
#On the server computer, open your QuickBooks file and then open the Fishbowl Client. | #On the server computer, open your QuickBooks file and then open the Fishbowl Client. | ||
#In Fishbowl, open the '''Accounting''' module group, select the {{Module|Accounting Integration}}, click on the '''Configure''' tab, and then click the large '''QuickBooks Connection''' button.<br>[[File: | #In Fishbowl, open the '''Accounting''' module group, select the {{Module|Accounting Integration}}, click on the '''Configure''' tab, and then click the large '''QuickBooks Connection''' button.<br>[[File:Accounting_Config_subtab.png]] | ||
# Read the information on the first step of the wizard and click '''Next'''. | # Read the information on the first step of the wizard and click '''Next'''. | ||
#Follow the instructions on the second step of the wizard to create a user in QuickBooks called '''Fishbowl''' and click '''Next'''. | #Follow the instructions on the second step of the wizard to create a user in QuickBooks called '''Fishbowl''' and click '''Next'''. | ||
#Proceed to the '''QuickBooks File''' step, select '''Use file currently opened in QuickBooks''', and click '''Next'''.<br>[[File:QuickBooks Integ 1.png]] | #Proceed to the '''QuickBooks File''' step, select '''Use file currently opened in QuickBooks''', and click '''Next'''.<br>[[File:QuickBooks Integ 1.png]] | ||
# Integrating with QuickBooks requires .NET 4.0 or later, which is included on most computers or can be installed by running Windows Update. | # Integrating with QuickBooks requires .NET 4.0 or later, which is included on most computers or can be installed by running Windows Update. | ||
#Go to the QuickBooks application and choose '''Yes, always; allow access even if QuickBooks is not running''' and select the '''Fishbowl''' user that was previously created in QuickBooks. If QuickBooks is not open on the server computer at the time that Fishbowl exports data, this user will be used to automatically | #Go to the QuickBooks application and choose '''Yes, always; allow access even if QuickBooks is not running''' and select the '''Fishbowl''' user that was previously created in QuickBooks. If QuickBooks is not open on the server computer at the time that Fishbowl exports data, this user will be used to automatically log into QuickBooks. Click '''Continue'''.<br>[[File:QuickBooks Approval With User.png]] | ||
#Return to the Fishbowl application and select if you will be using Fishbowl created accounts or choosing from existing QuickBooks accounts and click '''Next'''.<br>[[File:Default Accounts.png]] | #Return to the Fishbowl application and select if you will be using Fishbowl created accounts or choosing from existing QuickBooks accounts and click '''Next'''.<br>[[File:Default Accounts.png]] | ||
#Choose which items you would like to import from QuickBooks into Fishbowl and click '''Next'''. After the import is complete, click '''Finish'''.<br>[[File:Accounting_integration_import_items.png]] | #Choose which items you would like to import from QuickBooks into Fishbowl and click '''Next'''. After the import is complete, click '''Finish'''.<br>[[File:Accounting_integration_import_items.png]] | ||
| Line 103: | Line 122: | ||
Now that you are integrated with QuickBooks, you can export data from Fishbowl into QuickBooks by clicking the {{Button|Export}} located in the module toolbar of the '''Accounting''' module. You may notice an additional icon in the system tray for Fishbowl Nexus. Fishbowl Nexus is a separate application that will run automatically when exporting to QuickBooks. | Now that you are integrated with QuickBooks, you can export data from Fishbowl into QuickBooks by clicking the {{Button|Export}} located in the module toolbar of the '''Accounting''' module. You may notice an additional icon in the system tray for Fishbowl Nexus. Fishbowl Nexus is a separate application that will run automatically when exporting to QuickBooks. | ||
'''The following links contain more information about integrating with an accounting system | '''The following links contain more information about integrating with an accounting system:''' | ||
*[[System_Requirements#Supported QuickBooks | * [[System_Requirements#Supported QuickBooks versions|Supported QuickBooks versions]] | ||
*[[QuickBooks#FAQs|QuickBooks FAQs]] | * [[QuickBooks#FAQs|QuickBooks FAQs]] | ||
*[[QuickBooks#Integration|Advanced QuickBooks integration instructions]] | * [[QuickBooks#Integration|Advanced QuickBooks integration instructions]] | ||
*[[QuickBooks#Export|Export data from Fishbowl to QuickBooks]] | * [[QuickBooks#Export|Export data from Fishbowl to QuickBooks]] | ||
*[[QuickBooks#Import|Import data from QuickBooks to Fishbowl]] | * [[QuickBooks#Import|Import data from QuickBooks to Fishbowl]] | ||
* [[Accounting Journal Entries]] | * [[Accounting Journal Entries]] | ||
*[[QuickBooks#QuickBooks_on_another_computer|Connect to QuickBooks on another computer]] | * [[QuickBooks#QuickBooks_on_another_computer|Connect to QuickBooks on another computer]] | ||
*[[Fishbowl_for_Linux#Integrate_with_QuickBooks|Linux - Integrate with QuickBooks]] | * [[Fishbowl_for_Linux#Integrate_with_QuickBooks|Linux - Integrate with QuickBooks]] | ||
*[[Fishbowl_for_Mac#Integrate_with_QuickBooks|Mac - Integrate with QuickBooks]] | * [[Fishbowl_for_Mac#Integrate_with_QuickBooks|Mac - Integrate with QuickBooks]] | ||
*[[QuickBooks Online|QuickBooks Online integration]] | * [[QuickBooks Online|QuickBooks Online integration]] | ||
* [[Xero|Xero integration]] | * [[Xero|Xero integration]] | ||
<br><br> | <br><br> | ||
== | ==5. Add data to Fishbowl == | ||
There are several ways to get your company data into Fishbowl. | There are several ways to get your company data into Fishbowl. | ||
| Line 136: | Line 155: | ||
#Click '''Finish''' to complete the import. | #Click '''Finish''' to complete the import. | ||
'''The following links contain more information about adding data to Fishbowl | '''The following links contain more information about adding data to Fishbowl:''' | ||
* [[Imports_and_Exports#Import_tips|Import tips]] | * [[Imports_and_Exports#Import_tips|Import tips]] | ||
*[[Imports_and_Exports#List_of_imports_and_exports|List of imports]] | * [[Imports_and_Exports#List_of_imports_and_exports|List of imports]] | ||
*[[Imports_and_Exports#Suggested_order_of_imports|Suggested order of imports]] | * [[Imports_and_Exports#Suggested_order_of_imports|Suggested order of imports]] | ||
<br><br> | <br><br> | ||
== | ==Learn how to use Fishbowl== | ||
Congratulations! Now that Fishbowl is installed and running, it's time to learn about the specific features of Fishbowl. Each module in Fishbowl has a corresponding article on the documentation site that describes specific functions. Below are a few of the ways you can find articles. | Congratulations! Now that Fishbowl is installed and running, it's time to learn about the specific features of Fishbowl. Each module in Fishbowl has a corresponding article on the documentation site that describes specific functions. Below are a few of the ways you can find articles. | ||
| Line 152: | Line 171: | ||
*Type search terms in the search box to search the entire documentation site.<br>[[File:Search Terms.png]] | *Type search terms in the search box to search the entire documentation site.<br>[[File:Search Terms.png]] | ||
'''The following links may also be helpful in learning more about Fishbowl | '''The following links may also be helpful in learning more about Fishbowl:''' | ||
* [[FAQs|Frequently Asked Questions]] | * [[FAQs|Frequently Asked Questions]] | ||
Latest revision as of 09:52, 17 March 2026
Welcome to Fishbowl! This article will guide you through the process of installing, starting, and setting up Fishbowl. Click a number below to jump to a section, or scroll down to read through the article.


Fishbowl Advanced has two main components. The Fishbowl Client is the visible program that users interact with. The Fishbowl Server runs behind the scenes, processing and storing all of the data. Both the server and the client can be run on a single computer, or the Fishbowl Client can be installed on workstations that communicate with the Fishbowl Server over a network.

The hardware recommendations for the Fishbowl Server are higher than the Fishbowl Client. You should install the Fishbowl Server on the most powerful computer that you can as that computer will most likely be running your MySQL database and Accounting system as well.
1. Install MySQL
This step is no longer required for new installations of the Fishbowl Server Application on Windows. Fishbowl 2024.6 and later versions will automatically install MySQL 8. If you still wish to install your own installation of MySQL the manual installation instructions are listed below otherwise proceed to step 2:
Fishbowl Advanced utilizes a popular database platform called MySQL that is free to install. MySQL only needs to be installed on the Fishbowl Server computer.
Fishbowl 2024.6 and newer will automatically install MySQL 8. Manual instructions are listed below:
- Download the MySQL 8 installer for Windows by clicking here.
If you will be running the Fishbowl Server on macOS, click here. - Select the Server only installation and then click Next.

- On the next step, select Execute to download the required components and then click Next.
- Click the Execute button again to install MySQL and then click Next.
- Click Next again, select Server Computer in the Config Type field, and then click Next.

- Select Use Strong Password Encryption for Authentication and then click Next.
- Create a strong password. You will need to enter this password when creating your Fishbowl database, so make sure that it is securely stored and then click Next.

- Leave the default settings on the Windows Service step, and then click Next.
- Leave the default settings on the Server File Permissions step, and then click Next.
- Click Execute to apply all of the listed configurations.

- Click Finish and complete the installation wizard.


Congratulations! You have installed MySQL 8 on your server computer. Next you will install the Fishbowl Server application on the same computer. If you were previously connected to a MySQL 5.7 database, the Fishbowl Server will be prompt you to migrate your database to MySQL 8.0 using the password you chose. If you use an ODBC connection for shipping integrations, it will need to be reconfigured after migrating to MySQL 8.0.
2. Install Fishbowl
After you've completed the MySQL installation, you're ready to install Fishbowl Advanced. You will need to install the Fishbowl Advanced Server on one computer, and the Fishbowl Advanced Client on any additional computers that you want to use to access your Fishbowl database. The same installer is used for the server and the client. After the initial install, all of the clients will automatically update whenever the server is updated to a new version.
Follow the steps below to install Fishbowl.
- Download the latest version of the Fishbowl installer. Physical copies of the installer can be shipped by request. Once the download is complete, open the Fishbowl installer.

- Select the Country, Business Type, and Industry. This will allow the creation of the most applicable demo database.

- Click Next to advance to the Installation Mode step and select one of the installation options.
- TRIAL INSTALL - If you would like to try Fishbowl for 14 days, select the Trial option and click Next to automatically install the server and client on the same computer, using the default settings. A Fishbowl Trial icon will be placed on the desktop that will launch both the server and the client.

- CLIENT INSTALL - If you are installing the Fishbowl Client on a workstation, select Current Fishbowl User and then choose Client Only.
- SERVER INSTALL - The Fishbowl Server only needs to be installed on one computer (the same computer as QuickBooks if you plan on integrating). To install the Fishbowl Server, select Current Fishbowl User and then choose Server with Client. Click Next to advance to the License Key step. Select a trial license key or enter the permanent license key you received when you purchased Fishbowl.

- TRIAL INSTALL - If you would like to try Fishbowl for 14 days, select the Trial option and click Next to automatically install the server and client on the same computer, using the default settings. A Fishbowl Trial icon will be placed on the desktop that will launch both the server and the client.
- If you are installing the Fishbowl Server, the installer will try to find your MySQL 8.0 installation.

- If the install location is empty, install MySQL on your server computer. If you close and then relaunch the Fishbowl installer, it will attempt to find the MySQL 8.0 installation, or you can click the Browse button to manually find the installation (typically in C:\Program Files\MySQL\MySQL Server 8.0).
- Click Next to proceed through the wizard. On the final step, select Run Fishbowl.

- If you were previously connected to a MySQL 5.7 database, the Fishbowl Server will be prompt you to migrate your database to MySQL 8.0 using the password you chose. If you use an ODBC connection for shipping integrations, it will need to be reconfigured after migrating to MySQL 8.0.


The following links contain more information about installing Fishbowl:
- Advanced installation instructions
- System Requirements
- Supported operating systems
- Install Fishbowl on Linux
- Install Fishbowl on a Mac
- Install Fishbowl Canada
- Change license key after install
- Access Fishbowl over the internet
- Move an existing installation
- Running multiple Fishbowl Servers
- Uninstall Fishbowl
3. Start Fishbowl
Once the Fishbowl install has been completed, it's time to start Fishbowl. Because a Fishbowl Client only works when there is a Fishbowl Server to connect to, it is important to make sure the server is running first.
If you chose the TRIAL INSTALL during installation above, the Fishbowl Trial icon on the desktop will automatically start the server and the client. Otherwise, follow the steps below.
Follow the steps below to start Fishbowl.
- If a desktop icon was created during the install, this can be used to start the Fishbowl Server. Otherwise, click the Windows Start Menu | All apps | Fishbowl | Fishbowl Server.

- The blue Fishbowl logo should appear in the taskbar by the clock. It may be necessary to click the arrow to see all icons. A red or yellow circle on top of the Fishbowl logo indicates that the server is in the process of starting up.

- Once the Fishbowl Server is running, start the Fishbowl Client using the desktop icon or the Windows Program menu. The Fishbowl Client can be run on the same computer as the Fishbowl Server, or on any workstations that the Fishbowl Client was installed on.


If you are a new customer, the Fishbowl Server will be running an example database. It is recommended that you log into this database to experiment and learn before creating your own database. If the server is running the example database, the client will automatically log in. Otherwise, follow the steps below.
Follow the steps below to log into Fishbowl.
- When the Fishbowl Client starts, you will be presented with a login window.

- Click the Details button, and then click the
 Search button next to the Server Address field to search for your Fishbowl Server.
 - Select your Fishbowl Server in the Server Address field. If the server is not found, enter the IP address or the name of the computer server.
- If you are connecting to the example database, enter admin as the username and admin for the password, and then click Login.


Once you are logged in, you may want to take a moment to become familiar with the layout and organization of the Fishbowl Client.

- Menu bar - Drop down menus, including one for each module group
- Action bar - Notifications, Messages, Bookmarks, Home, and Status
- Module toolbar - Action buttons for the currently active module
- Tabs - All of the currently open modules with the active tab displayed in blue
- Search pane - Search and open items in the module
- Module tabs - Subtabs for the active module with the active tab displayed in blue
- Modules - A list of clickable modules in the current module group
- Component toolbar - Contains additional actions for the item
- Module groups - Click to expand a section and see the modules in that group
Fishbowl is organized into modules. To open a module, select a Module Group on the left, and then click a Module. For example, to open the Sales Order module, click the Sales group on the left, and then choose Sales Order. Each module can also be opened from the module group menu at the top.
The following links contain more information about running Fishbowl:
- Launching the Fishbowl Server and Client
- Running Fishbowl for the First Time
- Parts of the screen
- Create your own database
- Change your password
- Change your license key
- Update license key online
- Start Fishbowl on Linux
- Start Fishbowl on a Mac
4. Integrate an accounting system
In addition to functioning as a standalone application, Fishbowl has the ability to integrate with QuickBooks, QuickBooks Online, or Xero. Data can be imported into Fishbowl from the accounting system, and when actions are performed in Fishbowl, the corresponding entries can be exported to the accounting system.
The following steps outline the basic process for integrating with QuickBooks.
- Before integrating with QuickBooks, you may want to create a copy of your QuickBooks file while you experiment and learn about the QuickBooks integration.
- On the server computer, open your QuickBooks file and then open the Fishbowl Client.
- In Fishbowl, open the Accounting module group, select the
 Accounting Integration module, click on the Configure tab, and then click the large QuickBooks Connection button.
- Read the information on the first step of the wizard and click Next.
- Follow the instructions on the second step of the wizard to create a user in QuickBooks called Fishbowl and click Next.
- Proceed to the QuickBooks File step, select Use file currently opened in QuickBooks, and click Next.

- Integrating with QuickBooks requires .NET 4.0 or later, which is included on most computers or can be installed by running Windows Update.
- Go to the QuickBooks application and choose Yes, always; allow access even if QuickBooks is not running and select the Fishbowl user that was previously created in QuickBooks. If QuickBooks is not open on the server computer at the time that Fishbowl exports data, this user will be used to automatically log into QuickBooks. Click Continue.

- Return to the Fishbowl application and select if you will be using Fishbowl created accounts or choosing from existing QuickBooks accounts and click Next.

- Choose which items you would like to import from QuickBooks into Fishbowl and click Next. After the import is complete, click Finish.


Now that you are integrated with QuickBooks, you can export data from Fishbowl into QuickBooks by clicking the  Export button located in the module toolbar of the Accounting module. You may notice an additional icon in the system tray for Fishbowl Nexus. Fishbowl Nexus is a separate application that will run automatically when exporting to QuickBooks.
The following links contain more information about integrating with an accounting system:
- Supported QuickBooks versions
- QuickBooks FAQs
- Advanced QuickBooks integration instructions
- Export data from Fishbowl to QuickBooks
- Import data from QuickBooks to Fishbowl
- Accounting Journal Entries
- Connect to QuickBooks on another computer
- Linux - Integrate with QuickBooks
- Mac - Integrate with QuickBooks
- QuickBooks Online integration
- Xero integration
5. Add data to Fishbowl
There are several ways to get your company data into Fishbowl.
- You can import data from QuickBooks.
- Data can be entered individually into Fishbowl. For example, open a module (Part, Customer, Vendor, etc.) and click the New button to add the appropriate data to Fishbowl.
- Fishbowl can import data from CSV, TXT, XLS, and XLSX files. These files can be viewed and edited in spreadsheet applications like Microsoft Excel, or in any text editor.
The following steps outline the basic process of exporting a template and then importing the CSV.
- Click the File menu at the top-left of the Fishbowl Client and choose Import.

- Select an import and click Next to read the instructions.
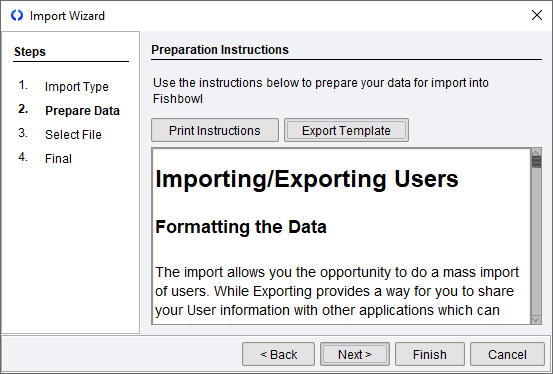
- Click the Export Template button and save the template file.
- Open the exported file in your spreadsheet application or text editor. Following the format of the file, enter your data into the fields and save the file.
- Click Next and choose the file you previously exported.

- Click Finish to complete the import.


The following links contain more information about adding data to Fishbowl:
Learn how to use Fishbowl
Congratulations! Now that Fishbowl is installed and running, it's time to learn about the specific features of Fishbowl. Each module in Fishbowl has a corresponding article on the documentation site that describes specific functions. Below are a few of the ways you can find articles.
- Click the
 How To button, located at the top of each module in the Fishbowl Client, to jump directly to the article about that module.
 - Type the first few letters of a module name in the search bar, located at the top right of every page on the documentation site, and select the desired article.

- Type search terms in the search box to search the entire documentation site.


The following links may also be helpful in learning more about Fishbowl:
The image below gives an overview of the major modules in Fishbowl.
